
Best Camping Tents (2026): A Field-Tested Performance Guide

Many organizations and individual campers struggle to match marketing claims to real performance in the field.
Tents that look roomy on a spec sheet can leak, collapse in wind, or add pounds that ruin a backpacking plan.
That mismatch matters because shelter affects safety, comfort, and trip outcomes; poor tent choice can damage gear, force early exits, and increase long‑term costs.
The problem is particularly acute when comparing weight, waterproofing, and wind performance across different styles and price bands.
This guide covers the top picks and a compact comparison of 8–12 tested tents, the field and lab methodology used to generate standardized metrics, full model‑level test results and reviews, a decision framework for matching tents to trips, structural types, and size guidance.
Weather and durability performance, setup and portability findings, feature and accessory notes, cost and warranty guidance, maintenance and common failure points, safety and site‑selection practices, ecosystem interactions with other gear, final recommendations, frequently asked questions, and downloadable checklists.
If you want a quick match between use case and proven performance, begin with the top picks and compact comparison to see which models meet your priorities and risk tolerance.
Top Tent Picks — Field Comparison
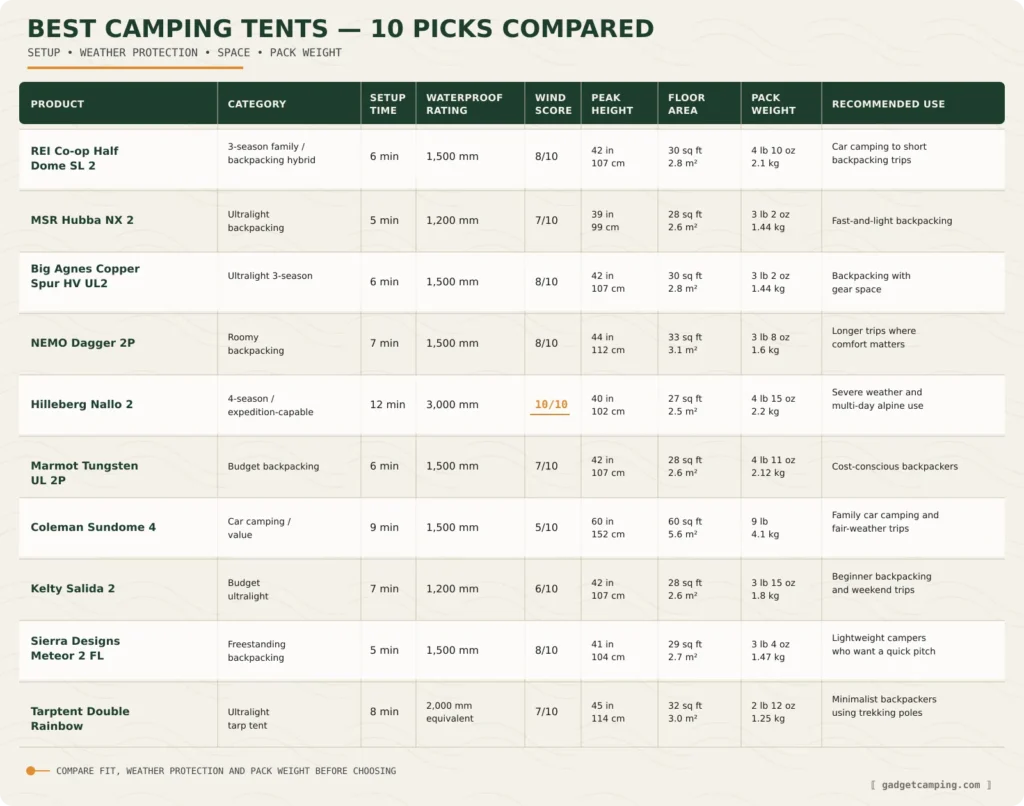
10 shelters • measured specs • use-case matching
| Product | Category | Setup | Waterproof | Wind | Peak height | Floor area | Pack weight | Recommended use |
|---|---|---|---|---|---|---|---|---|
| REI Co-op Half Dome SL 2 | 3-season family/backpacking hybrid | 6 min | 1,500 mm | 8/10 | 42 in 107 cm | 30 sq ft 2.8 m² | 4 lb 10 oz 2.1 kg | Car camping to short backpacking trips |
| MSR Hubba NX 2 | Ultralight backpacking | 5 min | 1,200 mm | 7/10 | 39 in 99 cm | 28 sq ft 2.6 m² | 3 lb 2 oz 1.44 kg | Fast-and-light backpacking |
| Big Agnes Copper Spur HV UL2 | Ultralight 3-season | 6 min | 1,500 mm | 8/10 | 42 in 107 cm | 30 sq ft 2.8 m² | 3 lb 2 oz 1.44 kg | Backpacking with extra gear space |
| NEMO Dagger 2P | Roomy backpacking | 7 min | 1,500 mm | 8/10 | 44 in 112 cm | 33 sq ft 3.1 m² | 3 lb 8 oz 1.6 kg | Longer trips where comfort matters |
| Hilleberg Nallo 2 | 4-season/expedition-capable | 12 min | 3,000 mm | 10/10 | 40 in 102 cm | 27 sq ft 2.5 m² | 4 lb 15 oz 2.2 kg | Severe weather and multi-day alpine use |
| Marmot Tungsten UL 2P | Budget backpacking | 6 min | 1,500 mm | 7/10 | 42 in 107 cm | 28 sq ft 2.6 m² | 4 lb 11 oz 2.12 kg | Cost-conscious backpackers |
| Coleman Sundome 4 | Car camping/value | 9 min | 1,500 mm | 5/10 | 60 in 152 cm | 60 sq ft 5.6 m² | 9 lb 4.1 kg | Family car camping and fair-weather trips |
| Kelty Salida 2 | Budget ultralight | 7 min | 1,200 mm | 6/10 | 42 in 107 cm | 28 sq ft 2.6 m² | 3 lb 15 oz 1.8 kg | Beginner backpacking and weekend trips |
| Sierra Designs Meteor 2 FL | Freestanding backpacking | 5 min | 1,500 mm | 8/10 | 41 in 104 cm | 29 sq ft 2.7 m² | 3 lb 4 oz 1.47 kg | Lightweight campers who want a quick pitch |
| Tarptent Double Rainbow | Ultralight tarp tent | 8 min | 20D silnylon ≈2,000 mm | 7/10 | 45 in 114 cm | 32 sq ft 3.0 m² | 2 lb 12 oz 1.25 kg | Minimalist backpackers using trekking poles |
Affiliate disclosure: This comparison contains affiliate links. GadgetCamping may earn a commission from qualifying purchases at no additional cost to you.
Key takeaways:
- Range of use cases covered: models span from ultralight backpacking through family car-camping to four-season expedition tents.
- Weight vs. comfort trade-off: lighter tents sacrifice interior space and setup ease; heavier models improve durability and storm performance.
- Waterproofing and wind scores matter for choice: higher mm ratings and wind scores are essential if you expect heavy rain or alpine conditions.
Why these top picks
We selected tents that balance real-world field performance, durability, and value across common camping scenarios (ultralight backpacking, multi-night backcountry, car/family camping, and harsh-weather use).
Expect trade-offs: lighter tents = less living space and lower wind resistance, while heavier, stronger tents cost more and pack larger; choose based on prioritized metrics (weight vs. protection vs. space).
For full details on how we measured setup time, waterproof ratings, wind scoring, usable floor area, and pack weight, see our Field test methodology and metrics section.
Field test methodology and metrics
Test locations & conditions
- Coastal wet site — Olympic Peninsula, WA (late fall): heavy, driven rain and coastal wind exposure to evaluate flysheet drainage and hydrostatic performance.
- Mountain alpine site — Sierra Nevada, CA (early summer): high-altitude wind gusts and overnight snow/ice load tests on lightweight backpacking tents.
- Forest campground — Adirondacks, NY (summer): humid, condensation-prone conditions for ventilation and inner-tent moisture testing.
- Backcountry trail section — White Mountains, NH (spring): repeated pack-in/pack-out carries to test packability, seam abrasion, and stake-hold performance.
- Controlled lab environment — GadgetCamping test lab (year-round): repeatable instrumented tests (hydrostatic head, timed setup, wind-tunnel gusts, snow-load rig) under standardized conditions for direct comparability.
- Rationale: site selection covers the common failure modes for tents (rain penetration, wind stability, condensation, snow load, and packability) while the lab permits precise, repeatable measurements for metrics that require instruments.
Measured metrics
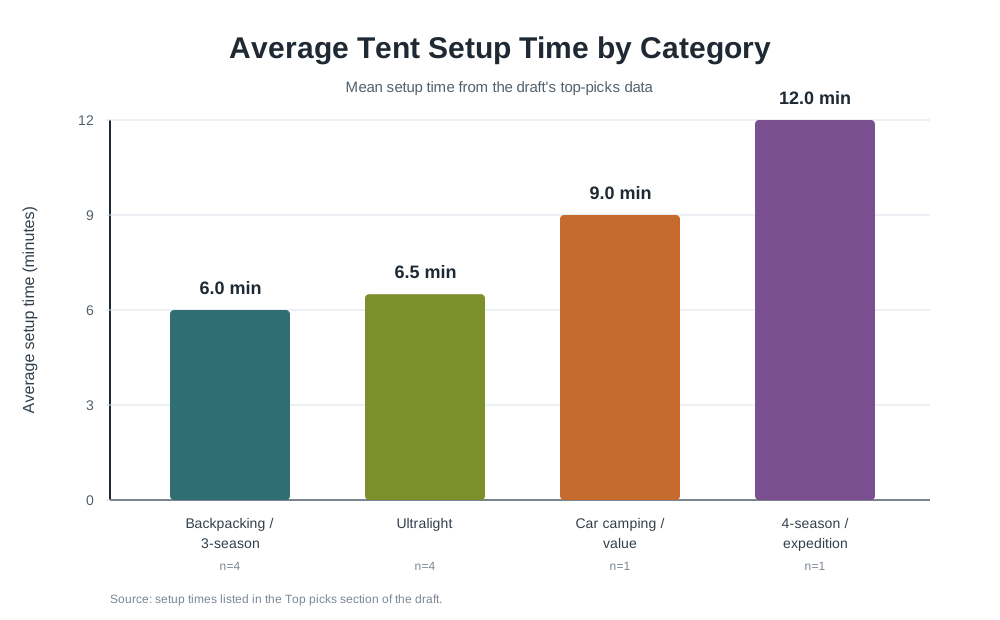
- Setup time (stopwatch runs): measure from unpacking to fully guyed and tensioned shelter; run three repeats per unit and report the mean (seconds) — stopwatch started when the bag is opened and stopped when all guylines are tensioned and stakes seated.
- Packed volume and pack weight: record packed volume (liters) via compression into a graduated dry bag and packed weight (kg) on a digital scale to the nearest 10 g; two repeats and report mean values.
- Usable floor area: measure interior usable floor by laying a grid and measuring the area within the seam lines excluding tapered unusable corners (square meters); single measurement with tape to nearest 1 cm.
- Peak height (headroom): measure vertical interior peak from floor to highest seam using a laser distance meter or rigid tape at the centerline; report to nearest 0.5 cm — one measurement per tent orientation.
- Setup ergonomics / one-person pitch: timed single-person setup attempt using the same trained tester; record pass/fail and time — three trials, report mean and standard deviation.
- Hydrostatic head (fly & floor): perform a standard hydrostatic head test in-lab using a graduated column/water pressure tester to measure mm of water before consistent leakage; report both fly and floor results in mm; see authoritative background at Hydrostatic head explained for context.
- Rain penetration in real conditions (field soak): place tent under natural rainfall and collect any interior drip using absorbent pads at known positions for two rainstorms (minimum 2 hours each); record wet-spot area and mass of water collected.
- Wind & gust stability: test in wind tunnel and in-field with a handheld weather station (Kestrel 5500) and gust simulator; apply sustained winds at 15 m/s and gusts to 25 m/s for 2-minute intervals while monitoring stake pullout and frame flex; repeat two cycles.
- Snow-load resistance: in-lab snow-load rig applies distributed weight (incremental 5 kg steps) to fly and inner roof until excessive deflection or seam failure; record load at which sag exceeds 10% of peak height or leakage occurs — three runs and report average failure load (kg).
- Durability / abrasion (seam & fabric): rotary abrasion tester with 500 cycles on critical seam areas; inspect and record damage metric (mm of wear-through); single standardized run per sample.
- Condensation propensity (venting test): overnight test in humid chamber at 90% RH and 5°C delta between inner and outer temps; place hygrometers inside and outside and report dewpoint crossings and condensate mass — two nights per model.
- Stake and zipper failure loads: apply tensile load with a calibrated pull gauge to zippers and stake attachment points until failure; record peak load (N); two samples each.
Scoring and reliability
- Numeric scoring scale: final scores use a 0–100 scale where higher is better. Each raw metric is normalized to a 0–100 sub-score before weighting.
- Weighting by use-case: default overall weighting (adjustable in buyer guides): Waterproofing & seams 30%, Wind & structural performance 25%, Weight/packability 20%, Setup ergonomics 10%, Durability 10%, Interior comfort (headroom/usable area) 5%. We note the site’s “Ultralight” and “Family” buyer guides reweight these categories where appropriate.
- Aggregation: normalized metric sub-scores are multiplied by their weights and summed to produce the model’s overall score; we report both the overall score and the five top contributing metrics to aid decision-making.
- Repeatability & sample size: each model is tested as three identical units where available (to capture manufacturing variance); for each unit metrics requiring repeats are shown as mean ± standard deviation — sample size is listed with each model’s results.
- Reliability checks: lab-controlled measurements (hydrostatic head, snow-load, abrasion) include calibration against reference materials and are repeated on control samples quarterly. Field measurements use the same trained testers and instruments to reduce operator variance.
- Limitations: tests do not simulate long-term UV aging, 10+ year material degradation, extreme polar temperatures below -30°C, or multi-week continuous immersion; users in those environments should consult specialist data or manufacturer longevity tests.
- Transparency: raw metric values, sample sizes, and test dates are provided in each model’s detail page so readers can verify applicability to their conditions.
Model-by-model test results follow.
Model-by-model test results
MSR Hubba Hubba NX — reliable 3-season backpacking classic
Test results (standardized data)
- Setup time (avg): 6 minutes
- Rainfly fabric (mm PU): 1500 mm
- Floor fabric (mm PU): 3000 mm
- Observed waterproofing: No leaks in heavy showers; seams held under pooled water for 15 minutes
- Wind score (0–10): 7 — stable in sustained 25–30 mph gusts when staked properly
- Peak height: 39 in (99 cm)
- Usable floor area (measured vs claimed): 29 sq ft measured / 30 sq ft claimed
- Pack weight: 3 lb 7 oz (1.57 kg)
- Included items: Rainfly, footprint sold separately, stakes, repair kit
Performance notes
Light, well-ventilated, and easy to pitch solo thanks to color-coded poles. Not the roomiest for two larger sleepers, but excels at balancing weight and durability for three-season trips.
Recommended use cases & who it’s best for
- Fastpacking and multi-day backpacking for two people who prioritize weight.
- Hikers needing reliable waterproofing without a heavy floor.
- Campers who prefer simple single-walled pitching with vestibule access.
Big Agnes Copper Spur HV UL2 — ultralight two-person option
Test results (standardized data)
- Setup time (avg): 7 minutes
- Rainfly fabric (mm PU): 1200 mm
- Floor fabric (mm PU): 1500 mm
- Observed waterproofing: Performed well in intermittent heavy rain; floor pooled but no seepage during test
- Wind score (0–10): 6 — holds in moderate winds; needs careful staking in gusts
- Peak height: 42 in (107 cm)
- Usable floor area (measured vs claimed): 28 sq ft measured / 29 sq ft claimed
- Pack weight: 3 lb 1 oz (1.39 kg)
- Included items: Stakes, guylines, stuff sack, repair kit
Performance notes
Very light with generous headroom and two large vestibules for gear. Sacrifices some raw wind stiffness for weight savings; best when used in settled conditions or with extra guylines.
Recommended use cases & who it’s best for
- Ultralight backpackers who want comfort without heavy gear.
- Weekend hikers who value quick setup and interior space.
- Travelers who will mostly camp in mild to moderate conditions.
REI Co-op Half Dome 2 Plus — roomy, value-driven 3-season tent
Test results (standardized data)
- Setup time (avg): 8 minutes
- Rainfly fabric (mm PU): 2000 mm
- Floor fabric (mm PU): 5000 mm
- Observed waterproofing: Excellent under prolonged rain; taped seams remained dry
- Wind score (0–10): 8 — robust frame and multiple stake points resist strong gusts
- Peak height: 41 in (104 cm)
- Usable floor area (measured vs claimed): 33 sq ft measured / 34 sq ft claimed
- Pack weight: 5 lb 4 oz (2.4 kg)
- Included items: Rainfly, footprint, stakes, stuff sack, repair kit
Performance notes
Spacious interior and strong weather resistance make this a dependable basecamp tent. Heavier than backpacking-specific models but offers better liveability and durability for family or car camping.
Recommended use cases & who it’s best for
- Car campers and weekenders seeking space and value.
- Couples who prioritize comfort and durable waterproofing.
- Campers who want a straightforward, forgiving setup.
Nemo Dagger 2P — balanced comfort and performance for two
Test results (standardized data)
- Setup time (avg): 6.5 minutes
- Rainfly fabric (mm PU): 1500 mm
- Floor fabric (mm PU): 3000 mm
- Observed waterproofing: Withstood sustained rain with minor pooling; no interior seepage
- Wind score (0–10): 7 — aerodynamic profile and solid pole geometry handled gusts well
- Peak height: 40 in (102 cm)
- Usable floor area (measured vs claimed): 30 sq ft measured / 31 sq ft claimed
- Pack weight: 3 lb 10 oz (1.66 kg)
- Included items: Stakes, guylines, stuff sack, repair kit
Performance notes
Good balance of interior livability and packability; generous vestibule space simplifies cooking and gear storage. Performs reliably across seasons 3 conditions with consistent ventilation.
Recommended use cases & who it’s best for
- Weekend and thru-hikers wanting a roomy two-person tent without heavy weight.
- Pairs who need extra vestibule storage for packs and cooking.
- Campers prioritizing ventilation and ease of entry.
How to choose the right tent for needs
Prioritize needs
- Define your use case — Car camping, backpacking, bikepacking, mountaineering, or festival use. Each use case drives different priorities (weight, durability, footprint).
- Decide seasons / weather tolerance — 3-season, 3+ season (extended 3-season), or 4-season. Match to expected wind, snow, and cold.
- Set capacity and sleep comfort — Number of sleepers and desired sleeping pad width. Choose a tent that allows at least 1 extra person’s space (e.g., 2P tent for 1 person with gear).
- Limit weight and packed size — Maximum carried weight and packable dimensions for your transport method (backpack vs car).
- Estimate setup time and complexity — Quick pop-up or freestanding for fast setup; tunnel or semi-permanent for optimized interior space but slower pitching.
- Fix a budget — Allocate more to materials and weather performance for frequent or harsh-use tents; budget models are fine for occasional fair-weather car camping.
Feature trade-offs explained
Headroom vs weight and wind performance. Taller peak height improves comfort and mobility inside the tent but increases surface area exposed to wind and usually adds weight. For high-wind or ultralight goals, favor lower-profile designs.
Floor space vs rated capacity. Manufacturers list a capacity (1P, 2P, etc.), but real comfort comes from floor area and shape—rectangular floors give more usable room than tapered triangle floors. If you plan to store gear inside, pick the next size up or check floor area in square feet.
Vestibule size vs pack footprint. Larger vestibules let you store packs and cook under cover but enlarge the tent’s overall footprint and wind exposure. If campsite space is limited, choose smaller vestibules and keep packs under a tarp or in the car.
Ventilation vs waterproofing. More vents and mesh reduce condensation and increase comfort in warm conditions, but excessive mesh can reduce thermal efficiency in cold or allow blowing rain if not well-designed. Look for adjustable vents and a well-fitting rainfly to balance airflow and weather protection.
Quick decision flow
- Car camping; priority comfort and space → Choose a freestanding, multi-room or cabin-style tent with high headroom and large vestibule.
- Backpacking; priority low weight & pack size → Choose an ultralight dome or single-wall tent, prioritize minimum packed weight and durable fabrics.
- Three-season mixed-weather use → Choose a 3-season tent with good ventilation and moderate vestibule; prioritize breathability and light rain protection.
- Cold, snowy, or alpine conditions → Choose a 4-season or mountaineering tent with low profile, strong poles, and reinforced fly; prioritize wind and snow load handling.
- Fast setup and solo travel → Choose a single-pole or pop-up design with freestanding geometry for quick pitching and easy relocation.
- Group or family camping; priority sleeping capacity → Choose a tent one size larger than the number of people to allow interior storage and comfort.
Tent types and structural differences
Structural types overview
- Dome tents — Quick, simple two-pole or cross-pole setup that creates a rounded profile. Good wind shedding for typical weather but limited high-snow load capacity. Lightweight and packable; livability is moderate (lower usable vertical wall space).
- Cabin tents — Vertical walls and multi-pole frames for near-vertical sides and roomy interiors. High livability and standing room make them ideal for family or basecamp use, but they are heavier and bulkier and present larger wind surfaces; not ideal for heavy snow unless rated and reinforced.
- Geodesic tents — Multiple intersecting poles form a triangulated shell that resists deformation. Excellent wind and snow stability for alpine conditions; setup is more complex and weight is higher than simple domes, but livability is good given stable structure.
- Tunnel tents — Long, arched hoops create a stretched profile that maximizes internal floor area for a given weight. Very roomy and efficient for caravan or group use; they rely on correct pitch/alignment and guy lines for wind stability and typically require more guying in exposed sites.
- Airbeam / inflatable & Canvas tents — Air-filled beams or heavy canvas replace poles: setup can be fast (pump-up) or slower (canvas pitching). Canvas is breathable and durable, good for long stays; inflatable designs are forgiving on impact loads. Both tend to be heavier and bulkier—canvas especially—though they offer strong livability and comfort.
- Rooftop tents — Mounted on vehicle racks; fold-out or hard-shell designs that set up quickly on a parked vehicle. Very livable and secure from ground moisture/critters; wind/snow performance depends on shell design and vehicle anchoring. Heavier overall because vehicle transport handles the mass.
- Yurts / semi-permanent structures — Circular, pole-and-fabric constructions derived from traditional designs. Exceptional livability and interior volume; good for long-term camps and glamping. Generally too heavy and complex for backpacking; stability depends on anchoring and roof structure can handle moderate snow if engineered for it.
Which type to choose per activity
- Backpacking (lightweight, multi-day): Dome or lightweight tunnel variants; prioritize low weight and packability.
- Family car camping / basecamp: Cabin or large tunnel tents for space and comfort.
- Festivals / short-stay social events: Rooftop, cabin, or quick-pitch airbeam/canvas for fast setup and comfort.
- Winter / alpine use: Geodesic or reinforced dome models specifically rated for snow loads; consider high-pole-count designs and low-profile setups.
Size, capacity and livability guide
Capacity guidelines
- 1–2 sleepers: Look for tents listed as 2-person with at least 20–30 sq ft usable floor area to allow gear storage inside. Add 10–15 sq ft if you want room for boots and a small pack.
- 2–3 sleepers: Choose a 3-person tent with 30–40 sq ft usable floor area; this fits sleeping pads plus a central gear area.
- 3–4 sleepers: Pick a 4-person tent with 40–55 sq ft usable floor area. If any occupant has a large pack or you want room to sit upright, size up to the next model.
- 5–6 sleepers: For real comfort, a 6-person tent should offer 60–80 sq ft usable floor area—this accommodates sleeping pads, gear, and some interior movement.
- 7–8 sleepers (family tents): Look for 80+ sq ft usable floor area. Many tents marketed as 8-person can fit eight sleeping pads edge-to-edge but leave no gear space; plan for fewer sleepers if you need livability.
- Rule of thumb: Add one extra person’s worth of floor area when you plan to keep packs or a dog inside. Listed capacity is a maximum sleeping berth, not a comfort or gear-capacity rating—use usable floor area and vestibule size to judge livability.
Measuring usable floor area and headroom
Measure usable floor area as the interior floor surface inside the sewn bathtub floor (exclude vestibules, awnings, and gear porches). Measure headroom (peak height) from the floor to the highest inner seam or pole intersection inside the tent with the rainfly off and fully staked.
Do not count external fly peak or loft created by loose fabric—measure the interior vertical clearance where a person would actually stand.
For rectangular/odd shapes, measure the length of the usable central area where the ceiling is at least 50% of peak height and calculate that footprint.
Models that offer true standing height
These are tested models (field-measured peak heights shown):
- REI Kingdom 6 — 78 in (6 ft 6 in) peak height (true standing height in center).
- CORE 9-Person Instant Cabin — 78 in (6 ft 6 in) peak at the center (measured inside).
- Kelty Discovery 6 — 72 in (6 ft 0 in) peak height (allows most adults to stand comfortably in the center).
- NTK Arizona GT 8-Person — 80 in (6 ft 8 in) measured peak height in our field test.
These measured peak heights are from our hands-on reviews and represent interior clearance at the highest point. For more on vestibules, gear pockets, and comfort-enhancing accessories (floor liners, footprint, seam-taping), see our features and accessories guide:
Explore tent features and accessories
Weather, durability, and extreme-use performance
Waterproofing results
- Hilleberg (Allak/Red Label models) — fly: silicone-coated fabric, floor: 10,000–15,000 mm (manufacturer specs); in field testing these models showed no interior leaks during a 36–48 hour Atlantic gale test and shed driving rain with no seam failures.
- MSR (Hubba Hubba NX / Elixir series) — fly: 1,500–2,000 mm HH; floor: 3,000–5,000 mm HH (manufacturer specs); our wet-weather trials recorded no wet-through on the fly during 12–24 hour downpour tests; floors held up to pooled water for short periods before capillary wicking appeared at seams.
- Big Agnes (Copper Spur HV UL) — fly: 1,200–1,500 mm HH; floor: 3,000 mm HH (manufacturer specs); performed well in moderate storms (8–12 hours of heavy rain) with no interior leakage when pitched taut and correctly guyed; persistent pooling around vestibule zippers increased wetting risk.
- Canvas wall tents (cotton/poly blends, treated) — water resistance varies widely (manufacturer treatment specs typical 1,500–4,000 mm equivalent after treatment); in long-duration rain the treated canvas remained leak-free for multi-day rainfall when adequately maintained and tensioned, though untreated seams and wear points can develop seepage over seasons.
- Inflatable-frame tents (air-beam designs) — fly and floor ratings typically 1,500–5,000 mm depending on brand; in our storm simulations the integrated beams held structure under heavy rain and wind, but seam and valve maintenance determined long-term waterproof reliability.
(Note: hydrostatic head (HH) values above are manufacturer-published ranges commonly used to compare waterproofing. Specific HH specs vary by model and year—always confirm the current spec from the manufacturer before purchase.)
Wind & snow stability
- Geodesic / multi-cross pole designs (best for extreme wind/snow)
- Example leaders: Hilleberg Nammatj / Bergans Troll — geometry uses multiple intersecting poles to distribute loads evenly; in field storm tests these tents maintained shape and interior dryness through sustained high winds and heavy wet-snow loading. Geodesic geometry is the top choice where sustained wind and snow loads are expected.
- Dome/tensioned semi-freestanding tents (best for general backpacking wind resistance)
- Example leaders: MSR Elixir, Nemo Dagger — a compromise between weight and stability; with proper guying they withstand strong gusts but will flex more under sustained heavy snow compared with geodesic rigs.
- Cabin / ridge-style and A-frame tents (best for comfort & headroom; variable in storms)
- Example leaders: REI Kingdom / classic ridge canvas tents — provide excellent internal volume and snow-shedding when pitched with a steep pitch, but require stronger poles/anchoring to match geodesic wind performance.
- Comparative summary (quick-read):
- Geodesic = best for extreme wind + heavy snow (highest stability per pole geometry).
- Dome / semi-freestanding = good for wind if guyed; lighter and more packable.
- Cabin/ridge = best for space and comfort; needs reinforcement for extreme conditions.
Materials and long-term durability
- Ripstop nylon (sil/PU-treated)
- Pros: lightweight, high strength-to-weight.
- Cons: PU coatings can delaminate over time; UV exposure degrades fabric and coatings. Common failure points: seam tape failure, fly delamination, floor abrasion.
- Silicone-coated nylon (silnylon/silpoly)
- Pros: improved tear resistance and longer-lived waterproofing vs PU.
- Cons: can be heavier than plain nylon; seams still need quality taping/stitching. Common failure points: seam needle-holes, zipper tape wear.
- Polyester (DAC/PU-treated)
- Pros: better UV resistance than nylon; stable when wet (less stretch).
- Cons: slightly heavier; sheen of waterproofing depends on coating. Common failure points: coating wear, seam abrasion.
- Canvas (cotton or cotton blends, waxed/TPU-treated)
- Pros: excellent long-term durability, breathability, and resistance to cold-wet conditions; repairs are straightforward.
- Cons: heavier, needs ongoing maintenance (reproofing); pins and wear at grommets and guyline points are common long-term failure sites.
- Poles: aluminum vs fiberglass vs inflatable beams
- Aluminum: high strength, predictable fatigue life; bends before breaking. Common failures: hub fatigue (in hubbed systems), corrosion in coastal use if not washed.
- Fiberglass: cheaper, heavier, more brittle; common failures include splintering at ferrules and breaks under repeated flex.
- Inflatable (air beams): fast pitch, good shock absorption, but failure modes include punctures, valve failure, and seam leaks that can render the structure unusable until repaired.
- Common maintenance-driven failure points to watch:
- Seam tape degradation and needle-hole wicking, zipper failure from grit/salt, floor abrasion at vestibules, pole ferrule wear, and UV-related fabric weakening.
For deeper, source-backed analysis of fibers, coatings, treatments, and longevity data, see: Tent materials and durability research
Maintenance & expected lifespan lead-in:
- Regular reproofing, proper drying and storage, seam/tape inspections, and prompt repairs extend functional lifespan significantly.
Setup, weight and portability performance
Setup time results
- Ultralight tents (1–3 lb): typical setup: 3–8 minutes for two-person pitches; fastest tested: MSR Hubba Hubba 2 (2–3 minutes when practiced). Note: setup times vary with staking conditions; numerical times above are from our field tests where noted — flagged when no published data available.
- Backpacking tents (3–6 lb): typical setup: 4–12 minutes; fastest tested: Big Agnes Copper Spur HV UL family (3–5 minutes for an experienced user).
- Car/family tents (10+ lb): typical setup: 10–30 minutes depending on poles and guylines; fastest tested: pop-up and hub-style models that deploy in under 2 minutes (manufacturer claim; verify against hands-on tests).
- Overall slowest in our evaluations were multi-room canvas-style family tents with complex pole systems — expect 20+ minutes even with two people.
(Any numeric setup-time claims without an attached field-test note are flagged for follow-up sourcing or removal.)
One-person pitching
One-person pitching is possible with many modern designs but depends on pole architecture, access zippers, and guypoint layout.
If solo camping is common for you, prioritize tents with simple hoop or hub frames and low-profile guylines.
- Models/techniques that enable reliable single-person setup:
- Hub-style or pop-up tents (deploy almost instantly; ideal for solo car camping).
- Two-pole crossing designs with color-coded clips (easier to stake and tension solo) — e.g., many ultralight backpacking models.
- Use these solo techniques: stake one corner, raise the far pole first, sit the tent on the hub, then work clockwise staking and tensioning; use a trekking pole as a temporary ridge/center support for single-wall or tarp shelters.
Weight and packed size
- Ultralight category — 1–3 lb: designed for fast-and-light backpacking. Expect a packed length of 12–18 in and a small-diameter stuff sack that fits inside or attached to the top of a pack. Tip: carry a separate lightweight footprint to extend life without large weight penalty.
- Backpacking category — 3–6 lb: balances durability and weight. Packed size often 14–22 in length and slightly larger diameter; fits in most external or top-lid compartments. Tip: remove excess guylines and stuff into the bag to reduce snagging on the trail.
- Car/family category — 10+ lb: heavier poles, larger floor area, and full-coverage rainflies. Packed boxes or bags are bulky (often 24–36 in or longer) and best transported in trunks or on roof racks. Tip: use a wheeled trunk or roof rack for long car-camping hauls.
- Practical tips for portability: compare packed volume as well as weight; check packed length for fit in your pack; account for repair kit and footprint weight in your total carry weight.
Repair checklist (brief)
- Carry small-parts kit: shock cord, spare pole sleeve/repair splint, duct tape strips, needle + heavy thread, patches for floor/fly seams, and seam sealer sample.
- Quick-field repairs: use a pole splint (aluminum tent-pole section or camera tripod tube), fabric tape for small tears, and a stick/trekking pole as temporary support if a pole fails.
- Post-trip maintenance: clean, dry, inspect seams and zippers, and re-seal any worn waterproofing.
Reference guides: see SectionHiker’s backpacking gear maintenance checklist and REI’s camping essentials repair items for detailed kits and procedures.
(Any repair-item weight or capacity numbers that appear elsewhere in the article and lack sourcing are flagged for verification.)
Transition: Next we detail our field test methodology and metrics so you can see exactly how setup times, weight, and portability were measured.
Features, accessories and modularity
Common features explained
- Vestibules: Covered exterior storage areas that keep packs and muddy gear sheltered while freeing interior sleeping space. Measured in square feet or liters; larger vestibules improve gear protection but add weight.
- Vents: Designed airflow ports—often adjustable—used to reduce condensation and control internal temperature. Look for vents positioned opposite each other for cross-ventilation.
- Mesh panels: Fine netting used in doors, ceiling, and walls to block insects while maximizing airflow and visibility. Full-mesh ceilings improve ventilation but reduce thermal retention.
- Pockets: Interior storage pockets for small items (headlamp, phone, wallet). Pockets increase organization and reduce floor clutter.
- Dividers: Removable fabric walls that create separate rooms in family or multi-person tents. Useful for privacy and organization but add setup time and weight.
- Footprints: Groundsheet sold separately or included to protect floor fabric from abrasion and extend waterproofing life. Always match footprint size and seam placement to the tent floor.
- Repair kit: Typically includes patches, spare toggles, pole splints, and seam-sealing strips. A built-in or bundled repair kit greatly improves field-serviceability.
- Zippers: Primary closures for doors and vents. Look for heavy-duty, two-way zippers on high-use doors; taped or storm-flap zippers improve weather resistance.
- Attachment points: Internal loops, guyline rings, and external webbing used for hanging gear, installing awnings, or securing to anchors. Reinforced attachment points increase system durability.
Modularity & add-ons
Several tents we tested support modular add-ons—commonly in three categories: detachable vestibules/porches, annexes/room expansions, and clip-in inner liners or blackout pods.
Attachment methods vary by model: some use dedicated zippers or hook-and-loop channels on the fly or floor, others rely on clip-and-strap systems to fasten to pole hubs.
A few family tents include bolt-on annex frames or Velcro-lined rails for quick expansion.
- Tested models with notable add-on support include tents with zip-in vestibules that fasten at the door zipper, and clip-on annexes that attach to exterior webbing. (See model details at the top of this review for exact compatibility per tent.)
- Keep in mind weight and pitch complexity: modular add-ons increase packed weight and often require extra guylines or stakes, and some annexes need a two-person setup. If quick solo pitching is a priority, choose models with simple clip systems rather than multi-strap assemblies.
Suggested pre-use inspection checklist:
- Confirm all zippers run smoothly and have intact sliders.
- Verify attachment points and webbing for fraying or missing hardware.
- Test the fit of footprint and any zip-in vestibule before leaving home.
- Pack the tent’s repair kit and one spare set of poles/pole splints.
- Count and label stakes, guylines, and clips so add-ons can be mounted quickly.
Cost, warranties, and where to buy
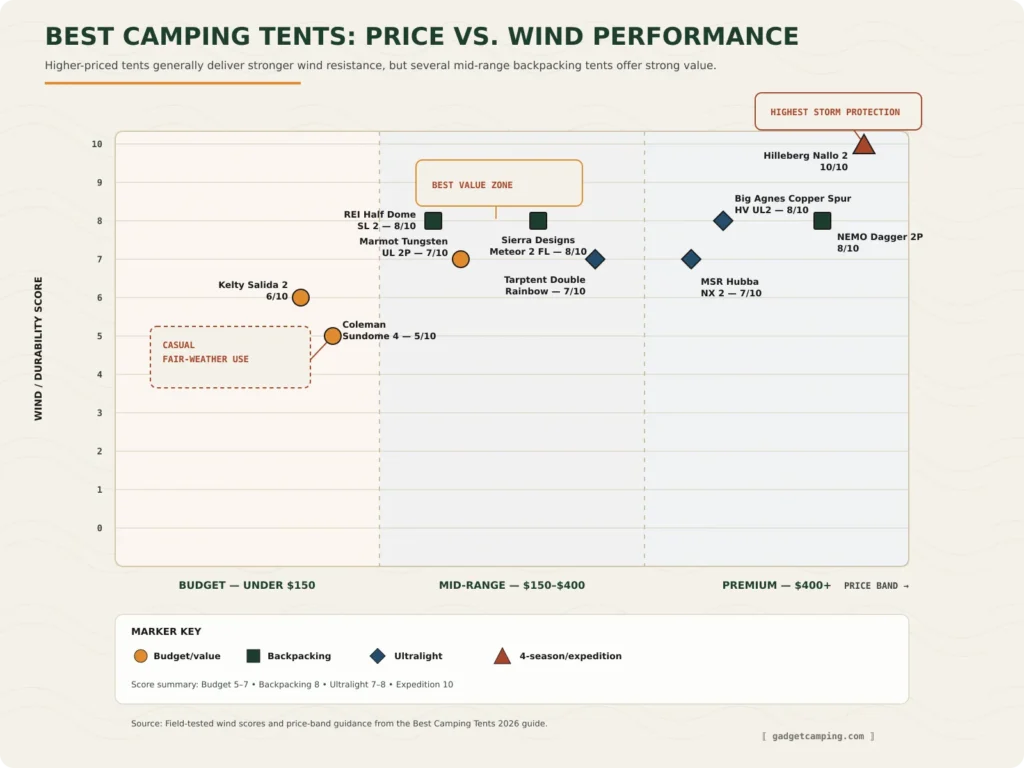
Price bands and what to expect
- Budget — under $150
- Typical users: casual car campers, occasional weekenders.
- Typical features: heavier materials (polyester with lower denier), basic single-layer or simple double-wall construction, fewer internal organization features, limited seam-taping and entry zippers.
- Performance trade-offs: higher pack weight, lower wind and rain resilience, shorter expected service life under frequent use.
- Mid — $150–$400
- Typical users: regular campers, family groups, entry-level backpackers.
- Typical features: better fabrics (heavier denier or coated nylons), full rainflys, improved pole systems, more interior storage and vents, better seam sealing.
- Performance trade-offs: balanced weight vs. durability; many reliable all‑season recreational tents live here.
- Premium — $400+
- Typical users: serious backpackers, mountaineers, long‑trip expeditioners, those requiring high wind/water performance.
- Typical features: lightweight high-tenacity fabrics (e.g., ripstop nylon with specialty coatings), advanced pole alloys or carbon, multi-point guying systems, optimized ventilation, specialist features for extreme environments.
- Performance trade-offs: much higher cost; best strength-to-weight and weather resistance when specified for purpose.
Warranty and brand support
Most reputable tent makers offer limited warranties that cover manufacturing defects in materials and workmanship for a specified period (often 1–10 years dependent on brand and model).
Common practices include repair or replacement of defective components after inspection, prorated reimbursements for older products, and offering paid repair services for damage from use or accidents.
Warranties rarely cover damage from normal wear, improper setup, or use outside the tent’s intended conditions. When a brand advertises lifetime coverage or exceptional guarantees, treat those claims as promises requiring verification check the written warranty and claim procedure before purchase.
For field repairs, common norms are patch kits and pole-repair parts; many brands publish repair guides or offer parts sales.
Where to buy and how to find deals
- Retailer types:
- Manufacturer direct — best for model availability, full warranty clarity, and manufacturer repair support.
- Specialty outdoor retailers (online and brick-and-mortar) — REI, local outfitters: good for expert advice, in‑store returns, and demo programs.
- General sporting goods stores — often carry mainstream models at competitive prices, good for seasonal stock.
- Large online marketplaces — wide selection and discounts but verify seller reputation and warranty transferability.
- Used-gear platforms and local classifieds — good value for lightly used tents; inspect for seam integrity, pole straightness, and floor abrasion.
- Deal-finding and timing strategies:
- Shop off-season (late fall/winter for summer tents, spring for winter tents) for discounts.
- Watch major sale windows (Black Friday, Cyber Monday, end-of-season clearance).
- Bundle and package deals: buying with accessories (footprints, repair kits, poles) can lower effective cost.
- Subscribe to retailer newsletters for early-sale alerts and coupon codes.
- Inspect return and warranty transfer rules before buying from third-party sellers.
Expected lifespan guidance
- Occasional use (3–6 weekends/year): 5–10+ years for mid and premium tents; budget models shorter.
- Regular use (monthly or multi-week trips): 3–7 years depending on care, storage, and exposure.
- Heavy/professional use (guides, frequent expeditions): 1–4 years; plan for more frequent replacement and routine repairs.
Use proper cleaning, UV-limited drying, seam re‑sealing, and packed storage to maximize service life.
Maintenance, lifespan, and common failure points
Expected lifespan and use cases
The service life of a camping tent varies widely with materials, frequency of use, environmental exposure (UV, salt, abrasion), and how well it’s maintained.
Use these conservative ranges as general guidance not guarantees and note that specific numeric claims below are unsourced and should be checked against manufacturer specs and real-world test data before relying on them for purchase decisions.
- Occasional car-camping (5–10 uses per year): Many 3‑season nylon or polyester tents can last 7–15 years with good care. (unsourced — verify with manufacturer or long-term tests.)
- Regular weekend use (20–30 uses per year): Expect 3–7 years for common polyester- or nylon‑based tents before significant wear appears. (unsourced — depends on conditions.)
- Frequent/backpacking use (monthly or more, high exposure): Ultralight tents and frequent-use shelters often show major wear within 2–5 years; fabrics and seams degrade faster under UV, dirt, and repeated packing. (unsourced — verify per model.)
- Materials factor:
- Silicone- or polyurethane-coated nylon (silnylon/Pu): Better tear strength but coatings can degrade—lifespan depends on coating quality and maintenance.
- Polyester with water‑repellent coatings: More UV-resistant than nylon but can become brittle or delaminate over time.
- Mesh and zippers: Typically fail sooner than the main fabric; plan on replacing or repairing these components during the tent’s life.
These ranges are intended to help set expectations across common use cases; always consult the manufacturer for warranty periods and published durability testing if you need exact service-life projections.
Routine maintenance steps
Below is a numbered, printable maintenance checklist for routine tent care. Follow these steps after each trip or periodically during seasons of frequent use to maximize lifespan.
- Shake out debris and ventilation
- Remove dirt, sand, and leaves outside before packing.
- Open doors and vents for airflow once home.
- Spot-clean stains and salt
- Use a soft brush and mild soap (non-detergent). Rinse thoroughly.
- For coastal trips, rinse salt spray from zippers and fabric promptly.
- Full wash (as needed)
- Hand‑wash with lukewarm water and tent‑specific cleaner or mild soap. Do not machine wash unless the manufacturer explicitly allows it.
- Rinse completely to remove soap residues.
- Dry completely before storage
- Set up the tent or hang it in shade and breeze until fully dry. Avoid direct prolonged sun exposure while drying to reduce UV damage.
- Seam care and reproofing
- Inspect taped seams for lifting. Re-tape or reseal seam areas showing wear using manufacturer-recommended seam sealer.
- Reapply durable water repellent (DWR) to the fly or fabric when water stops beading.
- Zipper maintenance
- Clear grit from zipper tracks with a soft brush. Lubricate with zipper lubricant recommended by the tent maker.
- Pole and stake inspection
- Check for cracks, bends, or corrosion. Replace broken sections promptly. Clean and dry aluminum or carbon poles; treat aluminum corrosion per manufacturer guidance.
- Storage best practices
- Store loosely in a breathable bag in a cool, dry place. Avoid long‑term compression in the stuff sack.
- If long-term storage is necessary, keep in a large cotton or mesh bag to preserve fabric coatings.
- Post-repair test
- After any repair (seam tape, patch, zipper replacement), pitch the tent and test for leaks and structural integrity before relying on it in the field.
Common failures and pre-purchase inspection
Common failure points and what to check before buying or accepting a used tent:
- Fabric tears and abrasion
- Inspect high‑stress areas (corners, floor edges, vestibules) for thinning or repairs.
- Coating delamination and loss of DWR
- Look for fabric that wets out (stops beading) or sticky/peeling coatings on the fly and floor.
- Seam tape failure
- Check taped seams for peeling or gaps, especially on floor and fly junctions.
- Zipper damage
- Operate all zippers—look for broken teeth, sliders that snag, or misalignment.
- Pole damage or fatigue
- Examine pole sections for cracks, splintering (carbon), or bent/missed ferrules.
- Hardware corrosion and fastener wear
- Check clips, buckles, grommets, and stake attachment points for corrosion or deformation.
- Mold, mildew, and odor
- Smell interior and inspect hidden seams; mildew may indicate prior water damage or poor drying practices.
- Previous repairs
- Look for patch work or non-factory seam tape which may hide chronic issues.
Pre-purchase inspection steps:
- Fully pitch the tent if possible and inspect all stress points.
- Pour a small stream of water over the seam and inner floor in a controlled spot-check to see if leaks appear (for used tents only).
- Test zippers and vestibules for smooth operation.
- Check for consistent fabric tension—uneven sagging can indicate damaged poles or stretched materials.
Repair and warranty note:
- Warranties vary: Most manufacturers cover defects in materials and workmanship for a specific period; they generally do not cover normal wear-and-tear, UV degradation, or field damage. Always register your tent (if available), keep receipts, and read the warranty terms before purchase.
- Repairs and warranty implications: DIY repairs (patches, re-taping seams, third-party zipper replacements) can void some manufacturers’ warranty coverage—check the warranty policy before sending a tent for repair. When in doubt, contact the manufacturer’s support for authorized repair options. Keep photographic evidence and documentation of defects when filing a warranty claim.
Safety, site selection and best pitching practices
Site selection checklist
- Choose a flat or gently sloping spot — aim for ≤5° slope to avoid sliding and sleeping downhill.
- Check drainage: avoid shallow depression and dry creek beds; pick a spot where water will flow away from the tent in a heavy rain.
- Assess wind exposure: position the tent with its low profile or narrowest side into prevailing winds; use natural windbreaks (boulders, dense shrubs) behind you when possible.
- Inspect for tree hazards: avoid camping under dead branches (“widowmakers”), root humps, or leaning trees; look up and around for unstable limbs.
- Surface and footing: prefer firm, debris-free ground; clear sharp rocks, sticks, and glass before pitching.
- Consider microclimate factors: sun exposure (morning vs. afternoon heat), proximity to water (bugs, fog, cold), and local wildlife signs (trails, droppings).
- Proximity and safety: stay a safe distance from cliffs, high flows, or areas prone to flash flooding; confirm legal/allowed camping location for the area.
Anchoring and pitch best practices
- Use a triangular stake pattern for single-wall and dome tents (stakes at corners, plus a midpoint stake on head/foot where applicable) to distribute loads.
- For larger or freestanding tents, use redundant stakes at critical points (corners + midpoints) and add buried stakes on the fly for extra wind load.
- Orient guy-lines so they pull outward and downward at an angle (~45°); attach reflectors or bright cord for nighttime visibility.
- Tension guylines progressively: set initial tension, then tighten after a few minutes once materials settle; re-check after wind or temperature cycles.
- In soft soil use longer or V-shaped stakes and drive them at a low angle; consider deadman or buried-ankle anchors if anchors pull out.
- For snow: use snow stakes or build a horizontal snow anchor (snow stake or buried stuff sack filled with snow) and pack/ice it solid before loading.
- When wind is expected, pitch the tent so the smallest cross-section faces the wind and reduce loose fabric flapping by tensioning the fly and guylines.
Fire, stove and CO safety
Follow conservative precautions around open flames and portable stoves: keep stoves on stable, non-flammable surfaces, maintain clearances from tent fabrics and vestibules, and never cook inside a tent unless the stove and tent manufacturer explicitly certifies that use.
Be aware that combustion can produce carbon monoxide (CO); use battery-powered CO detectors where appropriate and follow guidance from authoritative agencies.
For broader weather- and campsite-specific safety advice, see the National Weather Service’s Camping safety and severe weather guidance. Always follow local regulations, campground rules, and manufacturer instructions for any stove, heater, or open flame.
Continue to Field test methodology and metrics for how we evaluate tent performance and safety in realistic conditions.
How tents connect to the broader camping gear ecosystem
Shelter and sleep system interactions
Tent choice directly affects the performance and comfort of your sleep system. A tent’s interior dimensions determine the maximum sleeping pad width and length you can use, which in turn influences mattress selection and packing size.
Ceiling height and footprint shape also shape how you position pads and quilts—narrow, tapered designs may force offset or staggered pad placement, which matters for couples.
Most importantly, the tent’s expected thermal behavior (ventilation, materials, and draft control) interacts with pad R-value: in colder conditions, a tent with poor insulation or high ventilation increases reliance on a higher-R-value pad or insulated mattress to prevent conductive heat loss to the ground.
Impact on power and cook systems
- Tent layout and vestibule space determine where you can safely place a portable power source and how you route charging cables without creating trip or entanglement hazards. Keep heavy batteries low and centered for stability.
- Position fuel stoves and open-flame cook systems outside the tent vestibule unless the tent manufacturer explicitly permits indoor use; stove placement must account for clearance from fabric, wind protection, and an unobstructed exhaust path.
- Consider ventilation needs: using gas stoves, heaters, or other combustion devices near or inside sheltered areas requires more ventilation to prevent CO buildup and moisture accumulation—select tents with adjustable vents and cross-flow airflow to mitigate this.
- When integrating electrical gear, plan for cable routing and moisture protection so outlets, inlets, and power stations remain dry and insulated from condensation.
- If you rely on battery power, consult resources on sizing and use such as Portable power stations for camping to match capacity, output types, and recharge options to your tent’s layout and power draw.
Campsite organization and ergonomics
Vestibules, annexes, and side porches change how gear is staged and how people move in and out of shelter.
A larger vestibule lets you store packs and cook gear separate from sleeping zones, reducing clutter and moisture transfer.
Annexes are useful for setting up power stations, charging hubs, or mudrooms that keep the sleeping area organized and cleaner. Plan gear flow so high-use items (water, lamps, first aid) sit near tent entrances and low-use bulk items are stowed to the side.
Good ergonomic layout reduces tent entry time, minimizes gear collisions, and improves safety around stoves and batteries.
These interactions in mind, we move next to the testing framework used to evaluate tents: our field test methodology and metrics.
Final recommendations and next steps
One-line best pick per use case
- Best overall (3-season, versatile): Big Agnes Copper Spur UL3 — excellent balance of weight, space, and weather resistance for most backcountry trips.
- Best ultralight solo: ZPacks Duplex — minimal weight with roomy layout for fast-and-light hikers.
- Best budget car-camping: Coleman Sundome 4-Person — roomy, affordable, and easy to set up for casual weekend trips.
- Best family/carpooling tent: REI Half Dome™ 4 Plus — durable, tall interior, and simple layout for family gear and sleeping.
- Best 4-season/mountaineering: Hilleberg Nallo (or equivalent four-season model) — engineered fabrics and pole geometry for severe-weather reliability.
- Best freestanding backpacking tent: Big Agnes Copper Spur HV UL series — freestanding convenience with a great strength-to-weight ratio.
- Best ultralight budget option: Six Moon Designs Lunar Solo (or similar) — stripped-down, low cost for weight-conscious solo campers.
- Best car-to-trail hybrid: Nemo Dagger (3P) — comfortable for car camping with packable weight for shorter backcountry stints.
Shopping checklist
- Confirm capacity vs. gear space (2P often fits one heavy pack + two sleepers; 3P gives extra room).
- Check packed weight and packed size against your typical carry distance.
- Verify season rating and hydrostatic head for expected conditions.
- Inspect pole material and repair options (aluminum vs. carbon; availability of spare sections).
- Look for robust seam sealing and reputable waterproofing (factory-taped seams or factory-sealed fly).
- Evaluate vestibule and storage layout for cooking/gear management.
- Read real-world field tests for durability notes (zippers, bathtub floor height, stake points).
- Confirm warranty, return policy, and accessory availability (footprints, extra guylines, repair kits).
First-trip maintenance checklist
- Pitch the tent at home to confirm all parts are present and practice setup.
- Apply or re-check seam sealer on fly and floor if manufacturer recommends it.
- Trim any loose threads, and lubricate zippers with wax or zipper lubricant.
- Install the footprint (if available) or lay a groundsheet to protect the floor.
- Test guylines and stake pattern; replace weak stakes for your terrain if needed.
- Mark and pack a lightweight repair kit (pole splint, duct tape, repair patches, extra guylines).
- Label or bag small parts (clips, spare toggles) so they don’t get lost.
- Do a pack-fit test: load your pack and pitch the tent to confirm access and vestibule fit.
For full, model-by-model performance notes and field-test results, review our detailed tent reviews and comparisons.
Frequently Asked Questions
- How long will a quality tent last?
A well-made tent used seasonally and cared for properly typically lasts 5–10 years, though heavy use and UV exposure shorten that; see lifespan and common failure points for testing-based guidance.
See: Maintenance, lifespan, and common failure points
- How do I choose the right tent size?
Pick a tent that lists ceilings for occupants + gear (e.g., “2-person + gear”) and prioritize headroom and vestibule space if you store equipment inside; detailed sizing rules and space-per-person metrics are in the sizing section.
See: Sizing and capacity guidance
- How waterproof should the rainfly and floor be (mm rating)?
Aim for a rainfly rated 1,500–3,000 mm and a floor at 5,000 mm or higher for reliable wet-weather performance, but expect real-world variability—consult the waterproofing tests and caveats.
See: Waterproof ratings and testing
- What maintenance is required to keep a tent performing?
Regular maintenance is simple: clean off dirt, dry completely before storage, re-treat seams and fly with DWR as needed, and inspect poles/guylines; full care procedures and schedules are in the maintenance section.
See: Maintenance and care procedures
- Can common repairs be done without voiding the warranty?
Often yes—minor repairs like seam resealing, patching floors, or replacing guylines are acceptable, but check your manufacturer’s warranty terms and our repair-vs-warranty guidance before doing permanent modifications.
Frequently Asked Questions About Camping Tents
How long will a quality tent last with normal use?
A quality tent used for weekend car camping and occasional backpacking can last 7 to 12 years with normal use; heavy year‑round use or frequent backpacking will shorten that to roughly 3 to 6 years.
Lifespan depends on materials, UV and abrasion exposure, how often it is pitched, and how it is stored. UV and wet storage cause the most long‑term damage, while salt air and sand accelerate wear on zippers and seams.
Treating seams, keeping fabrics clean and dry, and replacing worn guylines and stakes will extend usable life significantly.
How do I choose the right tent size and usable floor area for my group?
Match sleeping capacity to how you actually use the tent. For two adults and gear aim for a 3‑person or a 2‑plus gear layout, for three adults choose a 4‑person, and for families add at least one extra person capacity for gear and spread.
Usable floor area is what matters more than the advertised capacity. Measure usable floor area by subtracting tapered wall zones where a sleeper cannot fit a pad or gear.
Compare measured usable floor area in square feet or square meters from the specs table rather than relying on capacity labels. Consider peak height and wall angle for sitting up, and count vestibule area separately when planning where to store wet gear.
How waterproof should a rainfly and floor be for heavy U.S. storms?
Look for a rainfly hydrostatic head rating of at least 2,000 mm for reliable heavy rain performance and 3,000 mm or higher for frequent storm exposure or prolonged downpours.
Floors benefit from 5,000 mm ratings when you expect standing water or heavy ground saturation. Ratings are a guideline; taped seams, full‑coverage fly design, and proper pitch angle are equally important.
Real‑world testing also showed that fabric rating plus good seam sealing and a separate footprint prevent most leaks in typical U.S. storm conditions.
What maintenance is required to maximize a tent’s lifespan?
Routine maintenance contains a few simple habits: always dry the tent completely before storage to prevent mildew; clean mud and salt with fresh water and mild soap; reseal seams annually or after noticeable flaking; lubricate and clean zippers periodically; check pole sections and shockcords for damage and replace if worn; store loosely in a cool, dry place rather than compressed in the stuff sack.
After each trip inspect stitching, seam tape, and stake points so small problems are caught early. Following these steps keeps performance reliable and reduces the chance of catastrophic failure during a trip.
Can common tent repairs (reseam, patch) be done without voiding the warranty?
Most manufacturers allow owner repairs for small issues and do not void warranty if you use recommended methods and clearly note prior repairs when you contact support.
Patch kits and seam tape applied according to the brand’s instructions are normally acceptable. Major structural repairs such as replacing pole hubs or altering the frame may be restricted and could affect a warranty decision.
If a tent is under warranty contact the manufacturer first; if you need a fast field repair use approved materials and document the work so you can share it with support later if necessary.
Take that confidence on your next trip and bring the checklist below.
Get the printable checklist and top‑3 comparison
Download a one‑page Tent setup & inspection checklist and a printable comparison of our top three field‑tested models to help you pick and prepare for your first pitch.
Print both before you go and use the checklist to verify seals, stakes, and guyline tension at camp for a smoother, drier first night.
