
A camp kitchen is a portable, organized cooking and food‑storage system you deploy at a campsite to prepare, cook, and clean meals safely and efficiently.
It brings together stoves, cookware, coolers, water and wash stations, and storage into a repeatable layout suited to the site and trip style.
A reliable camp kitchen reduces food‑safety risk, prevents wildlife encounters, and saves time and fuel, which preserves trip budget and comfort. Proper gear and workflows also limit environmental impact and keep campsites compliant with local rules.
This guide provides a concise orientation and usage tips, followed by a field‑tested list of essential gear, stove and fuel selection advice, cookware and tableware recommendations, cooler and food‑storage best practices, packing lists scaled by trip length and group size, three‑zone layout and site‑assessment checklists, wash‑station and sanitation procedures, food‑safety and meal‑planning rules, organization and lighting hacks, cleaning and Leave‑No‑Trace practices, safety and permit checks, DIY chuck box and table designs, routine maintenance, notes on how kitchen choices interact with core camping gear, answers to common questions, and printable checklists to use on trip day.
Define your base kit first and then confirm stove, cooler, and wash arrangements for the specific site and group.
Camp kitchen — quick summary and how to use this guide
Purpose
A camp kitchen is a portable, organized cooking and food-prep area you set up at camp. This guide explains what gear matters, how to prioritize durability and weight, and how to configure setups for different trip types.
Who this is for
- Car campers who can bring larger stoves and coolers
- Families needing fuss-free, safe cooking setups
- Couples who want compact, two-person systems
- Minimalist short trips where weight and footprint matter
- Winter setups that prioritize fuel reliability and wind protection
How to use this guide
Read the gear sections first to identify must-haves, then use the setup and packing lists to build a layout that fits your trip. Jump to the Essential camp kitchen gear (must-have gear) section to start with the items every setup needs: Essential camp kitchen gear (absolute must‑haves)
Essential camp kitchen gear (absolute must‑haves)
Gear list — numbered list of core items
- Stove (portable gas or multi-fuel) — Reliable, controllable heat source for cooking and boiling water.
- Cookware set (pot + pan + lid) — Versatile vessels for boiling, frying, and simmering one-pot meals.
- Fuel canister or fuel bottle — Matches the stove type and provides safe, consistent fuel supply.
- Lighter/matches and a firestarter — Redundant ignition methods ensure you can light a stove or start a campfire.
- Reusable plates/bowls and utensils — Durable eating gear reduces waste and withstands repeated use.
- Cutting board and a sharp knife — Safe, efficient food prep and portioning at camp.
- Food storage containers / resealable bags — Keeps food fresh, organized, and wildlife‑secure.
- Collapsible water container and water treatment — On‑site water storage plus filtration or purification for safe drinking water.
- Mess cleaning kit (biodegradable soap, sponge, dish towel) — Hygienic cleanup without harming the environment.
- Trash bags and a small pack of zip ties/cord — Leave-no-trace waste management and a way to secure items or repair gear.
Minimal vs full setups
For a minimal 1–2 person kit, pick a compact stove, a single small pot with lid, a spork/knife, a lightweight water bottle, and a compact cleanup kit—this keeps carry weight low and covers basic cooking needs.
Ultralight alternative: replace cookware with a single titanium cup and use dehydrated meals to minimize weight.
For a full family car‑camp kit, include multiple pots/pans, a larger multi-burner stove, a robust cooler or fridge, full serviceware, and extra storage containers for bulk food—this prioritizes convenience and meal variety.
Vehicle‑heavy alternative: add a heavy-duty camp oven or grill and a large powered cooler for longer stays.
These choices should directly inform your cookware and stove selection: minimalist setups favor single-pot, low-mass cookware and single-burner stoves, while family car-camp setups benefit from larger-capacity cookware and multi-burner or higher-output stoves to serve multiple people efficiently.
Choosing a camp stove and fuel strategy
For detailed model-by-model buying guidance, see Camping stoves buying guide. Below are field-focused comparisons and practical fuel-planning numbers you can use to choose and pack for your camp kitchen.
Stove type comparison — table-style paragraph
Below is a compact, table-style comparison to help match stove type to trip needs. Use it as a quick decision matrix.
Camping Stove Comparison Table
| Stove type | Pros | Cons | Field-use recommendation | Weight and fuel availability | Wind performance |
|---|---|---|---|---|---|
| Single-burner liquid fuel / white gas | High heat output; reliable in cold weather; refillable | Requires priming and maintenance; bulkier than canister stoves | Multi-day car camping, overlanding and groups needing high output | Moderate weight; refillable bottles; fuel can be transferred | Good with stable pot support; benefits from a windscreen |
| Two-burner propane camp stove | High output; cooks for groups; stable simmer control | Heavy; propane canisters are bulky; less efficient in cold weather | Car camping, family meals and extended campground stays | Heavy; propane canisters are commonly available but bulky | Fair; stable construction, but exposed burners need wind protection |
| Canister backpacking stove | Lightweight; simple operation; minimal maintenance | Limited output; canister waste; reduced cold-weather performance | Lightweight backpacking, solo trips and quick meals | Very light; isobutane-propane canisters are widely available at outdoor shops | Poor-Fair; highly susceptible to wind unless properly shielded |
| White-gas multi-fuel backpacking stove | Reliable in cold weather; high output; compatible fuels available internationally | Heavier than canister models; requires regular maintenance | Long expeditions and cold or remote environments | Moderate weight; refillable fuel bottles; fuel widely available | Good when correctly assembled and used with a windscreen |
| Wood or rocket stove | No fuel needs to be carried; renewable fuel source; lightweight options | Variable heat control; depends on dry local fuel; use may be restricted | Backcountry trips where dry wood is abundant and fires are permitted | Stove is very light; fuel availability depends on local conditions | Variable; can be sheltered, but performance suffers with wind or wet wood |
Quick comparison of camping stove weight, fuel availability, wind resistance and appropriate field use.
Fuel choice and planning
Choose fuel that matches stove type, trip length, weight constraints, and expected temperatures.
Liquid fuels (white gas/multi-fuel) perform better in cold and at altitude; canisters are cleaner and simpler for short trips.
For planning how much to carry, use per-person, per-meal estimates and then add margin for group cooking and emergencies.
Sample estimates (labelled as sample estimates — unsourced numbers; verify against manufacturer burn times or field tests before final packing):
- Canister canister-type stove: ~1 230g canister per person per 2–3 days, roughly 0.25–0.5 canisters per person per day depending on meal types and stove efficiency. (Sample estimate — unsourced numbers.)
- White gas / liquid fuel: ~0.5–1.0 liters fuel per person per day for group cooking and boiling water; continue adjusting for high-output cooking (frying) or cold conditions. (Sample estimate — unsourced numbers.)
- Group car-camping with a two-burner: 1–2 1-lb propane cylinders per day for a family of 4 if you’re doing multiple hot meals and coffee/tea rounds. (Sample estimate — unsourced numbers.)
How to refine these numbers:
- Check stove manufacturer burn-rate (g/hr or BTU/hr) and typical boil time for your pot size.
- Estimate time-on-burn per meal (boil for 1–3 minutes per liter, simmer time varies).
- Multiply burn time by burn rate and add 20–30% contingency for wind/cold/extra hot drinks.
- For group trips, consolidate fuel types to reduce waste (e.g., one shared white-gas bottle or several canisters).
Windscreens and stove placement
A windscreen improves efficiency and reduces fuel use, but safe placement and ventilation are essential.
Do not place the windscreen flush against the stove or block ventilation; avoid enclosed tents or vestibules without adequate airflow. Position stoves on stable, level, non-flammable surfaces.
Three short, actionable bullets:
- When to use a windscreen: use when wind reduces boil time or flames flicker — shield only the burner area, leaving airflow above and below.
- Safe clearances from tents/flammables: keep at least 3 feet (≈1 meter) from tent walls and fabric; maintain a 2-foot (≈0.6 m) clear zone around the stove free of fuel, paper, or dry brush. These are practical guidelines—adjust for stove type and local regulations.
- Positioning relative to prevailing wind: place stove with wind at your back or side, and set windscreen on the windward side to block gusts while keeping exhaust directed away from people and gear.
Note: Avoid absolute language; use do not for safety directives (for example, do not use canister stoves inside enclosed tents or poorly ventilated spaces).
Cookware, materials, and sizing for groups
Should you buy camping cookware
Recommendation: buy dedicated camping cookware only if weight, packability, or durability is a priority. Dedicated sets (titanium/aluminum nesting kits) excel for backpacking and minimalist car campers who need low weight and compact nesting.
For car camping or group cooks, use heavy-duty home pots—they heat more evenly and handle larger volumes. Pros/cons: camping sets = light, compact, sometimes fragile; home cookware = heavier, more versatile, better searing and capacity.
Material guide
Aluminum
Aluminum (often anodized or raw) is lightweight and conducts heat quickly, making it ideal for fast boiling and compact camping sets.
Cleaning: hand-wash, avoid abrasive pads on raw aluminum; anodized aluminum is more durable and easier to clean. Note: thin aluminum can warp over high heat.
Stainless steel
Stainless steel is durable, non-reactive, and good for high-heat searing. Cleaning: dishwasher-safe for many pieces but hand-wash on the trail; use a paste of baking soda for stuck-on food. It’s heavier than aluminum but resists dents and corrosion.
Cast iron
Cast iron offers excellent heat retention and durability—great for stews and searing. Seasoning: keep well-seasoned and dry after washing; reapply oil and heat to maintain the seasoning layer.
Cleaning: avoid soap when possible and dry thoroughly to prevent rust. Heavy—best for car camping.
Hard‑anodized
Hard‑anodized aluminum is a middle ground: lighter than steel, tougher than raw aluminum with a nonstick-like surface (not fully PTFE nonstick).
Cleaning: gentle scrubbing; avoid metal utensils if surface is coated. It balances weight, durability, and easier cleanup for group camp cooking.
Weight and packing note: Lighter materials (aluminum/titanium) save pack weight but may dent and have thinner walls.
Heavier options (cast iron/stainless) are more durable and cook better for groups. Prioritize nesting/stacking cookware to reduce bulk—choose sets designed to nest or use a single large pot for multiple tasks.
Sizing and scaling
- 2 people: 1.5–2.5 L pot, 8–10″ frying pan (one); 1–2 cooking surfaces (single-burner or camp stove with one pot support).
- 4 people: 3–4 L pot, 10–12″ frying pan; 2 cooking surfaces (two-burner stove or one stove plus grill) for simultaneous boiling and frying.
- 6 people: 5–8 L pot (stockpot) plus 12″ or larger skillet; 2–3 cooking surfaces recommended (dual-burner stove plus griddle or secondary burner) to keep meal times reasonable.
Include extra capacity for coffee, reheating, and one-pot meals. When packing, nest smaller pans inside larger pots, and use lids as plates to save space.
Plates, cups, utensils
- Materials: BPA-free hard plastic, stainless steel, silicone, and lightweight enamel are durable and camp-friendly. Avoid heavy glass.
- Suggested items: collapsible bowls, insulated mug for hot drinks, sturdy stainless plates or lightweight melamine plates for groups.
- Utensils: individual sporks or lightweight cutlery sets, a large serving spoon, slotted spoon, tongs, and a sharp camp knife. Prefer silicone or wooden cooking utensils for coated pans.
- Extras: pack a small cutting board, a few pot grippers, and spare utensils to avoid washing mid-trip.
Final note: balance weight vs durability—if car camping, favor durability and larger sizes; if packing in, prioritize lightweight, nesting sets. Next: Essential camp kitchen gear (absolute must-haves).
Coolers, refrigerated options, and food‑storage best practices
Choosing a cooler
Pick a cooler based on trip length, expected ambient temperature, and how often you’ll open it. Hard-sided coolers hold ice longer and stand up to rough handling; soft-sided coolers are lighter and fine for day trips or short car camping.
For multi-day trips in hot climates, prioritize high-performance hard coolers or a powered 12V/portable fridge.
Checklist—choose by trip length and climate
- Day trips / picnics: Soft-sided cooler (lightweight, easy carry). Capacity: 6–24 liters per 1–2 people.
- Weekend car camping (1–2 nights): Mid-size hard cooler or premium soft cooler. Capacity: 25–50 liters.
- Multi-day in mild temps (3–5 nights): High‑performance hard cooler with thick insulation. Capacity: 50–80+ liters depending on group size.
- Multi-day in hot climates (>80°F / 27°C) or prolonged access: Premium rotomolded hard cooler or powered 12V/portable refrigerator. Add 10–20% more capacity if you need extra ice or space for block ice.
- If weight or packability matters (backpacking): choose lightweight insulated boxes or soft coolers designed for car-to-trail shuttles; avoid heavy rotomolded units.
- Consider features: drain plug, tie-down points, locking capability, cup holders, and ease of cleaning.
Packing a cooler
Follow these steps to maximize ice retention and food safety:
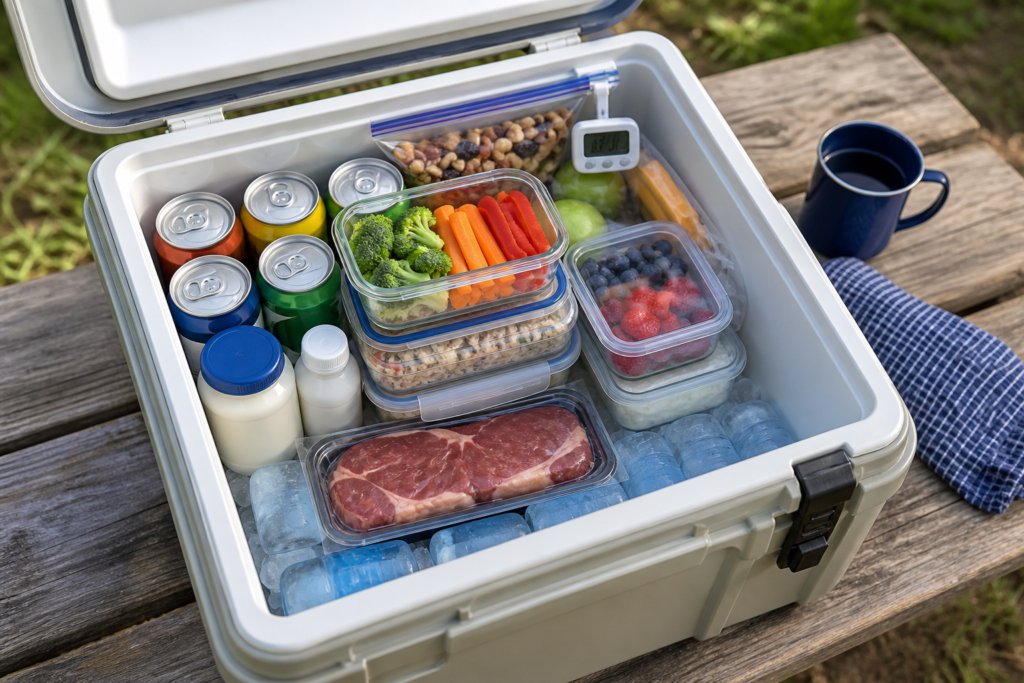
- Pre‑chill the cooler and items. Put the cooler in shade and cool non-perishable items in a refrigerator (or use frozen bottles) before loading. A cold cooler starts colder and uses less melt ice to reach safe temps.
- Use block ice where practical. Block ice melts slower than cubed ice; large blocks or frozen jugs are more efficient for multi‑day cold retention.
- Layering strategy. Place a layer of ice (or frozen blocks) on the bottom, then food, then more ice on top. Cold sinks — top ice chills contents better than only bottom ice.
- Pack densely and minimize air gaps. Fill voids with extra ice or frozen water bottles to reduce warm air pockets.
- Separate raw meat and ready‑to‑eat food. Keep raw meat in sealed, leak‑proof containers or double-bagged, and place it at the very bottom or in a separate cooler to prevent cross-contamination.
- Limit opening frequency. Designate one person to retrieve items and plan access to minimize door openings.
- Use thermometer and organize by temperature need. Keep a digital or dial thermometer near the top and maintain ≤40°F (4°C) for perishable foods. (If you state expected ice-retention times, you must cite the source; otherwise describe typical ranges.)
- Manage meltwater. Use the drain plug or a separate internal tray to keep food out of meltwater; standing meltwater speeds spoilage.
Note on ice‑retention times: published retention claims vary widely by cooler model and conditions (ambient temp, sun exposure, opening frequency). If you need specific hour/day numbers, use manufacturer test data or independent lab tests and cite them. Otherwise, refer to typical performance: soft coolers often last a day or less in hot conditions, mid-range hard coolers 1–3 days, and premium rotomolded coolers commonly 3–7+ days under controlled conditions.
Bear‑country and secure storage
When camping in bear country, follow established food‑storage rules and local regulations. For authoritative guidance see: Bear‑resistant food storage guidance
Practical secure-storage options:
- Bear‑resistant lockers: Use provided campground lockers where available; they’re the simplest and safest option.
- Bear canisters: Approved hard canisters are required in many backcountry areas for storing scented items and food; carry one sized to your trip.
- Hanging tactics (when lockers/canisters aren’t available): Use a proper bear hang 100–200 ft from tents, at least 12 ft off the ground and 6 ft from the tree trunk/branches. Only use hanging methods where allowed and effective — in some areas, hang systems are not bear‑proof.
- Vehicle storage: Store food in a locked vehicle’s trunk or in an airtight container; avoid leaving food in tents.
- Follow local rules: Park and trailhead regulations vary; always follow posted instructions and rangers’ guidance.
Safety note: If you mention dry ice as a cooling option, include safety and legal considerations dry ice can be hazardous in enclosed spaces (risk of CO2 buildup) and is restricted by some airlines/parks. Use gloves when handling and follow local disposal rules.
Containers for prepped food
- Materials: Use BPA‑free plastic, stainless steel, or heavy‑duty silicone for durability. Glass is fine for car camping but heavier and breakable.
- Sizes & portioning: Pack food in single‑meal portions to reduce exposure and repeated opening. Use nested sizes to eliminate wasted space.
- Stacking & organization: Use uniform, stackable containers to maximize space and stability. Place frequently used items on top or in a separate small cooler.
- Labeling & rotation: Label containers with contents and date. Use FIFO (first-in, first-out) for perishables and freeze pre-portioned sauces/meats to act as additional cold mass.
- Sealing: Choose containers with tight seals and consider leakproof bags for marinating or liquids.
Camping Cooler Types and Capacity Recommendations
| Cooler type | Amazon product | Capacity | Best for | Main advantage | Power or ice requirement |
|---|---|---|---|---|---|
| Soft backpack cooler | TOURIT Insulated Cooler Backpack | 30 cans | Day trips, hiking and 1–2 people | Lightweight and easy to carry | Ice packs or loose ice |
| Compact hard cooler | Coleman Pro Heavy-Duty Cooler | 25 qt / 36 cans | One or two campers for 1–2 nights | Durable body and better ice retention than soft coolers | Bagged ice |
| Large wheeled hard cooler | Coleman Xtreme Rolling Cooler | Up to 84 cans | Family camping, group meals and longer stays | Large capacity and easier transport when loaded | Bagged ice |
| Compact electric cooler | BougeRV 12V Refrigerator | 23 qt | One or two campers, cars and short road trips | Operates as a refrigerator or freezer without ice | 12/24V DC or 110V AC |
| Mid-size electric cooler | BougeRV 12V Refrigerator | 30 qt | Weekend camping and road trips | Compressor cooling with refrigerator/freezer capability | 12/24V DC or 110V AC |
| Large electric cooler | BougeRV 12V Refrigerator | 53 qt | Families, RV camping and extended stays | Large powered capacity without sacrificing space to ice | 12/24V DC or mains power |
Recommended capacity guide
| Camping situation | Recommended capacity |
|---|---|
| Solo day trip | 10–20 qt |
| Two-person overnight trip | 20–30 qt |
| Two-person weekend | 30–45 qt |
| Family weekend | 45–65 qt |
| Group or extended stay | 65+ qt |
| Powered car/RV camping | 23–53 qt, depending on trip length |
Packing lists: trip length and group size templates
Quick templates — 2 / 4 / 6 people × day / weekend / multi‑day
Each bullet list below assumes basic meal planning (breakfast + lunch + dinner) and one camp stove. Quantities are for fuel, ice / ice packs, cookware, utensils, and storage containers only.
- 2 people — Day trip
- Fuel: 1 small canister (230–220g) or one 8–12 oz liquid fuel bottle (estimate — unsourced)
- Ice / ice packs: 1 small soft cooler with 2 reusable ice packs
- Cookware: 1 small pot (1–1.5 L) + 1 frying pan (8–10″)
- Utensils: 2 sporks/knife-forks, 1 shared spatula, 1 can opener
- Storage containers: 2 small food tubs (500 mL) + 1 resealable bag for scraps
- 2 people — Weekend (2 nights)
- Fuel: 2–3 small canisters or 1 liquid fuel bottle (12–16 oz) (estimate — unsourced)
- Ice / ice packs: 1 soft cooler with 4–6 reusable ice packs or 10–15 lbs bag ice
- Cookware: 1 medium pot (1.5–2.5 L) + 1 pan, 1 kettle
- Utensils: 2 full utensil sets, 1 spatula, 1 ladle
- Storage containers: 2 medium tubs (1 L) + 2 small tubs + 1 dry-food box
- 2 people — Multi‑day (3+ nights)
- Fuel: 3–6 small canisters or 1–2 liquid fuel bottles (16–32 oz) (estimate — unsourced)
- Ice / ice packs: 1 high‑performance cooler with 8+ ice packs or 20+ lbs bag ice (estimate — unsourced)
- Cookware: 1 large pot (2.5–4 L) + 1 pan + collapsible kettle
- Utensils: 2 full sets, 1 set of tongs, 1 spatula
- Storage containers: 3–4 medium tubs, 1 dry-food bin, 1 crumb/scrap container
- 4 people — Day trip
- Fuel: 1–2 small canisters (estimate — unsourced)
- Ice / ice packs: 1 medium cooler with 4 reusable ice packs
- Cookware: 1 medium pot + 1 larger pan (10–12″)
- Utensils: 4 sporks/knife-forks, 1 spatula, 1 can opener
- Storage containers: 4 small tubs + 1 shared bag
- 4 people — Weekend
- Fuel: 3–4 small canisters or 1 liquid bottle (16–24 oz) (estimate — unsourced)
- Ice / ice packs: 1 larger soft cooler with 8 reusable ice packs or 15–20 lbs ice
- Cookware: 1 large pot + 1 large pan + 1 kettle
- Utensils: 4 full sets, 1 set of tongs, 1 serving spoon
- Storage containers: 4 medium tubs, 1 dry-food box
- 4 people — Multi‑day
- Fuel: 5–8 small canisters or 1–2 liquid bottles (24–32 oz) (estimate — unsourced)
- Ice / ice packs: High-capacity cooler with 10+ ice packs or 30+ lbs ice (estimate — unsourced)
- Cookware: 2 pots (1 large, 1 medium) + 1 large pan + kettle
- Utensils: 4 full sets, serving utensils, 1 cutting board
- Storage containers: 4+ medium tubs, 1 dry-food bin, 1 garbage/scrap tub
- 6 people — Day trip
- Fuel: 2 small canisters (estimate — unsourced)
- Ice / ice packs: 1 large cooler with 6 reusable ice packs
- Cookware: 1 large pot + 1 extra pan
- Utensils: 6 utensils, 1 can opener, 1 spatula
- Storage containers: 6 small tubs + 1 shared bag
- 6 people — Weekend
- Fuel: 4–6 small canisters or 1–2 liquid bottles (24–32 oz) (estimate — unsourced)
- Ice / ice packs: Large cooler with 12 reusable ice packs or 20–30 lbs ice
- Cookware: 2 pots + 2 pans + kettle
- Utensils: 6 full sets, 2 serving utensils
- Storage containers: 6 medium tubs, 1 dry-food bin
- 6 people — Multi‑day
- Fuel: 8–12 small canisters or 2 liquid bottles (32–48 oz) (estimate — unsourced)
- Ice / ice packs: High-capacity cooler(s) with 15+ ice packs or 40+ lbs ice (estimate — unsourced)
- Cookware: 2–3 pots, 2 pans, kettle, grill grate if needed
- Utensils: 6 full sets, extra serving tools, sharp chef’s knife
- Storage containers: 6+ medium tubs, 1 large dry-food tote, 2 scrap/garbage tubs
Fuel and ice planning
Use these as estimates; actual needs vary by stove efficiency, meal plan, ambient temperature, and cooler quality. Numbers below are estimates — flagged where unsourced.
- Fuel canister estimates (small screw-on canisters, ~230 g):
- Day trip: 1 canister per 1–2 people (estimate — unsourced)
- Weekend (2 nights): 2–4 canisters for 2–4 people; 3–6 for 6 people (estimate — unsourced)
- Multi‑day (3+ nights): 3–6 canisters for 2–4 people; 6–12 for 6 people (estimate — unsourced)
- Liquid fuel estimates (white gas / MSR-type bottles):
- Day trip: not usually needed unless heavy boiling — use 8–12 oz (estimate — unsourced)
- Weekend: 12–24 oz depending on cooking frequency (estimate — unsourced)
- Multi‑day: 24–48 oz for multi-night group cooking (estimate — unsourced)
- Ice / cooling capacity estimates:
- Small soft cooler: holds ~10–20 lbs ice (good for day/short weekend for 2 people) — use 2–6 ice packs or 5–10 lbs ice (estimate — unsourced)
- Medium cooler (~30–50 qt): 10–20 lbs ice or 6–10 ice packs — weekend for 2–4 people (estimate — unsourced)
- Large cooler (60+ qt / high performance): 20–40+ lbs ice or 10+ ice packs — multi‑day for 4–6 people (estimate — unsourced)
- Tips: pack ice as blocks where possible (lasts longer). Consider dry ice only where allowed (handles/safety vary).
- Notes and flags:
- All numeric values above are estimates based on typical use cases and stove/cooler performance — these figures are unsourced. For precise fuel burn rates, check your stove manufacturer’s burn-time specs; for cooler melt rates, check manufacturer performance tests or lab ratings.
- If you need precise planning for long trips, run a test boil and measure fuel use, or check product test pages on gadgetcamping.com for measured burn times and cooler retention data.
Fuel-Canister Burn Estimates
| Stove / Fuel Type | Typical Container | Approx. Burn Time | Practical Planning Estimate | Best For |
|---|---|---|---|---|
| Small backpacking canister stove | 8 oz / 227 g isobutane-propane canister | About 60 minutes on high | 1 canister for 2-4 days solo, or 1-2 days for two people with frequent boiling | Solo or lightweight meals |
| Two-burner propane camp stove | 16.4 oz / 1 lb propane cylinder | Up to 1 hour with both burners on high | 1 cylinder per day for 2-4 people with moderate cooking | Family car camping |
| Heavy camp cooking setup | 1 lb propane cylinders or refillable tank | Varies by burner output | Add 25-30% extra fuel for wind, cold weather, long boils, or group meals | Larger groups / full meals |
Cooler Ice Retention Comparison
| Cooler Type | Typical Ice Retention | Best Ice Strategy | Notes |
|---|---|---|---|
| Soft cooler | 12-24 hours | Ice packs or frozen bottles | Best for day trips, lunches, and short overnights |
| Standard hard cooler | 1-2 days | Block ice plus chilled food | Works well for weekend trips if opened sparingly |
| Rotomolded / premium hard cooler | 3-5 days | Pre-chill cooler, use block ice, fill air gaps | Strongest non-electric option for multi-day trips |
| Electric camp fridge | Indefinite with power | No ice needed | Best for long trips, but requires battery, vehicle, or solar power |
Pre‑trip staging checklist
Follow these numbered steps to stage gear, label, and pack efficiently. Finish when everything is ready to load.
- Gather menu and calculate meals per person — finalize number of cooked and cold items.
- Create a fuel/ice list from the menu using the estimates above — set aside canisters and ice packs.
- Lay out cookware and assign roles (who cooks, who cleans) — inspect for damage.
- Stack and nest pots/pans with heatproof cloths between items for packing.
- Group utensils into labeled kits (per-person sets + cooking/serving kit).
- Pack storage containers by meal and label with contents + day (use waterproof labels).
- Pre-measure spices/oils into small containers or zip bags and label.
- Pre-freeze or chill perishable items; load into the cooler in thermal layers (ice at bottom/top as appropriate).
- Place trash/scrap tub and compost bag in their designated container.
- Verify stove and fuel are leak-free; pack ignition tools (lighter, matches in waterproof case).
- Consolidate first-aid, sanitation, and dishwashing supplies in one labeled tote.
- Do a final inventory check against the printable checklist (tick off each grouped kit).
- Stage heavier items low in the vehicle and fragile items secured; perform weight distribution check.
- Attach final labels to each box/tote (contents and destination — e.g., “Kitchen: Pots”, “Cooler: Food Day 1”).
- Confirm everyone knows loading order and unpacking plan — close out checklist and mark ready to load.
Three‑zone kitchen layout and campsite setup checklist
Three‑zone layout
A three‑zone layout separates tasks to reduce accidents, speed workflow, and keep food clean: Prep/Storage, Cook/Heat, and Wash/Clean. Each zone should be distinct, level, and downwind from sleeping areas.
ASCII/text diagram — top view (zones labeled P, C, W; wind direction arrow):
Wind →
[P] — 6–10 ft — [C] — 6–10 ft — [W]
(Prep/Storage) (Cook/Heat) (Wash/Clean)
Numbered placement guide:
- Prep/Storage (P) — dry goods, cooler, prep table; keep sheltered and shady.
- Cook/Heat (C) — stove, grill, fuel; central and with clear space.
- Wash/Clean (W) — dishpan, greywater bucket, trash; downhill from cooking if possible.
Example layout — Single‑stove (solo or couple):
Wind →
[Cooler] – 4 ft – [Prep Table] – 6 ft – [Single Stove] – 6 ft – [Dish Basin]
Notes: Keep stove on flat ground; cooler shaded near Prep.
Example layout — Double‑stove family setup:
Wind →
[Food Storage] – 6 ft – [Prep Table (long)] – 6 ft – [Double Stoves side-by-side] – 8 ft – [Dish/Trash Station]
Notes: Use a long prep surface; keep a clear aisle for multiple cooks.
Example layout — Winter shelter (cold, snow):
Wind →
[Cooler in insulated box] – 3 ft – [Prep under tarp] – 4 ft – [Stove on elevated platform] – 6 ft – [Hot water & wash]
Notes: Raise stove above snow, maintain ventilation; avoid tent interior for open stoves.
Site assessment checklist
Inspect these features before setup — treat distances and conditions as guidance, not legal requirements:
- Wind direction and gusts — set up cook zone downwind of tents.
- Surface stability — level, firm ground; avoid loose rocks or soft snow.
- Slope/Drainage — avoid low points where runoff collects; place wash station downhill from food.
- Vegetation and fire fuels — clear at least 6 ft radius of flammable brush near cook zone.
- Fuel storage spot — cool, shaded, upright, and separate from stove by recommended distance.
- Water source — proximity for washing and emergencies; plan greywater containment.
- Camp rules & fire regulations — check local restrictions and permit requirements.
- Proximity to tents — prefer cook zone ≥ 10 ft (3 m) from sleeping areas when possible.
Stove and fuel placement
Follow these numbered safety distances and layouts as guidance (feet/meters shown). Adjust for wind, stove type, and manufacturer instructions.
- Minimum distance from tents and shelters: 10 ft (3 m) recommended. Exception: enclosed tent stoves must use manufacturer-specified vents and clearances.
- Fuel storage from stove: 6–10 ft (2–3 m) and always downwind of the stove. Store canisters upright on level ground.
- Open flame clearance: 3 ft (1 m) of clear vertical and horizontal space above and around burners.
- Cooking over snow/ice: elevate stove on a stable platform to prevent heat sink and instability; keep fuel insulated from freezing.
- Multiple-stove spacing: place stoves at least 2–3 ft (0.6–1 m) apart to avoid heat overlap and allow a safe work aisle.
Recommended quick layouts:
- Single stove: Stove centered on flat pad; fuel 6–10 ft upwind but accessible; prep table 4–6 ft side.
- Double stove (family): Stoves side-by-side with 2–3 ft separation; long prep table opposite; fuel box behind cook zone 8–10 ft.
- Winter shelter: Stove on raised platform with stable footing; fuel insulated box 6–8 ft away; secondary ventilation path maintained.
Safety note: Distances are guidance only—always follow your stove and fuel manufacturer’s instructions and local regulations.
Efficient wash station, greywater rules, and handwashing
Wash station setup — numbered steps for 2‑ and 3‑sink systems with required gear list
Required gear
- Two or three collapsible basins or tubs (sturdy, food‑safe)
- Large kettle or pot for hot rinse water
- Dish soap (biodegradable — see next section)
- Sanitizer (bleach or commercial sanitizer)
- Scrub brush and sponge
- Fine‑mesh strainer (for solids)
- Drying rack or clean towel
- Bucket for greywater collection/dispersal
- Gloves (optional)
- Measuring spoon or small bottle marked with dilution ratios
2‑sink system — numbered steps
- Wash: Fill Basin A with hot water (as hot as you can safely handle) and add a small amount of biodegradable soap. Scrub dishes to remove grease/food.
- Rinse: Fill Basin B with clean water (hot if possible). Rinse soap and loose particles.
- Sanitize: If required, use a sanitizing soak: place dishes in a sanitizing solution (see “Soaps and sanitizers”) for the recommended contact time (usually 1 minute).
- Dry: Air‑dry on a rack or a clean towel — do not towel‑dry if unsure of towel cleanliness.
3‑sink system—numbered steps
- Pre‑scrape/strain: Remove food scraps into a trash bag or compost (pack out) and use a fine‑mesh strainer to catch remaining solids.
- Wash: Basin A — hot soapy water; scrub thoroughly.
- Rinse: Basin B — clean rinse water to remove soap.
- Sanitize: Basin C — sanitizing soak solution (exact dilution in next section). Soak for required contact time.
- Dry: Air‑dry or place on a clean towel/rack.
Soaps and sanitizers
- Biodegradable soap examples: Dr. Bronner’s Castile Soap (concentrated castile), and other labeled biodegradable camp soaps or castile formulations. Prefer soaps clearly labeled biodegradable and low‑phosphate.
- Avoid: Using dish soap liberally at the shoreline or directly in lakes/streams; even biodegradable soap should not be discharged directly into water bodies.
Sanitizing methods (short bullets)
- Bleach (sodium hypochlorite) sanitizing solution: 1 tablespoon (15 mL) of household bleach per 1 gallon (3.8 L) of water. Soak cleaned dishes for at least 1 minute, then air‑dry. (Use unscented household bleach; discard solution after use.)
- Commercial food‑grade sanitizers: Follow manufacturer instructions for concentration and contact time.
- Boiling water: Submerge cleaned dishes in rolling boiling water for 1 minute (longer at high elevation) as an alternative when bleach or chemicals aren’t available.
Greywater disposal
Greywater (dishwater) should never be dumped directly into lakes, streams, or wetlands. Follow Leave No Trace principles: pack out food solids and minimize greywater impacts. Common practice for dispersed camping:
- Strain solids from greywater using a fine‑mesh strainer and pack those solids out with trash or compost where allowed.
- Disperse greywater by scattering it broadly on durable ground (not vegetation) at least 200 feet (≈70 meters) from any water source, trail, or campsite. If you collect greywater in a bucket, distribute it in small amounts over a large area to avoid concentration.
- Use biodegradable soap sparingly and only when water and local rules permit. Where campsite regulations or local land managers prohibit dispersal, follow those rules instead.
Note: some directions above (distance numbers and dispersal methods) reflect common backcountry practice; always confirm site‑specific rules with land managers. For official Leave No Trace dishwashing guidance, link to the Leave No Trace resource in your final page (do not duplicate here).
Food‑safety rules, thawing, meal planning, and special diets
Cooler safety and perishables
- Keep perishables at or below 40°F (4°C) — this is the commonly recommended safe-cold threshold (guideline: consult CDC/USDA for full guidance). Use a dedicated cooler thermometer and check it twice daily.
- Use layered cooling: frozen ice packs or blocks on bottom, refrigerated items in the middle, and a sealed top layer to minimize warm-air exposure.
- Limit cooler openings: every time the cooler is opened cold air is lost — plan access and group items so you open it once per meal.
- Safe times for high‑risk items (guideline):
- Raw poultry, ground meat, and seafood: minimize time in the “danger zone” (40–140°F / 4–60°C). Avoid leaving these unrefrigerated for more than 2 hours total (1 hour if ambient temps exceed 90°F/32°C). Label these numeric times as guidelines; verify localized guidance with CDC/USDA.
- Cooked foods and ready‑to‑eat perishables: follow the same 2‑hour/1‑hour rule for room‑temperature exposure.
- Thermometer usage: always use a calibrated instant‑read thermometer for both your cooler (to verify internal temp) and cooked foods (to confirm safe internal temps). Insert into the thickest part of meat or center of casseroles.
- Separate raw from ready‑to‑eat: store raw meat in sealed, leak‑proof containers under ready‑to‑eat foods to prevent cross‑contamination.
- Monitoring method: keep a quick log (time + cooler temp) for each day of the trip — useful for group cooks or long weekends.
Thawing and precook guidance
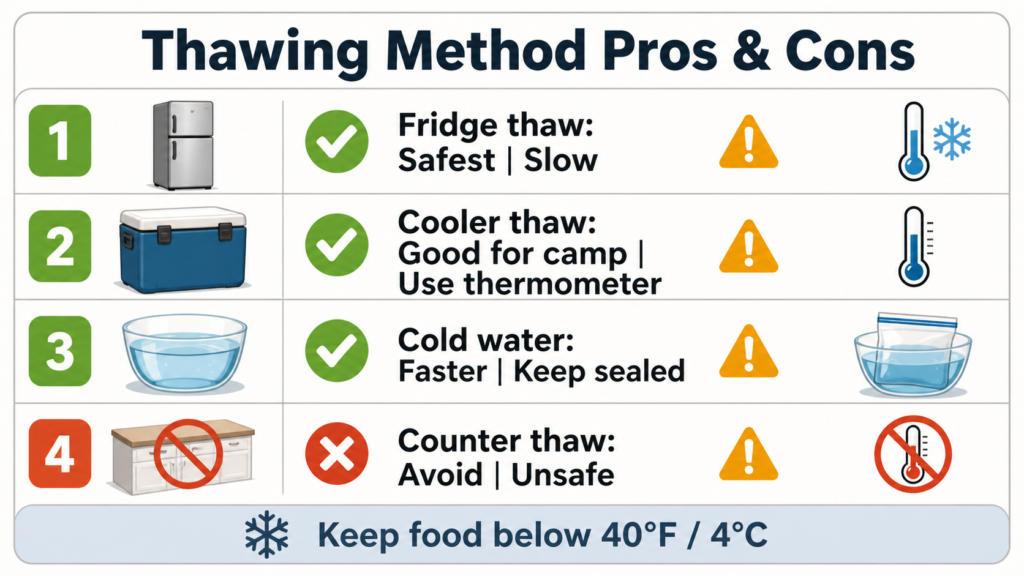
Recommended thaw methods (short list):
- Refrigerator thawing: move frozen item to cooler or fridge area to thaw slowly — safest method for texture and bacterial control.
- Cold‑water thawing in a sealed bag: place sealed meat in cold water, change water every 30 minutes until thawed; cook immediately after thawing.
- Precook then cool: partially or fully precook proteins at home, cool quickly in shallow pans, store in cold cooler, then finish or reheat at camp.
Examples and tips:
- Chicken breasts: refrigerator thaw overnight or cold‑water in sealed bag for a few hours; cook to safe internal temp when ready.
- Ground beef for tacos: precook at home, cool in shallow containers, pack in cooler, and crisp on skillet at camp.
- Prepped stew: cook fully at home, cool quickly, pack in a cooler; reheat to a safe internal temperature before serving.
Meal planning for groups and diets
Stepwise approach:
- Survey attendees: collect allergies, intolerances, and strict diets (vegetarian, vegan, gluten-free, religious restrictions) early.
- Design a flexible menu: choose 1–2 main proteins and multiple side options that can mix-and-match (e.g., grain bowl + protein + veg).
- Plan portions: estimate adult servings (typical guideline: 6–8 oz protein per adult meal when combined with sides) and add 10–20% buffer for groups; label quantities per container.
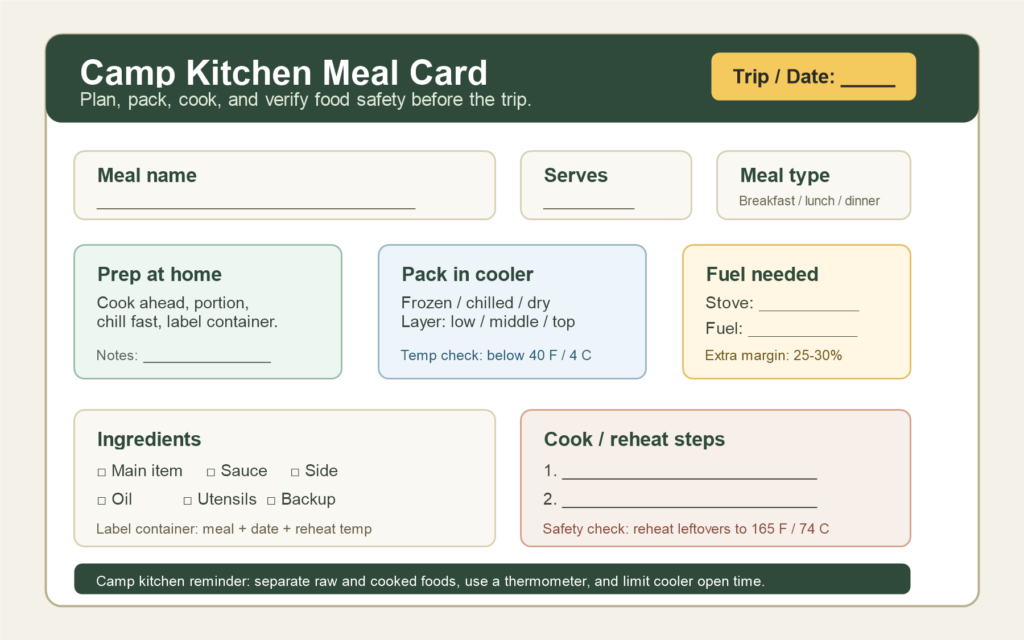
- Labeling and allergen control: use a simple, visible system — colored stickers or printed cards for each dish showing:
- Dish name
- Major allergens present (e.g., contains: peanuts, dairy, wheat)
- Whether vegetarian/vegan
- Date/time prepared
- Prepare separate stations: designate one prep surface/cookware for allergen‑free meals; store and serve allergen items separately to avoid cross-contact.
- Portion control and service: pre-portion where possible (individual bowls, single-serve wraps) to reduce cross-contamination and waste.
Example labeling method:
- Red sticker = contains nuts
- Blue sticker = dairy present
- Green sticker = vegan
Low‑waste meal ideas
- One‑pot chili (serves many): cook bulk at home, cool, pack in a single insulated container; reheat on camp stove. Serve in reusable bowls; pack leftover chili into resealable containers for next meal.
- Grain bowl kit: pre-cook quinoa or rice, portion into reusable jars with separate compartments (or small containers) for toppings — roasted veg, beans, and a small dressing bottle.
- Foil‑pack dinners: combine protein (fish/chicken/tofu), sliced veg, and a splash of oil and seasoning in foil; cook on grill. Single‑use foil, but minimal extra packaging.
- Wraps and prepped toppings: assemble fillings in separate containers (protein, chopped veggies, sauces). At mealtime, build wraps to order — reduces spoilage and accommodates diets.
- Breakfast oatmeal jars: portion oats, dried fruit, and nuts into jars; add hot water at breakfast. Reusable jars cut packaging waste.
Packaging and service ideas:
- Use stackable reusable containers and labeled lids.
- Bring a small set of reusable silicone bags for wet ingredients or sauces.
- Use shared serving utensils and a dedicated utensil for allergen dishes only.
Quick spoilage‑check checklist
- Smell: unusual sour or rotten odor — discard.
- Texture: slimy or tacky surface on meats or produce — discard.
- Thermometer: internal temperature in the cooler above 40°F (4°C) or cooked food below recommended safe reheating temp — treat as unsafe.
- When in doubt: discard questionable items rather than risk illness.
Reheating caution: always reheat leftovers to a safe internal temperature (consult CDC/USDA for exact targets) and avoid reheating more than once.
Organization hacks, lighting, and finding gear in the dark
Packing and labeling system
- Tote organization: Use stackable, clear plastic totes sized by function (cooking, cleaning, first aid, tools). Keep frequently used items in the top or a dedicated “day” tote.
- Tote interior layout: Group small items in zip pouches or small foam trays so tools don’t rattle and are easy to pull out. Reserve one tote as a “spare consumables” box (batteries, duct tape, fuel).
- Label methods: Attach waterproof, writable labels (Dymo or laminated index cards) on the tote front. Use a two-line label: line 1 = category (COOKING), line 2 = high-priority contents (STOVE, FUEL, LIGHTS).
- Drawer inserts and dividers: Fit lightweight plastic drawer inserts or EVA foam cut-outs into utility drawers to keep utensils, spice jars, and small gear separated and visible.
- Prep a contents list: Tape a printed contents checklist to each tote lid so you can verify items during setup and strike.
Hanging and storage solutions
Keep most hanging solutions simple and fast to deploy. Use a mix of permanent and portable systems so you can adapt by site and group size. Options:
- Carabiner rails — run a rope or webbing rail and clip gear with carabiners (pots, water jugs, lanterns).
- Pegboard — portable pegboard panel mounted inside the kitchen awning for predictable tool placement.
- Elastic bungee systems — store bulky soft items (rolled tarps, sleeping pads) off the ground with shock-cord loops.
- Heavy-duty hooks — screw-in or removable S-hooks for hanging pans, towels, and lanterns from crossbars.
- Collapsible racks — folding shelving units for stacked totes and the camp fridge to keep a clear work surface.
Lighting and night workflow
Use the right light for the task and place it to eliminate shadows and glare. Recommendations for common light types:
- Lanterns
- Best for: area illumination (dining, prep table).
- Pros: even 360° light, multiple brightness levels.
- Cons: heavy for long hikes; can create flat light if placed poorly.
- Placement: center of the table or hung above the prep area at head height.
- Headlamps
- Best for: hands-free close work (stove control, cutting, repairing).
- Pros: follows your gaze; conserves power by lighting only where you look.
- Cons: narrow beam can miss peripheral tasks; may cast your shadow on work surfaces.
- Placement: on person; keep a low-power red or dim mode option to preserve night vision.
- Rechargeable task lights
- Best for: focused, portable work (dishwashing, reading campsite maps).
- Pros: high lumen output, adjustable angles, USB-rechargeable with power stations.
- Cons: limited throw unless high-spec; watch heat on high settings.
- Placement: clamp or stake-mounted near sinks and prep surfaces; angle down to reduce glare.
- Battery flashlights (spot/beams)
- Best for: signaling, finding items at distance, quick searches.
- Pros: long throw; compact.
- Cons: poor area fill; not ideal for cooking groups.
- Placement: kept in a known pocket or central “finders” tote for quick retrieval.
- Placement recommendations (general)
- Layer lights: combine a lantern for area light + headlamps for individual tasks.
- Avoid placing bright lights behind prep surfaces — light should come from above or the side to reduce shadows.
- Keep a dedicated “night” tote with spare batteries, a lantern, and two headlamps so you don’t scramble after dark.
Consistent POV note: these tips use you throughout so your team can implement them quickly.
For guidance on campsite cleanup and sanitation best practices, see the CDC’s camping water and sanitation recommendations.
Cleaning, waste management, and Leave‑No‑Trace practices
Dishwashing best practices
Follow these numbered steps to minimize environmental impact and keep the camp kitchen sanitary:
- Wash — Use a biodegradable soap and hot water in a dedicated basin to remove food residue.
- Rinse — Rinse with clean water in a second basin to remove soap and loosened debris.
- Sanitize — Apply a food-safe sanitizing method (e.g., dilute bleach solution or commercial sanitizer) and allow appropriate contact time before use or storage.
- Pack out solids — Strain and collect food particles and solid waste in a sealed bag; pack out or dispose of solids according to local regulations
For additional guidance on minimizing impacts from dishwashing while camping, see: Leave No Trace dishwashing guidance.
Brief environmental note: improperly discarded food scraps and soapy runoff can alter local water chemistry and attract wildlife. Keep actions small and contained to reduce those effects.
Grease and cookware maintenance
Trash and food‑scrap management
Pack out all trash and control food scraps to avoid creating wildlife attractants. Store food and trash in bear‑proof containers or in a sealed vehicle where required, and use odor-resistant bags for food waste if you plan to carry it out.
If local facilities accept compostable waste, follow campground rules; otherwise, collect compostable scraps with your trash and pack them out. These practices reduce habituation of wildlife and lower the chance of site contamination.
Final site sweep — quick checklist
- Visual sweep for wrappers, food particles, and bottle caps.
- Smell check near cooking and storage areas for lingering odors.
- Check ground and firepit for buried food, grease spots, or partially burned trash.
- Secure all trash and food in sealed bags/containers before leaving.
Following these steps keeps your camp kitchen functional and minimizes impacts on the campsite and local wildlife, supporting sustainable camping and gear longevity.
Fire rules, legal permits, and keeping kids & pets safe
Regulations checklist — items to check with local rangers/websites
- Open-fire and stove rules in the specific unit (campground, forest, BLM area) — local restrictions change by season.
- Permit requirements for campfires, charcoal, or backcountry cooking.
- Campfire and food storage rules — Rules before going
- Fire danger level and current burn bans (red-flag days).
- Designated fire-ring / pit rules and approved fuel types.
- Distance and occupancy limits for group sites, bear boxes, and food storage lockers.
- Local waste and greywater disposal rules that affect cooking stations.
- Contact info for the local ranger station and how to report a wildfire or rule violation.
Fire‑safety distances and best practices (guidance)
- Keep cooking and open-flame activities at least 10 feet (3 m) from tents, tarps, vehicles, and flammable vegetation.
- Maintain a 15–25 foot (4.5–7.5 m) clear zone around larger campfires; clear to mineral soil if possible.
- Place portable stoves on a stable, non-flammable surface and 10 feet (3 m) from tent walls and low branches.
- Store fuel (propane cylinders, liquid fuel, spare canisters) at least 5 feet (1.5 m) from flames and heat sources, upright and away from direct sun.
- Keep a bucket of water, shovel, and a fire extinguisher or Class B/C extinguisher within reach of the cooking area.
- When extinguishing: douse with water, stir ashes, and feel for heat—do not leave until cold to the touch.
- These are guidance values—follow any stricter numeric rules posted by land managers.
- Replace absolute phrasing: do not rely on wind direction or temporary smokescreens to protect adjacent areas.
Family safety tips — zoning, barriers, and supervision
- Create zones: cooking/fire zone, play zone, sleeping zone — mark each clearly and keep gear confined.
- Physical barriers: use cones, rope, collapsible crowd-control poles, or a low mesh fence to define the cooking/fire perimeter.
- Active supervision: assign an adult to supervise kids and pets whenever food or fire is present; rotate responsibility on multi‑adult trips.
- Simple routines: teach kids a quick checklist—stop, look, step back—before approaching the camp kitchen; pets must sit or be leashed when food is being handled.
- Tool rules: keep cookware handles turned inward, utensils out of reach, and hot liquids on a lower table level.
- Emergency plan: establish a meetup point and rehearse a basic burn or choking response and how to call for help (know nearest ranger contact).
DIY chuck box, portable tables, and simple mods
Chuck box build plan
Materials (for a single 36″ wide chuck box shown below — adjust to fit your stove/cookware):
- Materials
- 3/4″ exterior-grade plywood: 2 sheets (4′ x 8′)
- 1/4″ plywood (backs, drawer bottoms): 1 sheet
- 2×2 pine (frame/reinforcement): 4 pieces (8′ lengths)
- Full-extension drawer slides (pair) × 2
- Piano hinge or two continuous hinges (36″)
- Heavy-duty toggle latches × 2–3
- Corner/edge protectors × 4
- 2″ wood screws, 1-1/4″ screws, and #8 machine screws for hardware
- Handles (recessed or rope) × 2
- Weatherproof sealant or marine varnish (1 quart)
- Foam or non-slip drawer liners
- Optional: propane regulator shelf hardware, spice rack hardware, cutting-board slide hardware
- Estimated weight (finished, empty): 45–65 lb (depends on wood choice and hardware)
- Tools required: circular saw/table saw, drill/driver, router (for handle recesses), measuring square, sander. Power tools recommended; flag if you want a hand-tool-only build.
Exterior dimensions (recommended baseline — adjust to fit gear):
- Overall exterior: 36″ W × 18″ D × 30″ H (closed)
- Note: If you use a larger camp stove or griddle, increase width to 42″–48″.
- Top lid/working surface when open: 36″ W × 36″ D (with fold-out side or lid support)
- Interior usable depth: ~16″ (allow for 3/4″ plywood each side)
- Drawer interior size (example): 32″ W × 14″ D × 4″ H (fits flatware/cookware lids)
- Flag: if your cookware is >12″ diameter or stove is taller than 6″, you must increase internal height; these dimensions may be too small — measure gear before cutting.
Numbered build steps (concise)
- Measure and plan — inventory all gear (stove, pots, plates, fuel) and record maximum widths/heights. Confirm stove footprint and ventilation clearances. (If missing these, stop and measure now.)
- Cut panels — cut top, bottom, two sides, front, back, and internal divider/outlet openings from 3/4″ plywood to the exterior dimensions above. Label each piece. (Power tool: circular/table saw.)
- Assemble frame — build a 2×2 internal frame glued and screwed to bottom panel to reinforce weight-bearing areas (stove shelf, drawer openings).
- Attach sides and back — stand the box and screw the sides and back to the bottom and frame; check for square with a carpenter’s square.
- Fit interior shelves — install fixed shelves for heavy items (stove and fuel) and a top shelf for spices/coffee. Use 3/4″ cleats screwed into side panels. Suggested stove shelf height: 6″–8″ from bottom (adjust to stove height).
- Build and install drawers — construct shallow drawers from 1/2″ or 3/4″ plywood; mount with full-extension slides centered in drawer opening. Leave 1/8″ clearance each side.
- Install lid and supports — attach lid with piano hinge at back; add lid stays or support brackets to hold the lid fully open at 90°. If you want a fold-out work surface, mount a sliding bracket or flip-out leaf that rests on removable legs.
- Hardware and organization — attach toggle latches on front, recessed handles on sides, and edge protectors. Mount spice racks to inside lid and add a dedicated cutting-board slot (vertical or slide-out).
- Finish and weatherproof — sand, apply sealant/varnish on all exterior surfaces and edges. Seal screw holes and edges with waterproofing to reduce water ingress.
- Load test — pack all gear and test opening/closing, drawer operation, and stove ventilation. Note any interference; adjust shelf heights or add ventilation cutouts as needed.
Interior organization suggestions (practical layouts)
- Top lid: vertical spice rack, utensils hooks, paper towel holder.
- Upper shelf: plates, small bowls, coffee/tea canisters in bins.
- Middle drawer(s): cutlery, small tools, fuel accessories (organized with foam inserts).
- Stove shelf (bottom): fixed shelf with ventilation and clearance; secure stove with strap or bracket.
- Side panels: pegboard or elastic webbing for potholders, tongs, lighter.
- Add labels for each compartment and foam padding where glass or light items sit.
Portable table designs
- Folding-leg tables
- Description: Prebuilt tables with telescoping or folding legs (typical camp table).
- Typical dimensions: 24″–36″ W × 18″–24″ D × 28″–30″ H.
- Weight/transport: 8–18 lb; most fold flat for carrying; fits in trunk or roof box.
- Pros: quick setup, stable on flat ground, often no tools required.
- Cons: limited load capacity (check manufacturer), bulk when transporting.
- Tools: none required for assembly; no power tools to build.
- Custom fold-out designs (integrated into chuck box or trailer)
- Description: hinged table panels that fold out from a box or vehicle; can include gas struts or drop-leg supports.
- Typical dimensions: 30″–48″ W × 18″–24″ D when deployed.
- Weight/transport: integrated — adds weight to the box (estimate +6–15 lb depending on materials).
- Pros: saves standalone table, large continuous workspace, tailored storage.
- Cons: requires precise hinges and support brackets; may need reinforcement.
- Tools: power tools required (saw, drill); metal brackets may need hardware/drilling.
- Compact prep boards / slide-out cutting surfaces
- Description: small, removable cutting boards or slide-out prep boards that stow under a lid or in a drawer.
- Typical dimensions: 12″–18″ W × 10″–24″ D.
- Weight/transport: 1–4 lb each; easy to carry.
- Pros: lightweight, packable, inexpensive, sanitary surfaces.
- Cons: limited workspace; multiple boards may be needed.
- Tools: minimal; router or jig saw useful for creating slides.
Comparison bullets (quick)
- Stability: Folding-leg > custom fold-out (if well-reinforced) > compact prep boards.
- Packability: Compact prep boards > custom fold-out (integrated) > folding-leg tables.
- Build difficulty: Folding-leg (none) < compact prep boards (easy) < custom fold-out (advanced — power tools required).
- Recommended use: Families/large meals: folding-leg or custom fold-out. Solo/couple/minimalist: compact prep boards.
| Camp Kitchen Setup | Packed Weight | Footprint at Camp | Typical Load Capacity | Best Use |
|---|---|---|---|---|
| Small folding side table | 2-6 lb | Low | 20-50 lb | Solo meals, coffee setup, light prep |
| Roll-top aluminum table | 8-15 lb | Medium | 50-100 lb | 2-4 people, prep station, dish setup |
| Full camp kitchen table | 15-30+ lb | High | 75-150+ lb | Group cooking, stove stand, multi-zone kitchen |
| Portable chuck box / kitchen box | 20-50+ lb loaded | Medium to high | Depends on table or stand used | Organized gear storage and repeat car-camping trips |
Quick gear modifications
- Secure lids and containers
- Use toggle latches or padlock hasps on cooler/chuck box lids to prevent accidental openings. For plastic containers, add metal strap clamps or bungee cord loops anchored to the box.
- How-to: mark lid centerline, install two latches equidistant from center, pre-drill pilot holes, torque screws to avoid stripping.
- Add drainage and ventilation
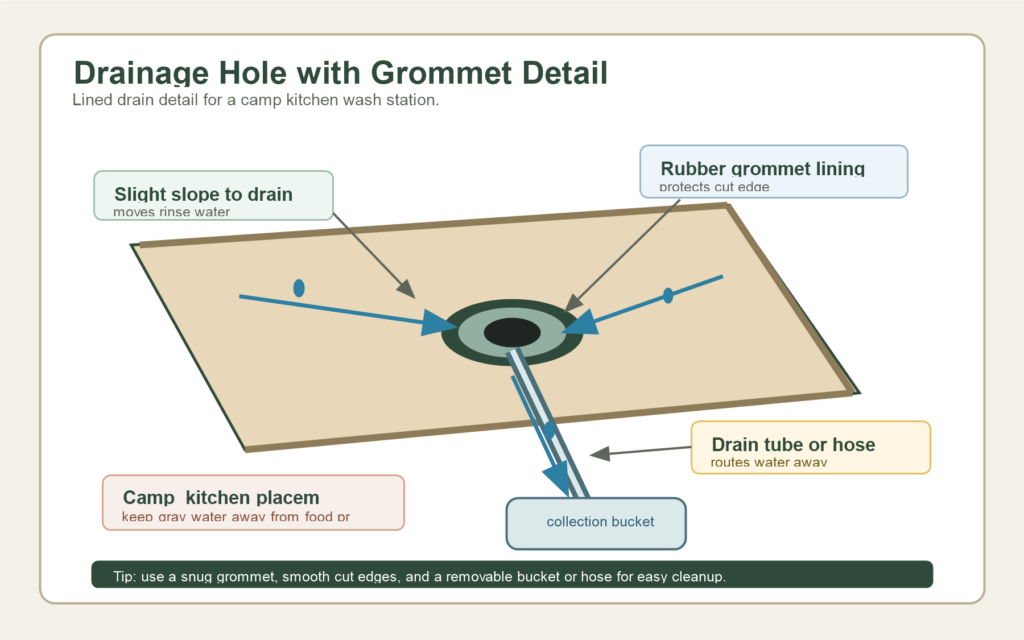
- Drill 1/4″–3/8″ drainage holes in the lowest rear panel of camp sinks/cooler boxes and fit with rubber grommets or a threaded bulkhead and plug for controlled draining.
- For stove or fuel compartments, add ventilation slots (1″ wide × 6″ long) near the top and bottom of the compartment for passive airflow; protect with screen to keep insects out.
- Warning: keep fuel storage ventilation separate from cooking surface and comply with propane regulator clearances.
- Strap systems and load security
- Install anchor points (D-rings or cam-buckle straps) inside boxes to secure heavy gear and prevent shifting in transit.
- How-to: screw D-rings into 2×2 frame blocks, not just thin plywood; use stainless hardware for corrosion resistance.
- Drainage-friendly cutting boards and sink mods
- Add small 1/8″–1/4″ chamfered grooves on board edges for juice runoff; store with a slight angle for drying.
- Non-slip and leveling feet
- Fit adjustable rubber feet or folding legs with thread-in adjustable studs to level tables on uneven ground.
- Heat and splash protection
- Attach a removable heat shield (thin aluminum sheet with standoffs) behind the stove shelf to protect plywood. Bolt through with spacers to allow airflow.
- Quick-release cooktop mount
- Use a slide-in bracket for your stove (two vertical angle-iron pieces with captive bolts) so the stove is secured but removable for cleaning.
- Simple electrical mods
- Mount a fused 12V distribution block with inline fuse for lights or small devices; keep wiring tidy and use cable glands at entry points.
- Warning: If wiring >12V/15A runs are involved, consult a tech or use a certified marine-grade harness.
Practical notes and warnings
- Weight & transport: list estimated finished weight for each option and consider vehicle load limits and lifting help for >50 lb items.
- Power tools required: custom fold-outs, recessed handles, and routed slides typically require saws/routers — label those steps as “power-tool required.”
- Safety: when adding drainage or ventilation near fuel, maintain separation and avoid creating ignition paths; always use stainless or galvanized hardware near water.
Routine maintenance, pre‑trip checklist, and post‑trip care
Stove and grill maintenance — numbered steps for cleaning and winterizing
- Cool and disconnect — turn off fuel, let unit cool completely, then disconnect fuel canister or hose.
- Remove loose debris — brush out ash, food particles, and grease with a stiff brush and compressed air (if available).
- Disassemble removable parts — grates, burners, drip trays, and jets. Keep small parts together in a labeled container while cleaning.
- Clean surfaces — wash grates and trays with hot soapy water; use a non‑abrasive pad for coated surfaces. For stubborn carbon, soak parts 30–60 minutes before scrubbing.
- Clear burner ports and jets — use a soft wire or manufacturer‑recommended tool to remove blockages; avoid enlargement of ports.
- Inspect seals and fittings — check O‑rings, gaskets, hose crimps, and regulator for cracks, brittleness, or deformation; replace any suspect parts.
- Test for leaks — after reassembly, perform a soap‑bubble test on connections with a low gas flow (outdoors, away from flames).
- Winterize / long‑term storage:
- Drain fuel — remove and safely dispose of or store fuel canisters per manufacturer guidance. If using liquid fuel stoves, follow the maker’s purge procedure.
- Dry thoroughly — wipe all components dry; leave open to air dry to prevent corrosion.
- Store in a dry place — use a sealed container or gear bag with desiccant packs.
- Protect seals — apply light silicone grease to O‑rings before storage if recommended by manufacturer.
- Schedule — clean after every trip; perform full inspection and winterize at end of season or before long storage. (Suggested intervals; replace parts per manufacturer specifications.)
Cookware care and storage
- Cast‑iron (seasoning & care)
- After use: wipe out excess food; rinse with hot water only (no soap if preserving seasoning).
- Dry immediately and heat briefly to evaporate moisture.
- Apply a thin coat of cooking oil while warm to maintain seasoning.
- For rust spots: scrub to bare metal, dry, and reseason with multiple oil‑bake cycles.
- Stainless steel (cleaning)
- Use warm soapy water and non‑abrasive pads; remove burnt food with a paste of baking soda + water.
- For stubborn discoloration, use a stainless cleaner or diluted vinegar soak.
- Avoid stacking damp pans to prevent water spots and corrosion.
- Packing and storage
- Nest cookware with protective cloth or paper between items to prevent scratching.
- Store cast‑iron dry and lightly oiled; keep stainless dry and ventilated.
- Pack lids separately or inverted with a soft divider to reduce rattling and damage.
Pre‑trip and post‑trip checklist
- Before you leave home:
- Fuel & supplies — fuel canisters full or new; spare fuel and refill adapters packed.
- Parts & tools — spare O‑rings, regulator, cleaning kit, multi‑tool.
- Test — light stove/grill briefly at home to confirm function (outdoors).
- Pack — cookware, utensils, cleaning rags, and storage bags organized and secured.
- At camp (daily):
- Wipe cooking surfaces after each meal.
- Store opened fuel and food per safety rules.
- After each trip (mandatory):
- Clean — wash grates, burners, cookware; remove grease and food residue.
- Dry — fully dry all components; air‑dry overnight if possible.
- Inspect — check seals, hoses, burners, and cookware for wear or damage.
- Replace/repair — swap any worn O‑rings, cracked seals, or damaged cookware.
- Pack for storage — winterize stoves/grills if storing long‑term (see above); store gear dry.
- Annual (recommended):
- Deep clean and service — disassemble and clean jets, perform leak tests, and replace manufacturer‑recommended consumables.
- Professional service for complex repairs or if you notice persistent issues.
Final step: confirm everything is cleaned, tested, and stored — ready for the next trip.
How camp kitchen choices connect to core camping gear decisions
Gear interactions
The camp kitchen interacts with core camping gear in several practical ways. Stove vs. tent placement affects safety and ventilation—stoves need a stable, well-ventilated spot away from tent walls. Cooler vs. power determines whether you rely on ice logistics or a powered fridge and battery capacity. Table size vs. tent footprint influences campsite layout: a larger table may require more clear space and change tent entrance/awning placement. Stove vs. wind management impacts burner choice and pot stability—wind screens or low-profile stoves reduce heat loss and flare-ups. Power station vs. refrigeration ties cooking plans to available watt‑hours and recharge options (solar, vehicle) because continuous fridge draw can dominate a camp power budget. These intersections are factual considerations that change gear choices, campsite layout, and how much power and space you must plan for.
Decision workflow
- Assess shelter first: consider tent size, vestibule/awning space, and allowable stove placement before selecting table or stove footprint.
- Estimate power needs next: prioritize refrigeration and any electric cooking or charging loads when choosing a power station or cooling method.
- Match stove to site conditions: if windy or restricted, prioritize wind-resistant or enclosed-burner stoves over larger, higher-output models.
- Fit kitchen footprint to tent layout: select table size and accessory placement to preserve circulation and emergency egress.
- Balance portability vs. capability: prioritize lighter, compact kitchen gear for backcountry or choose higher-capacity powered options for vehicle or basecamp setups.
Frequently Asked Questions
- How long will food stay cold in a cooler?
Short answer: It depends on cooler type, ice/ice-pack strategy, and opening frequency. Typical retention ranges from ~12–48 hours (estimate) for soft coolers and standard hard coolers, and longer for high‑end rotomolded coolers or electric fridges. Check the Coolers & Food Storage section for packing tips and tests:
Tip: verify with a thermometer inside your cooler — the estimate above is a guideline, not a guarantee.
- Can I precook meals and store them safely at camp?
Short answer: Yes — with proper cooling and reheating. Precook, chill quickly, keep below 40°F (4°C) while stored, and reheat to safe temperatures before eating. See the full food‑safety and meal‑planning guidance here.
- How much fuel should I plan to bring per day?
Short answer: It varies by stove, cooking style, and group size. A rough rule: estimate small canister stoves at ~1 canister per 2–4 days for solo cooking, or ~0.5–1 canister per person per day for heavy use — label these as estimates only.
Recommendation: confirm with your stove/ fuel documentation and carry an extra canister or backup heat source.
Frequently Asked Questions About Camp Kitchens
How long will a cooler keep food cold on a multi‑day trip?
How long a cooler keeps food cold depends on cooler type, ambient temperature, and packing technique. Hard rotomolded coolers with block ice typically hold 3 to 5 days in moderate conditions; soft coolers and budget hard coolers usually last 1 to 2 days.
Maximizing retention means pre‑chilling the cooler and contents, using block ice or frozen bottles rather than loose ice, layering food to minimize air gaps, separating raw meat in sealed containers, and opening the lid as little as possible.
Expect shorter performance in heat and plan to replace ice or use supplemental ice packs on day two or sooner when temperatures climb. Monitor internal temperature with a small thermometer and discard perishables if the cooler reads above 40°F (4°C) for more than two hours.
Is it safe to precook meat at home and reheat at camp?
Precooking meat at home is safe if you follow the same temperature and cooling rules you use for home food safety. Cook to the recommended internal temperature, cool rapidly in shallow containers, and refrigerate or freeze until departure.
Keep precooked items frozen solid in the cooler and reheat them at camp to at least 165°F (74°C) before eating. Use sealed, BPA‑free containers and separate raw and cooked foods in the cooler to avoid cross‑contamination.
If you cannot keep the item below 40°F (4°C) during transit or camp storage, plan to cook fresh instead. This method reduces meal‑time work and fuel use while preserving safety when you maintain cold chain and reheating targets.
How much propane or fuel should I bring per day for a two‑burner stove?
Daily fuel use varies by meal plan, stove output, and how many burners run simultaneously. A two‑burner propane stove with 10,000 to 20,000 BTU total typically uses about 0.5 to 1 pound of propane per hour at medium to high output.
For moderate cooking (breakfast, dinner, simple reheats) plan on roughly 0.5 to 1 pound of propane per person per day, or about one 16.4 ounce (1 lb) cylinder for 2 to 4 people for a single day of moderate use.
If you boil a lot of water, run both burners, or are cooking for larger groups, double that estimate. For liquid‑fuel or white‑gas stoves consult the stove’s burn‑time specs and bring at least 25 to 30 percent extra fuel to cover wind, colder temps, and longer cooks.