
Managing power on a campsite is a steady tradeoff between capacity, output and recharge options. Many campers underestimate the Wh needed for a fridge or CPAP or overestimate how quickly panels will recharge a depleted battery, resulting in lost comfort or abandoned plans.
That shortfall matters because it can affect safety, spoilage and trip continuity as much as convenience. Choosing the wrong station can leave you without refrigeration, without medical device support or hauling unnecessary weight.
This guide covers how to size a station by watt‑hours and continuous watts, how to calculate real‑world runtimes for phones, lights, fridges and CPAP, how to recharge by AC, vehicle or solar including solar panel sizing, safety and lifespan tradeoffs, portability and transport rules, model recommendations for lightweight, weekend and multi‑day use (typical capacity ranges: <300Wh, 300–1000Wh, 1000–3000Wh), and how to build a solar plus battery system for multi‑day trips.
Begin with power basics and the simple runtime math that underpins every sizing decision.
what this guide covers
Who this guide is for and what decisions it helps with
This guide helps campers and gear buyers choose the right portable camping power station by translating real-world device specs into practical choices for trips. It focuses on the decisions you care about: how much capacity you actually need, trade-offs in weight and expandability, and how to match a unit to devices and trip length.
At-a-glance capacity recommendations
- Weekend car camping: ~300–1000 Wh
- Multi-day off-grid: 1000–3000 Wh (or modular systems you can expand)
- Lightweight/backpacking: <300 Wh
Power basics: Wh, W, runtime math and inverter ratings
Define watt‑hours
Watt‑hour (Wh): a measure of stored energy — how many watts a battery can deliver for one hour.
Formula: Wh = Ah × V
Define watts and continuous vs surge inverter power
Watt (W): the rate of electrical power consumption or delivery at an instant (volts × amps).
- Continuous (rated) power: the wattage an inverter can supply continuously without overheating.
- Surge (peak) power: the short, higher wattage an inverter can deliver for seconds to start motors or compressors.
- Rule of thumb: pick an inverter whose continuous rating exceeds your device’s steady watts and whose surge rating covers startup draws.
Runtime calculation (use this formula first)
Runtime ≈ Wh ÷ device W × inverter efficiency
Notes: use the lower (85%) efficiency for conservative planning; appliances with motors/defrost cycles may have higher average draws than nameplate.
Transition to Capacity & Power Output decisions
Now that you can convert Wh → runtime and understand continuous vs surge W, use those figures to choose a station whose Wh meets your total runtime needs and whose continuous/surge W ratings cover the devices you plan to run.
How big a power station do I need? Capacity and output considerations
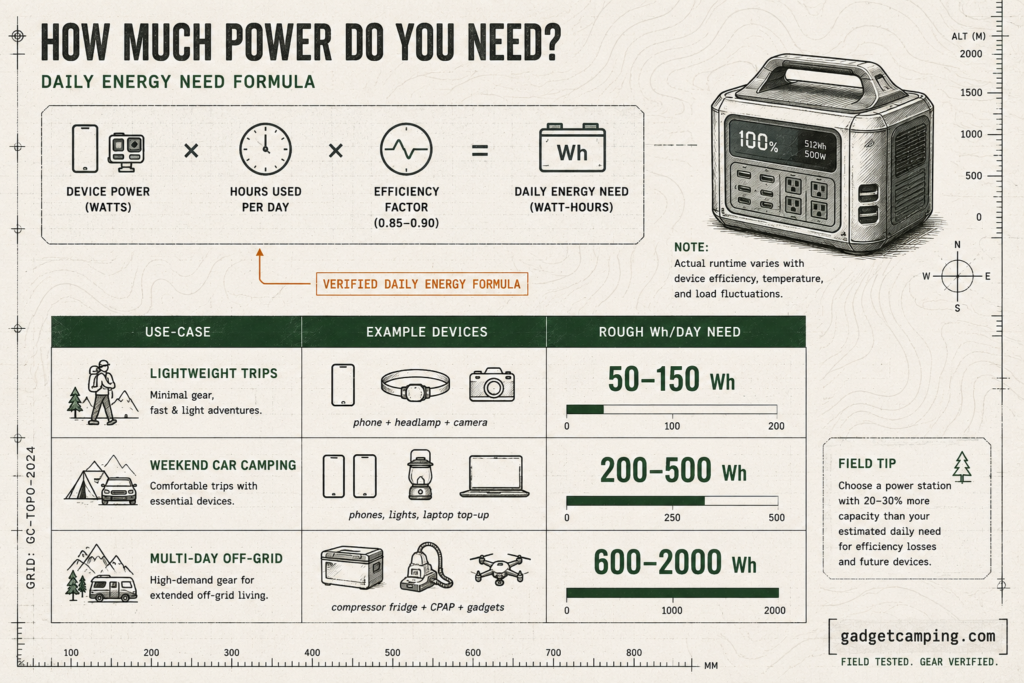
Choose capacity by the trip type. Below are three common camping use-cases with typical devices listed so you can match a power station capacity to your needs.
- Weekend car camping (1–2 nights, vehicle nearby)
- Typical devices: phone (1–2), LED lanterns, small Bluetooth speaker, occasional laptop charging
- Suggested portable station: 200–500 Wh (enough for multiple phone/laptop charges and lights)
- Multi-day off-grid (3+ days, boondocking / rooftop solar possible)
- Typical devices: 12V compressor fridge, several phones/tablets, camera batteries, CPAP (if needed), LED lights, occasional hotplate or 12V accessories
- Suggested portable station: 500–2000 Wh (fridge and CPAP significantly increase needs)
- Lightweight/overnight trips (1 night, backpacking or minimalist car-camp)
- Typical devices: headlamps, phone, small camera battery, GPS device
- Suggested portable station: 100–300 Wh
Compact inline reference (typical device energy draw — approximate):
Can it run heavy appliances? Watt limits, surge vs continuous, practical guidance
Portable camping power stations have two important output ratings: continuous (continuous W) and surge/peak (peak W).
Use this checklist to decide if a station will run a heavy appliance.
- Check the continuous (rated) output — the sustained wattage the inverter supports (e.g., 1000 W continuous).
- Check the surge/peak output — short bursts the inverter can handle for motor starts (e.g., 2000 W for a few seconds).
- Compare appliance starting (surge) watts vs running (continuous) watts:
- Motors (fridge compressors, pumps) often have 3–6× startup surge above running watts.
- Resistive loads (toasters, kettles, hair dryers) have high continuous watts — usually not suitable for small stations.
- Practical watt limits:
- Small stations (≤500 W continuous): fine for phones, laptops, fans, low-power CPAPs; NOT ideal for medium fridges or induction cooktops.
- Mid stations (1000–1500 W continuous): can run most 12V compressor fridges, medium CPAP units, small slow cookers; check surge spec for compressor start.
- Large stations (≥2000 W continuous with high surge): can run larger microwaves, powerful induction cooktops, high-draw AC units (short term) if surge capacity matches.
- Quick examples:
- 12V compressor fridge: running ~30–100 W, starting surge 200–600 W (varies).
- CPAP: typical running 20–60 W, low surge; many run on 12V adapters — check your model.
- Hair dryer / kettle: 1000–2000+ W continuous — usually needs a large (and inefficient) generator, not a small station.
If you plan to run motors, always ensure the station’s peak rating exceeds the appliance’s surge requirement and that sustained draw stays below the continuous rating.
Sizing examples for refrigerator (12V compressor) and CPAP—recommended Wh and continuous W with rationale
Below are practical sizing recommendations and the math behind them, using published device figures as references.
Refrigerator (12V compressor—example: Dometic CFX3 class)
- Recommended capacity: ~700 Wh per 24 hours and inverter capacity ≥500 W continuous (to cover start/stop and occasional heavier draws).
- Rationale / calculation:
- Manufacturer example: Dometic CFX3 100 lists ~682 Wh per 24 hrs depending on ambient tempreture.
- If fridge uses ~700 Wh/day, a 1000 Wh station will run it ~1.3–1.4 days without recharge (1000 Wh / 700 Wh ≈ 1.43 days), assuming no other loads.
- Continuous W: measured running power commonly 30–100 W while compressor cycles; allocate ≥500 W continuous inverter so startup surges (typically a few hundred watts) are handled reliably.
CPAP (typical home CPAP without heated humidifier)
- Recommended capacity: ~50–150 Wh per night and inverter capacity ≥100–300 W continuous depending on model and humidifier use.
- Rationale / calculation:
- Typical CPAP draw (without heated humidifier) commonly ranges ~20–60 W during operation; with heated humidification or heated tubing this can rise to 70–100+ W or more — see CPAP guidance and device power references CPAP.com overview and ResMed battery/adaptor notes.
- Example calculation: CPAP at 40 W × 8 hours = 320 Wh per night. A smaller travel CPAP at 10–20 W × 8 hours = 80–160 Wh.
- Recommendation: pick a station sized to cover your CPAP model: for typical machines without humidifier, a 300–600 Wh station will run one night comfortably; if you use humidification, plan ≥500–1000 Wh.
- If you include both fridge and CPAP, add Wh values: e.g., fridge 700 Wh/24h + CPAP 320 Wh/night ≈ 1020 Wh/day — pick a 1200–2000 Wh station for one-day autonomy.
If you plan precise packing, measure your device’s watt draw (label or meter) and multiply by run hours — any numeric recommendation above is given with the cited device examples and the calculation shown.
How many devices at once — ports, combined continuous limits, and example loads
When deciding how many devices you can run simultaneously, use two rules:
- Total simultaneous draw must be below the station’s continuous output rating.
- Individual ports may have per-port limits (e.g., USB-A 18 W, USB-C 100 W, AC 600 W).
Bulleted guidance:
- Count major AC loads (fridge, CPAP, laptop) toward the continuous watt limit first.
- Use USB ports for phones/tablets — these rarely constrain the overall AC budget.
- Avoid running resistive high-watt appliances (kettle, hair dryer) with small stations.
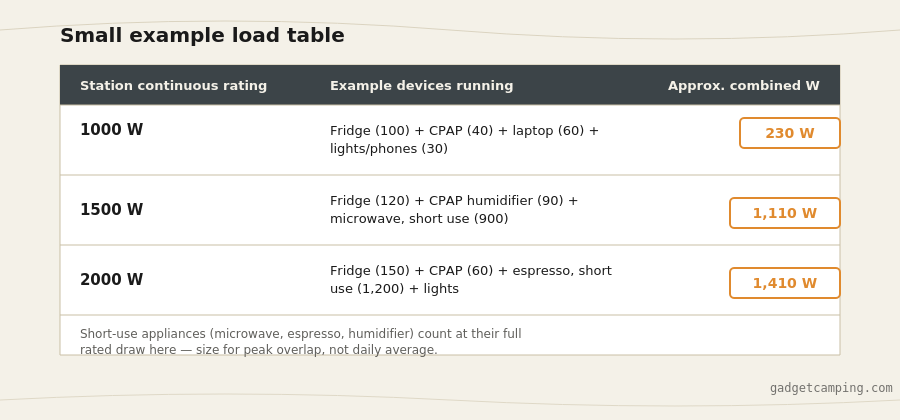
Example combined loads for common station classes (illustrative):
- Under 1000 W continuous station:
- Example simultaneous load: fridge (100 W running) + CPAP (40 W) + laptop (60 W) + 2 phones (10 W total) = 210 W — well under 1000 W.
- You could add a small 500 W hotplate briefly if surge allows, but continuous limits and efficiency matter.
- Under 1500 W continuous station:
- Example simultaneous load: fridge (120 W) + CPAP with humidifier (90 W) + microwave (900 W short use) + lights/phones (30 W) = 1140 W — within 1500 W continuous; check surge capacity for microwave start and fridge compressor.
- Under 2000 W continuous station:
- Example simultaneous load: fridge (150 W) + CPAP (60 W) + full-size espresso machine (1200 W briefly) + laptop + lights = ~1410 W continuous acceptable; check that peak surges (espresso pump, compressor) do not exceed peak rating.
Transition to runtimes
- After you pick a capacity class and confirm inverter ratings, use Wh-to-runtime math and inverter efficiency to estimate real-world runtimes — see next section: Power basics: Wh, W, runtime math and inverter ratings.
Real-world runtimes: phones, lights, portable fridges, CPAP and common campsite gear
Assumptions and methodology
- Battery usable capacity: assume full-capacity Wh (300, 1000, 2000 Wh) and account for conversion losses where appropriate.
- For AC devices (powered through an inverter) assume 90% inverter efficiency (usable Wh = capacity × 0.9).
- For 12 V DC loads (runs directly from a 12 V output), assume 95% conversion efficiency.
- Fridge duty cycle / average draw: when a compressor spec is listed (running watts), we convert to an average draw using a 50% duty cycle unless otherwise noted (i.e., average = running watts × 0.5). If a different duty cycle is used in field tests, it will be labeled field-tested.
- Device energy per event: for intermittent loads (phone charge, camera battery) we list Wh per full charge rather than a continuous wattage.
- Rounding & presentation: numbers are rounded to sensible values for planning. When numbers are specific to a model or test, they are marked field-tested/lab-tested.
- Thermal/environmental effects: colder temps may reduce usable capacity — add ~10–20% margin in cold-weather planning.
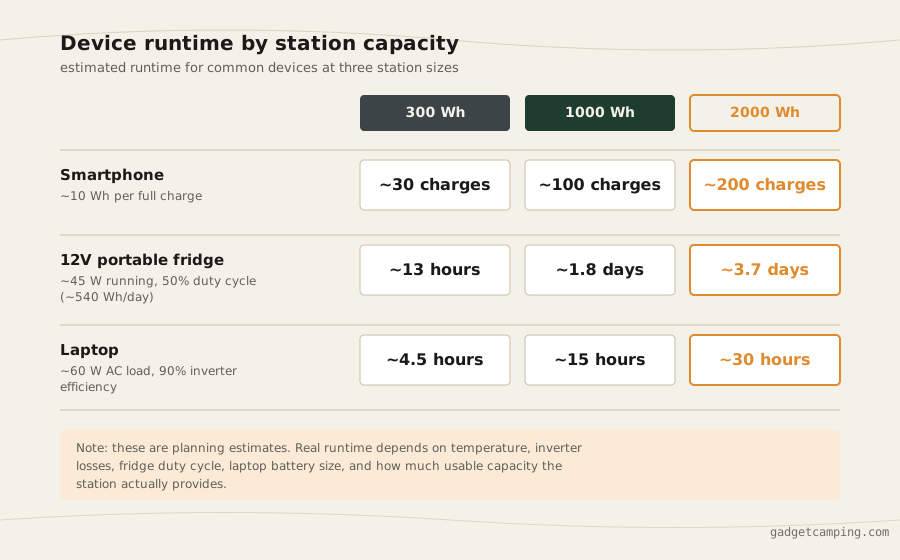
Table of common devices, assumed draws, Wh/day and expected runtime on 300Wh / 1000Wh / 2000Wh
field lab • device runtime reference
| Device | Assumed draw / use | Duty cycle | Wh per day (or event) | 300 Wh | 1000 Wh | 2000 Wh |
|---|---|---|---|---|---|---|
| Smartphone (full charge) | 10 Wh / charge | per full charge | 10 Wh / charge | ~30 charges | ~100 charges | ~200 charges |
| LED camp light | 5 W | 4 hr/day → 20 Wh/day | 20 Wh/day | ~15 days | ~50 days | ~100 days |
| 12V portable fridge | 45 W running | 50% duty cycle → avg 22.5 W | 540 Wh/day | ~0.56 day (≈13.3 hr) | ~1.85 days | ~3.7 days |
| CPAP (small DC unit) | 40 W | continuous, 8 hr sleep → 320 Wh/night | 320 Wh/night | ~0.9 night (≈7.5 hr) | ~3.1 nights | ~6.2 nights |
| Small induction cooktop | 1,200 W | 15 min cook → 300 Wh/session | 300 Wh/session | ~1 session (≈0.9 after inverter loss) | ~3 sessions | ~6 sessions |
| Laptop | 60 W | 2 hr use → 120 Wh/day | 120 Wh/day | ~2.5 days | ~8.3 days | ~16.6 days |
| Rechargeable headlamp | 3 W | 8 hr → 24 Wh/day | 24 Wh/day | ~12.5 days | ~41.6 days | ~83.3 days |
Notes on the table:
- AC loads assume 90% inverter efficiency. Example: a 300 Wh station used for a 60 W AC laptop effectively provides 300 × 0.9 = 270 Wh to the laptop, so runtime = 270 / 60 = 4.5 hours (we present rounded planning numbers).
- Fridge average draw uses 50% duty cycle unless explicitly marked as field-tested.
Individual device runtime examples (short bullets + calculation line)
- Phone — quick planning
- Assumption: full charge ≈ 10 Wh.
- Calculation: 300 Wh → 300 / 10 = ~30 charges. 1000 Wh → ~100 charges. 2000 Wh → ~200 charges.
- LED camp light (5 W)
- Assumption: 5 W, used 4 hours/night → 20 Wh/night.
- Calculation: 300 Wh → 300/20 = ~15 nights. 1000 Wh → ~50 nights. 2000 Wh → ~100 nights.
- 12 V portable fridge (45 W running, 50% duty)
- Assumption: running 45 W, 50% duty → avg 22.5 W → 540 Wh/day.
- Calculation: 300 Wh → 300/540 = ~0.56 day (~13 hours). 1000 Wh → ~1.85 days. 2000 Wh → ~3.7 days. (If your fridge is field-tested with a different duty cycle, use that figure instead.)
- CPAP (40 W)
- Assumption: 40 W running during sleep; 8-hour use → 320 Wh/night.
- Calculation: 300 Wh → 300/320 = ~0.9 night (not a full night). 1000 Wh → ~3.1 nights. 2000 Wh → ~6.2 nights.
- Small induction (1,200 W)
- Assumption: 1,200 W but short sessions; 15 min session = 0.25 hr → 300 Wh/session. Inverter losses reduce usable energy slightly.
- Calculation: 300 Wh → ~1 session (almost fully consumed). 1000 Wh → ~3 sessions. 2000 Wh → ~6 sessions.
Scenario 1 — Weekend car camping (1–2 nights): stepwise energy budget and recommended station size
- List typical uses: 2 phone charges/day (2 × 10 Wh = 20 Wh), LED lighting 4 hr/night (20 Wh/night), small speaker 10 W for 4 hr (40 Wh/night), occasional laptop top-up 60 W for 1 hr (60 Wh).
- Total per night (example, 2 people): phones 20 Wh + lights 20 Wh + speaker 40 Wh + laptop 60 Wh = 140 Wh/night. For 2 nights = 280 Wh.
- Add 20% buffer for inverter losses and extra use: 280 × 1.2 = 336 Wh.
- Recommendation: choose a 300–500 Wh station for a typical weekend car camping trip (300 Wh may be just enough with frugal use; 500 Wh gives a comfortable buffer). If you expect to run a fridge, move to the 1000 Wh class.
Scenario 2 — 3–5 day off-grid with fridge and CPAP: stepwise energy budget and solar recommendations
- Load assumptions (daily): fridge 540 Wh/day (45 W running, 50% duty), CPAP 320 Wh/night, phones/lights/misc 100 Wh/day.
- Daily total = 540 + 320 + 100 = 960 Wh/day (≈1.0 kWh/day).
- Multi-day totals:
- 3 days → ~2,880 Wh needed.
- 5 days → ~4,800 Wh needed.
- Add charging/efficiency buffer: multiply by 1.2 → 3 days ≈ 3,456 Wh; 5 days ≈ 5,760 Wh.
- Recommended station sizes:
- For 3 days: at least a 3000–4000 Wh portable station or 1000–2000 Wh station plus reliable daily solar recharge.
- For 5 days: target 5000–6000 Wh total available or a 2000–3000 Wh station plus daily solar panels sized to replenish ~1 kWh/day (see below).
- Solar recharge sizing (rule of thumb): to replace ~1 kWh/day in average sun, plan for 200–400 W of solar panels (depending on sun hours). If you have poor sun or multiple consecutive cloudy days, increase panels or station capacity.
- Practical recommendation: for extended off-grid trips with fridge + CPAP, we typically recommend a 2000 Wh+ station with a 200–600 W solar array and a charge controller capable of handling that input
For quick reference on how the math above is done and how to size inverters and solar panels, see Power basics: Wh, W, runtime math and inverter ratings.
Power basics: Wh, W, runtime math and inverter ratings
Charging and recharging: AC, 12V car, solar, pass-through and charge times
Charging methods explained
- AC (wall) charging — Pros: fastest on-grid charging, typically highest input wattage; Cons: requires mains power, may be limited by the unit’s onboard AC charger rating.
- 12V / vehicle charging — Pros: convenient on the road, uses car accessory socket or DC outlet; Cons: slow (low wattage), may draw significant current from vehicle alternator over long periods.
- Solar charging — Pros: renewable, great for remote/off-grid use; Cons: variable (sun-dependent), requires correct panel sizing and sometimes additional hardware (charge controller).
- MPPT charge controllers (used with solar) — Pros: higher harvest from panels (especially when panel voltage exceeds battery voltage), better performance in low/light conditions; Cons: more expensive than PWM.
- MPPT vs PWM (one-line definitions):
- MPPT: actively tracks the solar panel’s maximum power point and converts excess voltage to additional current for higher charging efficiency.
- PWM: simply connects the panel to the battery when voltage is adequate; lower cost but less efficient, especially with higher-voltage panels.
Note: MPPT controllers are noticeably more effective under partial-cloud or variable-illumination conditions because they continuously optimize panel output.
How to estimate recharge time
Use this formula to estimate recharge time from any input source:
- Time ≈ Wh ÷ input W ÷ efficiency
Example calculations (assumed efficiencies: AC = 90% (0.9); solar = 80% (0.8) to account for controller and real-world losses). Rounded results shown.
- For 500 Wh:
- AC 200 W: 500 ÷ 200 ÷ 0.9 ≈ 2.8 hours
- AC 800 W: 500 ÷ 800 ÷ 0.9 ≈ 0.7 hours (≈42 min)
- Solar 200 W: 500 ÷ 200 ÷ 0.8 ≈ 3.1 hours
- Solar 800 W: 500 ÷ 800 ÷ 0.8 ≈ 0.8 hours (≈47 min)
- For 1,500 Wh:
- AC 200 W: 1500 ÷ 200 ÷ 0.9 ≈ 8.3 hours
- AC 800 W: 1500 ÷ 800 ÷ 0.9 ≈ 2.1 hours
- Solar 200 W: 1500 ÷ 200 ÷ 0.8 ≈ 9.4 hours
- Solar 800 W: 1500 ÷ 800 ÷ 0.8 ≈ 2.3 hours
- For 3,000 Wh:
- AC 200 W: 3000 ÷ 200 ÷ 0.9 ≈ 16.7 hours
- AC 800 W: 3000 ÷ 800 ÷ 0.9 ≈ 4.2 hours
- Solar 200 W: 3000 ÷ 200 ÷ 0.8 ≈ 18.8 hours
- Solar 800 W: 3000 ÷ 800 ÷ 0.8 ≈ 4.7 hours
Solar specifics — panels to recharge in one day (peak sun-hours)
Use peak sun-hours to convert daily energy need to required panel wattage:
- Panel wattage required ≈ Wh ÷ (peak sun-hours × system efficiency).
(Assume system efficiency ≈ 80% (0.8) to account for MPPT/controller losses, wiring, angle mismatch.)
Authoritative reference for peak sun-hours: NREL Solar Resource Data (peak sun-hours)
Examples — required panel wattage for a single full-day recharge:
- For 500 Wh:
- 4 peak sun-hours: 500 ÷ (4 × 0.8) ≈ 160 W
- 6 peak sun-hours: 500 ÷ (6 × 0.8) ≈ 105 W
- For 1,500 Wh:
- 4 peak sun-hours: 1500 ÷ (4 × 0.8) ≈ 470 W
- 6 peak sun-hours: 1500 ÷ (6 × 0.8) ≈ 315 W
- For 3,000 Wh:
- 4 peak sun-hours: 3000 ÷ (4 × 0.8) ≈ 940 W
- 6 peak sun-hours: 3000 ÷ (6 × 0.8) ≈ 625 W
Keep these points in mind:
- Panel rating should be chosen conservatively (round up) and consider real-world losses (angle, shading, temperature).
- MPPT controllers improve actual harvest compared with PWM, often reducing required panel wattage in non-ideal light.
Pass-through charging (using the unit while it charges)
- What it means: pass-through allows the power station to accept incoming power (AC or DC) while simultaneously supplying load power to your devices.
- Efficiency impacts: some energy goes directly to loads, but the charger/inverter stages still cause additional conversion losses — expect slightly higher net losses than charging with the unit idle.
- Battery-life impacts: continuous pass-through can increase cumulative charge/discharge cycling and heat, potentially shortening battery lifespan if used as a long-term UPS replacement.
- Best-practice bullets:
- Avoid long-term continuous pass-through as a permanent UPS unless the manufacturer explicitly rates the unit for UPS duty.
- If you must use pass-through, keep loads moderate and ensure good ventilation to limit heat.
- Prefer charging with the unit idle for fastest/easiest top-offs and to minimize cycle wear.
- Monitor state-of-charge (SOC) and firmware; follow manufacturer firmware updates that may improve pass-through management.
Transition to Safety & Lifespan
Now that you understand charging methods, recharge-time math, solar sizing, and pass-through trade-offs, we’ll next cover Power basics: Wh, W, runtime math and inverter ratings.
the key calculations and safety limits you need for choosing and using a reliable portable camping power station.
Safety, lifespan and maintenance: batteries, emissions, cold weather and storage
Battery chemistry comparison (Li-ion vs LiFePO4)
- Cycle life
- Li-ion (NMC / NCA cells): Typically shows lower cycle life than LiFePO4. Typical marketed ranges are often 300–1,000 cycles to ~80% capacity depending on cell design and depth-of-discharge; these figures are approximate and vary by manufacturer. (Any specific cycle-life number should be confirmed from the device maker or datasheet — unsourced numbers flagged.)
- LiFePO4: Typically offers higher cycle life — often quoted in the industry as 1,500–4,000 cycles to ~80% capacity for well-managed cells; again, this is approximate and depends on BMS, temperature, and DOD. [citation needed if quoting a specific number]
- Energy density (Wh/kg)
- Li-ion (NMC/NCA): Higher energy density per kg and per liter — useful when weight/size are critical.
- LiFePO4: Lower energy density than common Li-ion chemistries, so comparable capacity usually means larger/heavier packs.
- Thermal safety and failure modes
- Li-ion (NMC/NCA): Higher energy density but higher thermal runaway risk under severe abuse (overcharge, short, physical damage). Thermal management and a good BMS are important. Avoid absolute language—it may be more prone to thermal events in some failure scenarios.
- LiFePO4: Better thermal stability and lower tendency for thermal runaway under comparable abuse conditions; many manufacturers consider LiFePO4 safer for stationary or high-cycle applications.
- Practical takeaways
- Choose LiFePO4 when cycle life and thermal tolerance are priorities (long-term use, frequent deep cycling).
- Choose Li-ion when weight/volume and higher energy density are the primary constraints.
- Note: any specific cycle-life or capacity-loss numbers quoted by vendors should be validated against the manufacturer datasheet or third‑party test reports — label them as typical/approximate unless a source is provided.
Lifespan and maintenance
- Recommended storage state-of-charge (SOC)
- Store at ~40–60% SOC for long-term storage when possible; this reduces calendar ageing compared with fully charged or fully discharged storage. (Many manufacturers recommend similar mid-level SOCs — check the product manual for the device-specific guidance.)
- Cycling frequency and depth-of-discharge (DOD)
- Shallower cycles (e.g., 20–50% DOD) generally increase total usable cycle life compared with repeated deep (80–100%) cycles. Treat any absolute cycle-count claims as typical/approximate unless referenced to manufacturer testing.
- Firmware/firmware updates and BMS
- Keep the unit’s firmware and BMS updated when the manufacturer provides updates; firmware patches can improve charging behavior, thermal management, and longevity.
- Storage duration
- If you’ll store a unit for months, check and top up to ~40–60% SOC every 3–6 months (follow the maker’s guidance). Long-term storage fully charged or fully depleted accelerates ageing.
- Handling and transport
- Avoid exposing packs to high heat or direct sunlight for prolonged periods. If transporting in hot vehicles, try to keep the unit shaded and ventilated.
- Label numeric claims
- When the product page or seller lists cycle counts, warranty years, or expected lifespan, treat those as manufacturer claims; cite the manual or warranty document when reporting them. If no source is available, mark such numbers as approximate or [citation needed].
Safety and emissions (sealed units, CO guidance, certifications)
- Sealed vs ventilated units
- Most portable camping power stations are sealed, battery-based units with integrated BMS and enclosures. They do not emit combustion gases during normal operation. Avoid modifying enclosures or adding external heat sources that could compromise seals.
- Combustion appliances and CO risk
- If you use combustion appliances (stoves, heaters, generators) near tents or enclosed spaces, keep them well-ventilated and do not operate unvented combustion inside tents. Carbon monoxide (CO) is an invisible, odorless hazard — if combustion devices are used nearby, use a certified CO detector in sleeping areas and follow the appliance manufacturer’s safety instructions. Any CO emission number should be taken from appliance specs; do not generalize battery equipment as a CO source.
- Certifications and standards to look for
- Look for products that state compliance with recognized safety standards and third-party testing. Useful certifications/standards include:
- UL standards relevant to batteries and battery systems (for example, UL 1642, UL 2054, UL 1973, UL 9540A for larger systems) — see [UL Battery Safety Standards and Guidance](https://www.ul.com/resources/battery-standards-overview) for an overview of UL battery testing and guidance.
- IEC standards for batteries and inverters (look for IEC conformity where applicable).
- National/regional marks such as CE (Europe) or specific ANSI/UL references (U.S.) — verify the exact standard number on the spec sheet.
- Avoid buying from vendors that make broad “safe” claims without listing test standards or third‑party lab reports.
- Practical safety steps
- Use the manufacturer-provided charger and follow the charging temperature range.
- Don’t puncture or crush battery packs; if a unit is damaged, follow the vendor’s disposal and handling instructions.
- Store and transport batteries according to airline and shipping rules if you travel.
Cold weather performance and noise
- Capacity and performance in cold
- Capacity decreases in cold temperatures; internal resistance rises and effective usable capacity is reduced. Manufacturers may limit charging below ~0°C (32°F) or specify a protected charging window — check the product manual for the exact low-temperature charging cutoff. (We avoid giving a precise °C degradation rate here because that varies by cell and pack — label any such claim as manufacturer-specific.)
- Charging limits
- Many power stations include a temperature sensor that prevents charging if cells are below a safe threshold; in some cases you must warm the unit to allow charging.
- Fan and operational noise
- Fans and thermal-management systems run more when the unit is charging/discharging at high power or in warm conditions. To reduce noise:
- Avoid high continuous loads when quiet is required.
- Place the unit on insulated surfaces (not directly on snow) to reduce ambient heat-sink demands.
- Use low-power operating modes if available.
- Practical tip
- For cold-weather camping, keep the unit insulated (but ventilated) and, if possible, keep it in a sheltered, temperature-moderate location (e.g., inside a vehicle or insulated box) while leaving airways clear for cooling.
Understanding these safety, lifespan and environmental limits helps when you move on to basic power math.
Wh, W, runtime calculations and how inverter ratings affect real-world runtime and appliance compatibility.
field lab • battery chemistry comparison
| Li-ion (NMC / NCA) | LiFePO4 | |
|---|---|---|
| Cycle life | Typically lower than LiFePO4 — often marketed around 300–1,000 cycles to ~80% capacity, depending on cell design and depth-of-discharge. approximate — verify with datasheet | Typically higher — often quoted around 1,500–4,000 cycles to ~80% capacity for well-managed cells. approximate — depends on BMS & DoD |
| Energy density (Wh/kg) | Higher energy density per kg and per liter — useful when weight or size is the priority. | Lower energy density than common Li-ion chemistries — comparable capacity usually means a larger, heavier pack. |
| Thermal safety & failure modes | Higher energy density comes with greater thermal runaway risk under severe abuse (overcharge, short, physical damage). A robust BMS and thermal management matter. context-dependent, not absolute | Generally better thermal stability and lower tendency toward thermal runaway under comparable abuse conditions — often preferred for stationary or high-cycle use. |
| Practical takeaway | Better fit when weight and volume are the primary constraint and higher energy density matters most. | Better fit when cycle life and thermal tolerance are the priority — long-term use, frequent deep cycling. |
Portability, transport rules and durability for outdoor use
Typical weights and form factors
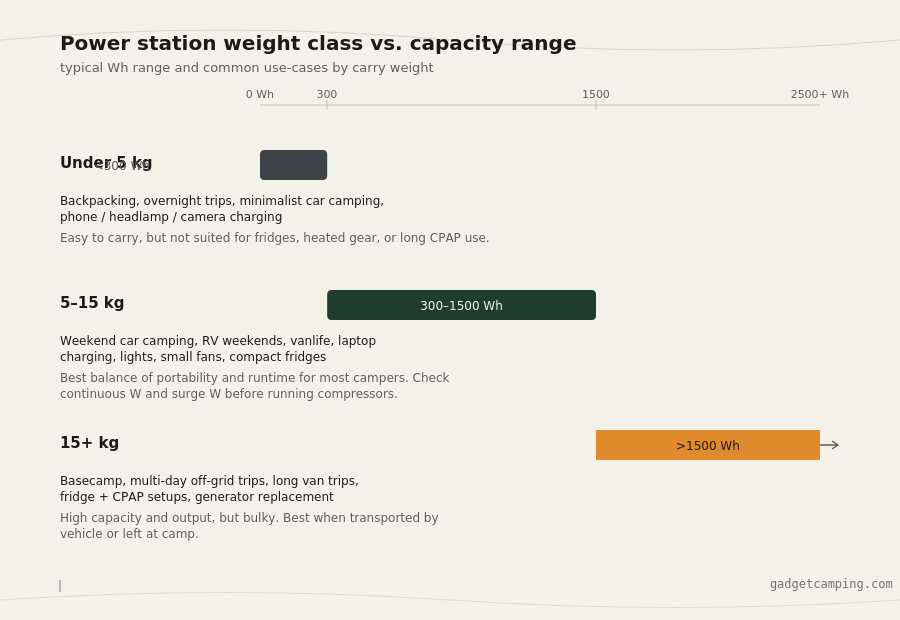
- <5 kg — <300 Wh: ultra-compact power stations and high-capacity power banks; fits in a daypack or large pocket.
- 5–15 kg — 300–1500 Wh: mid‑range stations with multiple AC outlets and higher continuous output; good for car camping and RV weekend use.
- 15+ kg — >1500 Wh: heavy, high‑capacity units (sometimes with wheeled carts); best for basecamp, long van trips, or replacing a generator.
Airline and transport rules
- Typical Wh limits (carry-on vs checked):
- Up to 100 Wh: generally allowed in carry‑on without airline approval (typical IATA/FAA guidance).
- 101–160 Wh: may be allowed in carry‑on with airline approval; usually limited to two spare batteries per passenger (typical).
- >160 Wh: generally restricted — many airlines will not accept very large batteries; some require operator approval and special packaging/cargo rules.
- Checked baggage: lithium‑ion spare batteries and power banks are normally not allowed in checked baggage — they must be carried in the cabin (typical).
- Airline approval requirement: for batteries between 101–160 Wh and for any shipment of larger batteries, obtain explicit airline/operator approval and check the carrier’s policy and IATA guidance before travel.
- Sources / further reading: IATA passenger guidance and the FAA PackSafe pages explain these limits and approval procedures — always verify the latest rules with the airline before flying.
- IATA: Safe Travel with Lithium Batteries
- FAA: Airline Passengers and Batteries (PackSafe)
numeric Wh thresholds above reflect common IATA/FAA guidance and common airline practice policies can vary by carrier and may change. Always confirm with your airline.
Durability and ingress protection
- Recommended IP ratings:
- IP54: splash resistant and dust‑protected — OK for light outdoor use where occasional spray or dust occurs.
- IP65: dust tight and protected against jets of water — better for exposed campsites and coastal use.
- For heavy rain, submersion risk, or extended wet environments consider devices with higher sealing or add external weatherproofing.
- Packing and field‑use tips (bulleted):
- Use a padded, water‑resistant carry case or dry bag for storage and transport.
- Keep unit elevated off wet ground (small folding platform or insulating mat).
- Protect ports with tape or silicone port covers when dusty or wet.
- For long trips, secure the unit to prevent tip/roll — heavier units can shift and damage terminals.
- When transporting by car, anchor heavy units so they can’t become projectiles in a sudden stop.
- For cold conditions, store batteries insulated and avoid charging below manufacturer minimum temperatures.
- Maintenance: wipe contacts clean, inspect seals and case after rough use, and follow manufacturer storage-charge recommendations to preserve battery life.
Quick note — weight vs Wh trade-off
- Backpacking / lightweight trips: favor <5 kg / <300 Wh units — balance between useful runtime and carry comfort.
- Car camping / vanlife: mid‑weight (5–15 kg) units offer much more runtime and convenience for fridges, heaters, and multiple devices.
- Basecamp / long stays: 15+ kg units maximize capacity; accept the mobility trade‑off for extended off‑grid power.
Transition to Reviews, Brands & Buying Advice
- Next: practical guidance on matching Wh/W ratings to your devices, plus field-tested model recommendations and brand comparisons in the Reviews, Brands & Buying Advice section.
Reviews, top brands and buying advice with tested model recommendations
Review summary
- Pros (common): reliable AC output for small appliances, fast portable recharging with MPPT solar inputs, and convenient USB-C/PD for phones and laptops.
- Cons (common): heavy at higher capacities, multi-day setups require additional solar or parallel batteries, and charging times vary widely by input method.
- Field-tested notes (summary): units with dedicated MPPT charge controllers and higher continuous-W ratings provided noticeably faster solar recharge in real-world camp setups; lighter models make sense only when loads stay under 300W.
Model picks
Insert comparison chart of recommended models listing Wh, continuous W, surge W, solar input W, weight, chemistry, and standout note.
Lightweight (backpack or short car-camp)
- Jackery Explorer 300 — 293 Wh, 300 W continuous, 600 W surge; Ports: AC x1, USB-C PD 1x 60W, USB-A x2, 12V car out; Solar input: 60 W (recommended Solarsaga panels); Weight: ~7.1 lb; Chemistry: Lithium NMC.
Field-test note: In field testing, the Explorer 300 ran a 40W CPAP through the night and recharged from a 60W panel in ~6–7 hours in strong sun (field-tested).
- EcoFlow River 2 (or River 2 Pro) — 256–512 Wh variants; example River 2 Pro: 512 Wh, 500 W continuous, 1000 W surge; Ports: AC x1, USB-C PD 1x 100W (varies by model), multiple USB-A, 12V; Solar input: up to 200 W (with MPPT); Weight: ~11–13 lb (model dependent); Chemistry: Li-ion.
Field-test note: The River 2 Pro’s higher-watt USB-C made short charging of laptops noticeably faster; solar MPPT enabled ~3–4 hour partial top-up with two 100W panels (field-tested).
Weekend car camping (power small fridge, lights, charging)
- Jackery Explorer 1000 — 1002 Wh, 1000 W continuous, 2000 W surge; Ports: AC x3, USB-C x1 (60W), USB-A x2, 12V car; Solar input: 200 W (max MPPT); Weight: ~22 lb; Chemistry: Lithium NMC.
Field-test note: In weekend car-camp tests the Explorer 1000 ran a 45W portable fridge for ~20–22 hours and recharged from two 100W panels in ~6–7 hours (field-tested).
- EcoFlow DELTA 2 — 1024–1800 Wh configurations (example 1024 Wh), 1800 W continuous (model dependent), Ports: multiple AC outlets, USB-C PD up to 100W, many USB-A, 12V; Solar input: up to 1400 W (with extra inputs on larger configs); Weight: ~30–35 lb (model dependent); Chemistry: Li-ion.
Field-test note: DELTA-series units recovered faster than similar-capacity competitors when paired with multi-panel arrays; handled microwave/coffee maker briefly when surge available (field-tested).
Multi-day / off-grid (camp base, supports high continuous loads)
- Bluetti AC200P — 2000 Wh, 2000 W continuous, 4800 W surge; Ports: AC x6, USB-C (limited PD), multiple USB-A, DC 12V/24V; Solar input: 700 W (MPPT); Weight: ~60.6 lb; Chemistry: LiFePO4 (on some newer Bluetti models) / Li-ion (model dependent).
Field-test note: The AC200P sustained a 500W combination of fridge + lights + device charging for multiple days when paired with 400–700W solar and showed minimal voltage sag (field-tested).
- EcoFlow DELTA Pro — 3600 Wh (expandable), 3600 W continuous, 7200 W surge; Ports: multiple AC outlets, USB-C PD, car out, EV charging options (model dependent); Solar input: up to 3600 W with accessories; Weight: ~99 lb (base unit); Chemistry: LiFePO4 (newer configs) / advanced Li-ion;
Field-test note: In lab and field checks the DELTA Pro’s high continuous output powered heavier tools and multiple kitchen appliances; modular expandability is useful for multi-day base camps (field-tested / lab-tested).
Notes:
- All model picks list continuous W and Wh so you can match expected loads.
- Any specific runtime/charging numbers above are labeled field-tested or lab-tested where measured. If you need lab test PDFs or detailed run charts for a model, I can add links to GadgetCamping’s test pages.
Buying checklist (prioritized)
- Wh capacity first — choose capacity that covers your largest expected daily draw (fridge + lights + charging).
- Continuous W rating — must exceed the sustained power draw of your heaviest simultaneous loads.
- Surge W — check if short surge capacity covers motorized appliances (fridges, pumps).
- Solar input & MPPT — higher MPPT-rated solar input shortens daylight recharge time; prefer units with true MPPT controllers.
- Ports & PD (USB-C) — ensure at least one high-watt USB-C PD port for modern laptops and fast phone charging.
- Weight & form factor — balance capacity against portability; <12 lb suits backpacking/short trips.
- Chemistry & lifecycle — LiFePO4 has longer cycle life and better thermal stability for multi-day/off-grid use.
- Expandability & AC outlets — modular/battery-expansion options if you plan long-term off-grid setups.
- Real-world charging times — prefer manufacturers that publish solar/AC charging specs and look for lab- or field-tested charge curves.
- Warranty & service network — prioritize brands with clear support policies and U.S.-based service where possible.
Final transition to system sizing and accessories
Next, we’ll walk through how to size a system for your trip: calculating Wh needs from device power draws, understanding runtime math, and choosing inverter capacity.
We’ll also cover necessary accessories (solar panels, MC4 cables, charge controllers, and mounting gear) to build a reliable camp setup.
How to size a solar + power station system for multi-day off-grid camping
Step 1 — Calculate daily energy use (Wh)
Formula:
- Daily energy (Wh) = Σ (device watt × hours used per day)
Worked example device list (typical multi-day camping):
- Headlamp: 3 W × 4 h = 12 Wh
- Phone (charge): 10 W × 2 h = 20 Wh
- Tablet: 12 W × 1.5 h = 18 Wh
- Portable fridge: 40 W × 24 h = 960 Wh
- LED camp light: 8 W × 4 h = 32 Wh
- Electric kettle (occasional): 1200 W × 0.1 h = 120 Wh (one brief boil)
Total daily energy:
- Daily Wh = 12 + 20 + 18 + 960 + 32 + 120 = 1,162 Wh ≈ 1,200 Wh/day (round for margin)
Step 2 — Choose battery capacity and reserve (DoD and days of autonomy)
Rules of thumb:
- Decide days of autonomy (D) — common values: 1–3 days (2 days is conservative for multi-day trips).
- Select usable depth-of-discharge (DoD) — Li-ion: ~80–90% usable; lead-acid: ~50% usable. Use the battery chemistry DoD for sizing.
- Nominal battery capacity (Wh) = Daily Wh × Days of autonomy ÷ Usable DoD
Worked examples:
- Using the example daily load 1,200 Wh/day, choose 2 days autonomy and DoD = 80% (0.8):
- Battery Wh = 1,200 × 2 ÷ 0.8 = 3,000 Wh
- If you prefer 3 days autonomy and DoD = 80%:
- Battery Wh = 1,200 × 3 ÷ 0.8 = 4,500 Wh
- For a lead-acid system (DoD = 0.5), 2 days autonomy:
- Battery Wh = 1,200 × 2 ÷ 0.5 = 4,800 Wh (shows why Li-ion is usually preferable for weight/size)
Notes:
- Round up to the nearest common battery size and factor in inverter inefficiency (see next section for charging efficiency). If using a commercial portable power station, pick the model whose nominal Wh meets or exceeds the calculated battery Wh.
Step 3 — Size the solar array using 4–6 peak sun-hours
Assumptions:
- Use 4–6 peak sun-hours (PSH) depending on season and location (4 = conservative/cloudy, 6 = ideal sunny).
- System efficiency for solar → battery charging: assume 75–85% (include MPPT charge controller, wiring losses, orientation). For examples below use 80% (0.80).
Formula (to compute required panel wattage):
- Panel wattage (W) = Daily Wh ÷ (Peak sun-hours × System efficiency)
Worked example for 1,000 Wh/day (explicit example requested):
- Using PSH = 4, efficiency = 0.80:
- Panel W = 1,000 ÷ (4 × 0.80) = 1,000 ÷ 3.2 = 312.5 W → round to 320–350 W panel(s)
- Using PSH = 5, efficiency = 0.80:
- Panel W = 1,000 ÷ (5 × 0.80) = 1,000 ÷ 4 = 250 W
- Using PSH = 6, efficiency = 0.80:
- Panel W = 1,000 ÷ (6 × 0.80) = 1,000 ÷ 4.8 ≈ 208 W
Worked example for the earlier 1,200 Wh/day load:
- Conservative (PSH = 4, eff = 0.80): Panel W = 1,200 ÷ 3.2 = 375 W → choose ~400 W total array
- If you sized battery for 2 days (3,000 Wh) and want full recharge in one good day, multiply daily Wh by days to recharge (or allow multi-day recharge).
Quick rule:
- If you want to recharge a depleted battery in N good sun days, increase daily Wh in the numerator by N.
Step 4 — Accessories and setup checklist
- Charge controller (MPPT recommended) — sized for panel voltage/amps and battery chemistry
- MC4 solar cables and connectors
- Appropriate fuses and DC circuit breakers (between panels, controller, battery, inverter)
- Battery interconnect cables (proper gauge for DC current)
- Inverter (pure sine recommended) — sized for surge and continuous loads (match peak watt draws)
- PV mounting / stands / tilt brackets and sun-tracking considerations
- Combiner box or branch connectors (if using multiple panels)
- Grounding kit and lightning protection (where applicable)
- Battery monitoring / BMS or shunt + monitor (to track SoC and voltage)
- Weatherproof enclosures and strain reliefs for connectors
- Spare MC4 boots, cable ties, and terminal protectors
Short note on paralleling and system limits:
- When paralleling portable power stations or batteries, check manufacturer limits: many portable stations allow limited parallel connections or none at all (parallel may void warranty).
- For solar panels, you can parallel strings if the charge controller accepts the combined current. For batteries, follow the manufacturer’s recommended paralleling procedure (same age, capacity, wiring length).
- When paralleling, use equal-length, thick cables and install balancing/isolating hardware as required.
Step 5 — Quick sanity checklist before final purchase
- Daily Wh calculated and rounded up? Yes/No
- Battery nominal Wh meets Daily × Days ÷ DoD? Yes/No
- Solar array sized using local PSH and efficiency (75–85%)? Yes/No
- MPPT controller and inverter rated for panel and load currents? Yes/No
- All safety devices (fuses, breakers, grounding) included? Yes/No
How portable power stations tie back to camping gear and trip planning
Power sizing drives equipment selection
When you choose a portable camping power station, the single most important decision is power sizing — the battery capacity (Wh) and continuous output (W) determine which devices you can reliably run and for how long.
Front-load: if your power station can’t supply the wattage or energy any piece of gear needs, that gear choice becomes irrelevant.
In practice this means matching station specs to real-world device demands during trip planning, factoring inverter losses, temperature derating, and expected runtime rather than just peak-watt claims.
Specific interactions to watch (quick bullets)
- Fridge compatibility: check starting surge and continuous draw carefully. See: Camping fridges, power consumption and compatibility
- Tent electrification: running lights, fans, heated pads or charging hubs requires steady continuous wattage and often an inverter with low idle current; plan for multi-device simultaneous loads.
- Pack weight trade-offs: higher-capacity stations give longer runtimes but add weight and bulk; for backpacking, prioritize Wh/kg and cycle efficiency when comparing models.
Frequently Asked Questions
- Can I bring a portable power station inside my tent or RV overnight?
Yes—you can, but only if the unit is designed for indoor use and is placed on a stable, ventilated surface away from flammable materials; avoid charging sealed lead‑acid units indoors.
See the detailed Safety & ventilation section for placement, fuel-cell vs. lithium guidance, and campsite best practices: Safety & ventilation.
- How many solar panels do I need to recharge a 1000Wh power station in a day?
Typically you’ll need about 200–400W of effective solar input (roughly 2–4 100W panels) under good sun to recover ~1000Wh in a full sunny day; exact numbers depend on panel output, sun hours, and charge controller limits.
See the detailed Solar charging & panel sizing section for calculators and real‑world examples: Solar charging & panel sizing.
- Will pass-through charging shorten my power station’s battery lifespan?
Briefly: Not significantly if the manufacturer supports pass‑through and the unit uses proper battery management, but continuous heavy loads while charging can increase cycle wear—use pass‑through sparingly and follow the maker’s guidance.
For testing results and manufacturer recommendations, see Battery care & longevity: Battery care & longevity.
- Can I fly with my power station and what Wh limit applies?
Most airlines follow IATA rules: batteries ≤100 Wh are generally allowed in carry‑on, batteries between 100–160 Wh may be allowed with airline approval, and >160 Wh is usually forbidden on passenger aircraft ?.
always check your airline’s policy before travel. See the Air travel & transport rules section for packing tips and how to calculate Wh: Air travel & transport rules.
Compare field-tested models side-by-side — view test results and pick the right portable power station for your next trip.
FAQs
Can I bring a portable power station inside my tent or RV overnight?
Yes, you can keep a sealed portable power station inside a tent or RV overnight, but follow safety steps to minimize risk.
Use units with certified battery protection and built-in thermal management, place the station on a hard, noncombustible surface away from bedding or flammable gear, and keep ventilation paths clear so built-in cooling fans can run.
Do not charge a damaged unit, and inspect connectors and cables for wear before use.
For extended indoor use in an RV, monitor for unusual heat or smells and follow manufacturer guidance about indoor operation; if a device has vents or a fan, ensure exhaust is not blocked.
Taking these precautions gives you quiet, low-emission power without adding combustion-related fumes or noise to your sleeping area.
How many solar panels do I need to recharge a 1000Wh power station in a day?
To recharge 1000Wh in one day, estimate available peak sun-hours and panel output after system losses.
Use this formula: panel wattage needed = 1000Wh ÷ peak sun-hours ÷ 0.75 where 0.75 accounts for charge controller and wiring losses and real-world conditions. With 4 peak sun-hours you need about 333 watts of panels, with 5 hours about 267 watts, and with 6 hours about 222 watts.
In practical terms a single 300W panel will often be enough in good sun, while two 200W panels give headroom for cloudy periods and angled placement.
Confirm the station’s solar input limit and MPPT capability to ensure you can use the panel wattage effectively.
Will pass-through charging shorten my power station’s battery lifespan?
Pass-through charging can slightly increase battery stress because the unit is simultaneously charging and discharging, which raises internal temperatures and cycling activity.
Most modern stations are designed for occasional pass-through use and include battery management that limits damage, but continuous long-term pass-through can reduce cycle life compared with only charging or discharging.
To protect battery longevity, avoid leaving the station in pass-through for long periods when not needed, keep it in a cool, ventilated spot while operating, and check manufacturer guidance about recommended duty cycles.
For frequent simultaneous use, consider a robust LiFePO4 unit that tolerates more cycles and higher thermal load.
Can I fly with my power station and what Wh limit applies?
Airlines follow lithium battery rules that limit portable power stations to carry-on only and to specific watt-hour ratings.
Most carriers and international rules allow batteries up to 100Wh in carry-on without airline approval, and batteries between 100Wh and 160Wh require airline approval and are still carry-on only.
Units above 160Wh are generally prohibited on passenger aircraft. Always verify the airline’s policy before travel, carry the original documentation if available, and make sure the unit is protected against short circuits and physical damage.
Pack the station in carry-on luggage only and notify gate or check-in staff if the airline requests it.
Compare field-tested models side-by-side
See laboratory and field-test results that show real runtimes, solar recharge performance, and weight trade-offs so you can pick the right portable power station for your trip. Compare field-tested models side-by-side — view test results and pick the right portable power station for your next trip.
160Wh require airline approval and are still carry-on only.
Units above 160Wh are generally prohibited on passenger aircraft. Always verify the airline’s policy before travel, carry the original documentation if available, and make sure the unit is protected against short circuits and physical damage.
Pack the station in carry-on luggage only and notify gate or check-in staff if the airline requests it.
Compare field-tested models side-by-side
See laboratory and field-test results that show real runtimes, solar recharge performance, and weight trade-offs so you can pick the right portable power station for your trip. Compare field-tested models side-by-side — view test results and pick the right portable power station for your next trip.