
How to Choose the Perfect Camping Power Station (Capacity, Watt-Hours & Solar)
To choose the perfect power station for camping, calculate your total daily watt-hour consumption and match it to a battery capacity that exceeds that sum by 20%.
There are 5 main factors to evaluate when selecting an outdoor power supply: battery capacity, inverter output, port variety, recharge speed, and weight.
Modern camping power stations transform outdoor adventures by eliminating the constraints of traditional gas generators.
These battery-powered systems deliver silent, emission-free electricity for everything from smartphones to electric coolers, enabling genuine off-grid comfort without compromising environmental values.
The portable power station market expanded 340% between 2020 and 2025, driven by overlanding enthusiasts, remote workers, and emergency preparedness advocates.
Unlike fuel-dependent generators, battery stations provide instant power without noise, fumes, or maintenance schedules.
The technology centers on lithium battery chemistry, primarily Lithium Iron Phosphate (LiFePO4) or standard Lithium-ion, paired with pure sine wave inverters that safely power sensitive electronics.
Selecting the right camping power station requires understanding energy mathematics, battery chemistry trade-offs, and real-world camping scenarios.
This guide provides the technical framework and practical calculations needed to match power capacity with actual outdoor requirements.
What Is a Camping Power Station and How Does It Work?
A portable power station is a battery-powered generator designed to provide electricity to electronic devices through AC outlets, DC carports, and USB ports during outdoor activities.
The core component is a Lithium Iron Phosphate (LiFePO4) or Lithium-ion battery pack that stores electrical energy measured in watt-hours (Wh).
An integrated inverter converts the battery’s DC power to standard 110V or 120V AC power, enabling compatibility with household electronics.
Modern units incorporate Battery Management Systems (BMS) that prevent overcharging, regulate temperature, and balance cell voltages to maximize safety and longevity.
Inverter capacity determines the maximum wattage of appliances you can power simultaneously.
A 1000W inverter powers a 600W blender and a 100W laptop concurrently, but cannot run a 1500W electric kettle. Peak surge ratings allow brief power spikes essential for motors and compressors that draw 2-3x their rated wattage during startup.
Key Components of a Camping Power Station
Battery Chemistry:
- LiFePO4 batteries deliver 3,500+ charge cycles and operate safely in extreme temperatures
- Lithium-ion batteries provide higher energy density in smaller packages but offer 500-1,000 cycles
- Capacity ranges from 150Wh for overnight phone charging to 3,000Wh+ for extended off-grid living
Inverter Types:
- Pure sine wave inverters produce clean power identical to grid electricity, safe for all electronics
- Modified sine wave inverters cost less but damage sensitive equipment like CPAP machines and laptops
- Inverter wattage ratings (300W to 3,000W) determine which appliances operate
Port Configurations:
- AC outlets (110V/120V) power standard household devices
- DC carports (12V) run automotive accessories like tire inflators and portable refrigerators
- USB ports (USB-A, USB-C, USB-C PD) charge phones, tablets, and USB-powered devices
- DC barrel ports (5.5mm, XT60) connect specialty camping equipment
Recharge Methods:
- AC wall charging (fastest, 2-8 hours for full charge)
- Solar panel input (120W to 400W panels, weather-dependent)
- 12V car charging during travel
- Dual charging (wall + solar simultaneously on advanced models)
The fundamental difference between camping power stations and traditional generators is the absence of combustion engines.
Power stations produce zero emissions, operate silently, and require no fuel storage or carburetor maintenance.
They function immediately in any orientation, tolerate freezing temperatures, and restart instantly after shutdown.
How many watt-hours do you need for off-grid camping?
Standard camping trips require 300Wh to 1,000Wh of capacity, depending on device usage.
Calculate your specific requirement using this formula:
Total Watts × Hours = Watt-Hours (Wh)
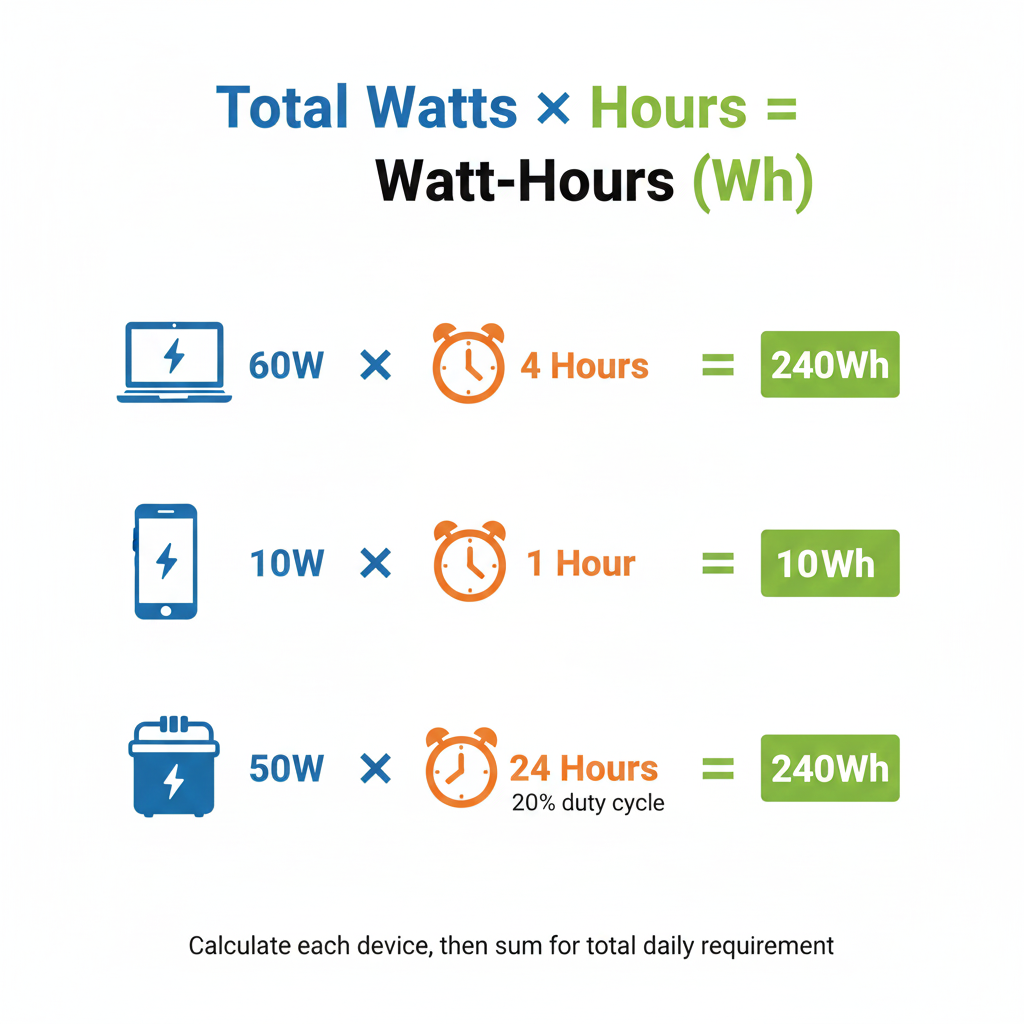
This calculation determines energy consumption over time. A 60W laptop running for 5 hours consumes 300Wh (60W × 5h = 300Wh).
Aggregate all devices you intend to power to establish total daily consumption.
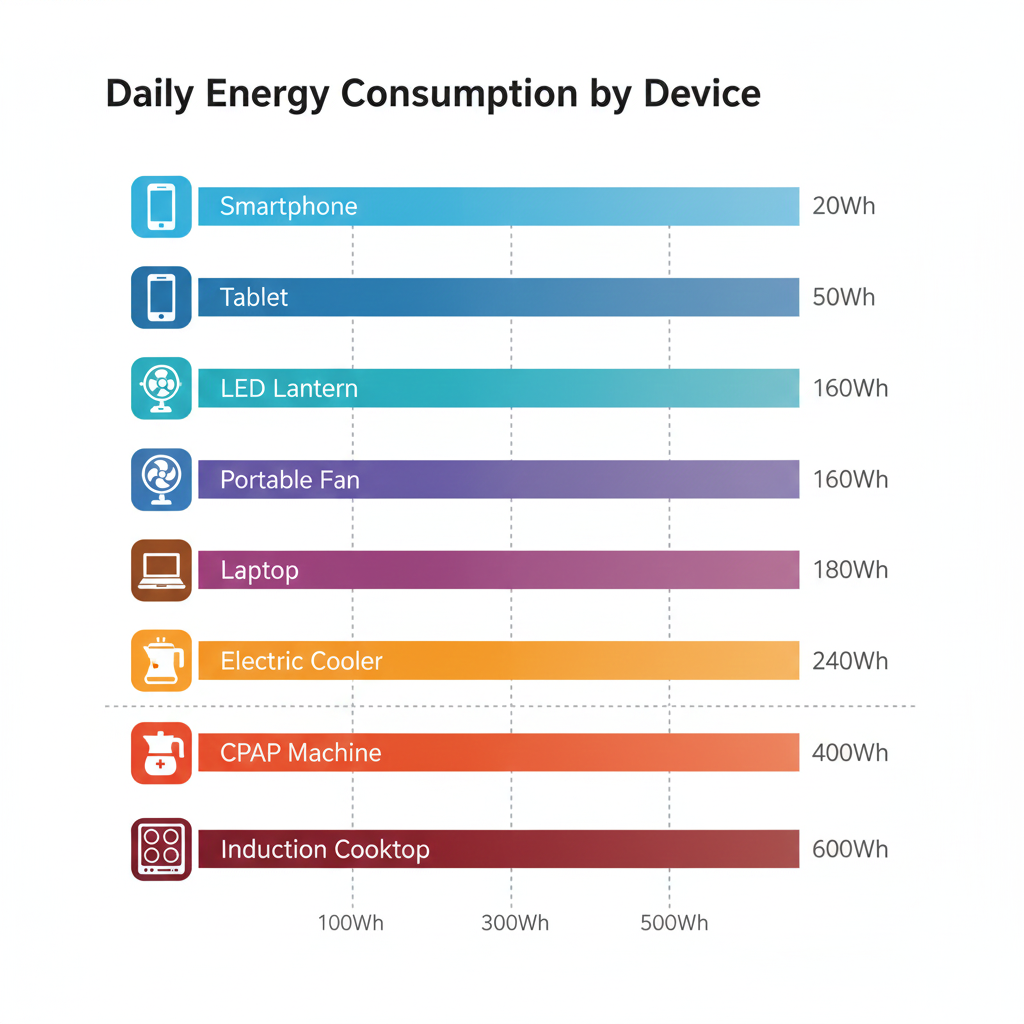
Device-Specific Energy Requirements
Smartphones and Tablets:
- Smartphone (3,000mAh battery): 10Wh per full charge
- Tablet (7,000mAh battery): 25Wh per full charge
- Smartwatch: 2Wh per charge
- Daily usage estimate: 2-4 phone charges = 20-40Wh
Laptops and Work Equipment:
- 13″ Laptop (45W charger): 45W × 4 hours = 180Wh
- 15″ Gaming laptop (120W): 120W × 3 hours = 360Wh
- Portable monitor: 15W × 6 hours = 90Wh
- Daily usage estimate for remote work: 200-450Wh
Lighting Systems:
- LED lantern (10W): 10W × 6 hours = 60Wh
- LED string lights (5W): 5W × 8 hours = 40Wh
- Headlamp charging: 5Wh per charge
- Daily usage estimate: 60-100Wh
Cooling and Food Storage:
- Electric cooler (50W with 20% duty cycle): 50W × 4.8 hours = 240Wh per day
- Portable fan (20W): 20W × 8 hours = 160Wh
- 12V car refrigerator (45W with 30% duty cycle): 45W × 7.2 hours = 324Wh per day
- Daily usage estimate: 250-350Wh
Medical and Sleep Equipment:
- CPAP machine (30W to 60W): 50W × 8 hours = 400Wh per night
- Heated blanket (50W): 50W × 6 hours = 300Wh
- Nebulizer (100W): 100W × 0.5 hours = 50Wh
- Daily usage estimate for CPAP users: 400-500Wh
Cooking Appliances:
- Portable induction cooktop (1,200W): 1,200W × 0.5 hours = 600Wh per meal
- Electric kettle (1,000W): 1,000W × 0.1 hours = 100Wh per boil
- Coffee maker (800W): 800W × 0.15 hours = 120Wh
- Daily usage estimate: 200-800Wh (highly variable)
Photography and Drones:
- Camera battery charging (7.2V, 2,000mAh): 15Wh per charge
- Drone battery charging (15.2V, 5,000mAh): 76Wh per charge
- Action camera: 5Wh per charge
- Daily usage estimate for content creators: 150-300Wh
Practical Camping Scenarios and Daily Power Use
Weekend Warrior (2-3 days):
- 2 smartphones (40Wh)
- LED lighting (60Wh)
- Laptop work 2 hours (90Wh)
- Electric cooler (240Wh)
- Total: 430Wh daily
- Recommended capacity: 500-600Wh station
Overlander (7+ days):
- 2 smartphones (40Wh)
- Laptop 4 hours (180Wh)
- 12V refrigerator (324Wh)
- Lighting (80Wh)
- Fan (160Wh)
- Camera charging (75Wh)
- Total: 859Wh daily
- Recommended capacity: 1,000-1,500Wh station with solar recharge
Medical Camping (CPAP required):
- CPAP machine (400Wh)
- Smartphone (20Wh)
- Lighting (60Wh)
- Total: 480Wh daily
- Recommended capacity: 600-800Wh station minimum
Family Camping (4 people, 3 days):
- 4 smartphones (80Wh)
- 2 tablets (50Wh)
- Lighting (100Wh)
- Electric cooler (240Wh)
- Portable fan (160Wh)
- Coffee maker (120Wh)
- Total: 750Wh daily
- Recommended capacity: 1,000Wh station
Cold Weather Camping:
- Smartphone (20Wh)
- Heated blanket (300Wh)
- Lighting (60Wh)
- Laptop (90Wh)
- Total: 470Wh daily
- Recommended capacity: 600Wh station, accounting for cold weather battery efficiency loss
The 20% Buffer Rule
Add 20% to your calculated daily consumption to account for:
- Inverter efficiency losses (5-15% depending on load)
- Battery degradation over time
- Unexpected device usage
- Cold weather capacity reduction
Example calculation:
- Daily consumption: 500Wh
- 20% buffer: 500Wh × 1.20 = 600Wh
- Select a station rated for 600Wh minimum
Select a solar-ready model if you plan to camp longer than 3 days. Solar input enables indefinite off-grid operation by recharging the battery during daylight hours, effectively creating unlimited capacity for extended adventures.
What are the main benefits of a LiFePO4 power station?
There are 3 main benefits of LiFePO4 batteries for entrepreneurs and frequent campers:
1. Life Cycles: Extended Investment Longevity
LiFePO4 batteries provide 3,500+ cycles before reaching 80% capacity. A cycle represents one complete discharge and recharge. For campers using a power station twice monthly, 3,500 cycles translates to 145+ years of service life.
Standard Lithium-ion batteries offer 500-1,000 cycles before capacity degradation becomes noticeable. This difference compounds over ownership:
Lifetime Value Comparison:
- LiFePO4 (3,500 cycles): Use twice weekly = 33 years
- Lithium-ion (800 cycles): Use twice weekly = 7.7 years
The upfront cost premium for LiFePO4 chemistry (typically 20-40% more expensive) disappears when amortized across the battery’s operational lifespan.
A $900 LiFePO4 station lasting 15 years costs $60 annually, while a $600 Lithium-ion unit lasting 5 years costs $120 annually.
Calendar aging also favors LiFePO4. These batteries retain 90% capacity after 10 years of storage at room temperature, compared to 70-80% retention for Lithium-ion variants.
Seasonal campers who store equipment for months benefit from minimal capacity loss between uses.
2. Safety: Thermal Stability Under Stress
Thermal stability is higher compared to standard Lithium-ion cobalt batteries. LiFePO4 chemistry resists thermal runaway—the catastrophic failure mode where batteries overheat and potentially ignite.
The phosphate-based cathode in LiFePO4 cells creates stronger molecular bonds than cobalt-oxide structures. This chemical stability prevents oxygen release during cell decomposition, eliminating the primary fuel source for battery fires.
Safety Metrics:
- LiFePO4 thermal runaway threshold: >270°C (518°F)
- Lithium-ion cobalt thermal runaway: >150°C (302°F)
- Real-world implication: LiFePO4 tolerates extreme conditions without safety degradation
This stability matters critically for camping scenarios involving vehicle storage, direct sunlight exposure, or accidental short circuits. LiFePO4 stations maintain structural integrity even when subjected to puncture or crushing conditions that trigger thermal events in traditional Lithium-ion packs.
Overcharging protection becomes redundant (though still implemented) because LiFePO4 cells accept overcharge current without temperature spikes. The chemistry naturally regulates heat generation, reducing dependence on electronic safeguards.
3. Durability: Consistent Performance Across Temperatures
Discharge rates remain consistent in temperatures ranging from -20°C to 60°C (-4°F to 140°F). This operational range exceeds standard Lithium-ion batteries by 20-30°C on both extremes.
Cold-weather camping particularly benefits from LiFePO4 temperature resilience. Lithium-ion batteries lose 20-40% capacity at 0°C (32°F), while LiFePO4 maintains 85-90% rated capacity.
At -10°C (14°F), the gap widens to 50-60% loss (Lithium-ion) versus 75-80% retention (LiFePO4).
Temperature Performance:
- Desert camping (40°C / 104°F): LiFePO4 delivers full rated capacity; Lithium-ion degrades 10-15%
- Winter camping (-10°C / 14°F): LiFePO4 maintains 75% capacity; Lithium-ion drops to 40-50%
- Vehicle storage (60°C / 140°F interior): LiFePO4 operates safely; Lithium-ion risks damage
High-temperature tolerance extends to charging cycles. LiFePO4 accepts charging current at 50°C (122°F) without efficiency penalties, enabling solar recharging during peak afternoon sun.
Lithium-ion charging typically cuts off above 45°C (113°F) to prevent cell damage.
The voltage curve stability of LiFePO4 delivers additional practical benefits. Output voltage remains nearly constant from 100% to 20% state of charge, providing consistent power delivery.
Lithium-ion voltage drops progressively during discharge, causing devices to receive diminishing voltage as the battery depletes.
How to select a camping power station: Step-by-step framework
Choosing a camping power station follows a systematic evaluation process that prioritizes energy requirements over marketing specifications.
Step 1: Calculate Total Daily Watt-Hour Requirements
Begin with actual device measurements, not estimates.
- List every device you power during camping
- Find the wattage rating on each device’s label or specification sheet
- Estimate daily runtime hours for each device
- Multiply watts × hours for each device
- Sum all watt-hour values
- Add 20% buffer for efficiency losses
Calculation example:
- Laptop (60W × 4 hours) = 240Wh
- Phone charging (10Wh × 2 charges) = 20Wh
- LED lantern (10W × 6 hours) = 60Wh
- Electric cooler (50W × 20% duty × 24 hours) = 240Wh
- Subtotal: 560Wh
- With 20% buffer: 672Wh
- Select: 700Wh+ capacity station
Step 2: Verify Inverter Capacity Matches Peak Loads
Identify your highest-wattage device and verify the inverter handles it.
Continuous wattage represents sustained power delivery. A 1,000W inverter powers a 900W device indefinitely but fails with a 1,100W appliance.
Surge wattage (or peak wattage) handles brief power spikes during startup. Electric coolers, power tools, and appliances with motors draw 2-3× rated wattage for 1-3 seconds during ignition.
Inverter selection criteria:
- Continuous wattage ≥ highest single device wattage
- Surge wattage ≥ highest startup surge requirement
- Example: 600W blender with 1,200W startup surge requires minimum 600W continuous / 1,200W surge inverter
Common surge requirements:
- Electric cooler (50W rated): 150W surge
- Power drill (500W rated): 1,500W surge
- Microwave (1,000W rated): 1,200W surge
- Induction cooktop (1,500W rated): 1,800W surge
Step 3: Evaluate Port Configuration
Match available ports to your specific devices.
Essential ports:
- AC outlets: Minimum 2 outlets for simultaneous laptop + appliance use
- USB-C PD (Power Delivery): 60W+ for laptop charging without AC adapter
- USB-A: 2-4 ports for phones, tablets, accessories
- 12V carport: Required for 12V refrigerators and automotive accessories
Advanced ports:
- USB-C PD 100W: Charges 16″ laptops and tablets at maximum speed
- Wireless charging pad: Eliminates cable need for Qi-compatible phones
- XT60 connector: Standard for solar panel input on premium models
- Anderson Powerpole: Professional-grade DC connection for amateur radio equipment
Port quantity matters for group camping. Families charging 4-6 devices simultaneously need 4+ USB ports to avoid sequential charging delays.
Step 4: Assess Recharge Speed and Solar Compatibility
Recharge time determines multi-day trip viability.
AC wall charging:
- Entry-level models: 8-12 hours for full charge
- Mid-range models: 4-6 hours for full charge
- Premium models: 1.5-2 hours for full charge (fast charging technology)
Solar charging calculations: A 500Wh battery requires 500 watt-hours of solar input to fully recharge. A 100W solar panel producing 5 hours of effective sunlight delivers 500Wh (100W × 5 hours = 500Wh).
Account for 20% conversion efficiency loss: 100W panel actually delivers 80W effective charging.
Solar panel sizing formula:
- Battery capacity (Wh) ÷ Daily sun hours ÷ 0.8 efficiency = Required solar wattage
- Example: 1,000Wh ÷ 5 hours ÷ 0.8 = 250W solar panel
Solar compatibility requirements:
- MPPT (Maximum Power Point Tracking) charge controller for optimal efficiency
- Input voltage range: 12V-48V accommodates most portable panels
- MC4 connectors standard for panel connections
- Parallel/series input allows multiple panel configurations
Dual charging capability (simultaneous AC + solar) cuts recharge time significantly. A 1,000Wh station accepting 500W AC + 200W solar recharges in 1.4 hours versus 5 hours with AC alone.
Step 5: Weight and Portability Analysis
The transport method determines acceptable weight limits.
Weight categories:
- Ultra-portable (< 15 lbs): Backpack camping, hiking portability
- Car camping (15-30 lbs): Standard camping, short-distance carrying
- Base camp (30-60 lbs): RV use, minimal movement after setup
- Emergency backup (60+ lbs): Stationary home backup, vehicle-assisted transport
Portability features:
- Integrated handles (reinforced, ergonomic grip)
- Telescoping handle + wheels (for 40+ lb units)
- Compact dimensions for vehicle storage
- Stackable design for multiple units
Calculate watt-hours per pound to compare efficiency:
- Entry-level: 15-25 Wh/lb
- Mid-range: 25-35 Wh/lb
- Premium: 35-50 Wh/lb
A 500Wh station weighing 15 lbs (33 Wh/lb) provides better power-to-weight ratio than a 800Wh unit at 30 lbs (27 Wh/lb), if both meet your capacity requirements.
Step 6: Examine Build Quality and Warranty Coverage
Camping equipment endures harsh conditions requiring robust construction.
Durability indicators:
- Impact-resistant housing: ABS plastic or aluminum casing
- IP rating: IP65+ for dust/water resistance (essential for outdoor use)
- Drop testing: Units tested for 1-meter drops
- Temperature rating: -20°C to 60°C operational range
Warranty evaluation:
- Standard coverage: 12-18 months parts and labor
- Premium coverage: 24-60 months with battery degradation guarantees
- Cycle guarantees: “80% capacity after 500/1000/3500 cycles” specifies long-term performance
- Support accessibility: Phone, email, chat support availability
Red flags:
- Warranty void if opened or repaired by user
- No battery cycle guarantee
- Limited support hours (email-only, 9-5 weekdays)
- Generic rebranded units without manufacturer support
Third-party reviews on outdoor forums and camping communities reveal real-world durability data.
Power stations failing after 6-12 months in customer hands signal manufacturing defects regardless of warranty terms.
Top camping power station categories by use case
Different camping styles demand specialized power solutions.
Best for weekend camping: 300-500Wh range
Ideal user: Solo or couple camping 2-3 days, minimal electronics
Power profile:
- 2 smartphone charges daily (40Wh)
- LED lighting 4 hours (40Wh)
- Laptop 2 hours (90Wh)
- Camera battery charging (15Wh)
- Electric cooler alternative: ice + passive cooler
- Total: 185Wh daily × 3 days = 555Wh
Recommended specifications:
- Battery: 300-500Wh LiFePO4 or Lithium-ion
- Inverter: 300W continuous
- Weight: Under 15 lbs for portability
- Ports: 2× AC, 2× USB-A, 1× USB-C PD
- Recharge: 4-6 hour AC, solar compatible
- Price range: $250-$500
Example models class: Units like the Jackery Explorer 300, EcoFlow River 2, and Anker 521 deliver sufficient capacity for light usage without excess weight or cost.
Solar pairing: 60-100W portable panel provides recharge capability for extended weekend trips.
Best for overlanding: 1,000-1,500Wh range
Ideal user: Multi-week road trips, vehicle-based camping, remote work
Power profile:
- Laptop 6 hours daily (270Wh)
- 12V refrigerator 24/7 (324Wh)
- 2 smartphones (40Wh)
- LED lighting (80Wh)
- Portable fan (160Wh)
- Camera/drone charging (100Wh)
- Total: 974Wh daily
Recommended specifications:
- Battery: 1,000-1,500Wh LiFePO4 preferred
- Inverter: 1,000-1,500W continuous, 3,000W surge
- Weight: 25-40 lbs acceptable for vehicle storage
- Ports: 4× AC, 4× USB-A, 2× USB-C PD, 2× DC carport
- Recharge: Fast AC charging (2-4 hours), dual solar input (300W+)
- Price range: $800-$1,500
Example models class: EcoFlow Delta 2, Bluetti AC200P, and Jackery Explorer 1500 provide the capacity and port variety for extended off-grid living.
No layout selected.Solar pairing: 200-400W folding solar array enables daily recharge for indefinite operation.
Best for CPAP camping: 500-800Wh range
Ideal user: Medical device dependent campers, sleep apnea patients
Power profile:
- CPAP machine 8 hours (400Wh)
- Smartphone (20Wh)
- LED lighting (60Wh)
- Backup capacity for additional night
- Total: 480Wh nightly
Recommended specifications:
- Battery: 600-800Wh minimum (2 nights backup)
- Inverter: 200W continuous (CPAP draws 30-60W)
- Pure sine wave mandatory (modified sine damages CPAP)
- Weight: Under 20 lbs for pack-in camping
- Ports: 2× AC (one dedicated to CPAP), USB charging
- Recharge: AC primary, solar backup
- Price range: $400-$800
Critical considerations:
- LiFePO4 chemistry for temperature resilience and cycle life
- Battery capacity calculator specific to CPAP pressure settings
- Heated humidifier adds 40-80W load; consider non-heated operation
- Altitude impacts CPAP pressure and power consumption
Example models class: Rockpals 500W, Goal Zero Yeti 500X, and Bluetti EB55 provide reliable CPAP power with pure sine wave output.
Solar pairing: 100-150W panel ensures nightly recharge even in partially cloudy conditions.
Best for family camping: 1,500-2,000Wh range
Ideal user: Family of 4, group camping, comfort-focused
Power profile:
- 4 smartphones daily (80Wh)
- 2 tablets (50Wh)
- Laptop 3 hours (135Wh)
- Electric cooler (240Wh)
- LED lighting extended (120Wh)
- Portable fan (160Wh)
- Coffee maker morning (120Wh)
- Device charging (100Wh)
- Total: 1,005Wh daily
Recommended specifications:
- Battery: 1,500-2,000Wh LiFePO4
- Inverter: 1,800-2,000W continuous, 4,000W surge
- Weight: 40-60 lbs (acceptable for car camping with wheels)
- Ports: 6× AC, 6× USB-A, 2× USB-C PD, 2× 12V carport
- Recharge: Ultra-fast AC (1.5-2 hours), 500W solar input
- Expandable battery option for longer trips
- Price range: $1,200-$2,000
Example models class: Bluetti AC200MAX, EcoFlow Delta Pro, and Anker 757 deliver family-scale capacity with expandability.
Solar pairing: 400W+ solar array enables 4-5 hour recharge for continuous multi-day operation.
Best for emergency preparedness: 2,000-3,000Wh+ range
Ideal user: Home backup, disaster preparation, power outage resilience
Power profile:
- Refrigerator (running 8 hours daily at 150W) = 1,200Wh
- LED lighting household (100Wh)
- Router/modem/devices (50Wh)
- Phone charging family (60Wh)
- Medical equipment backup (varies)
- Total: 1,410Wh daily minimum
Recommended specifications:
- Battery: 2,000-3,000Wh+ LiFePO4
- Inverter: 2,400W+ continuous, 4,800W+ surge (240V split-phase capable)
- Expandable battery modules (add 2-6kWh capacity)
- UPS (Uninterruptible Power Supply) mode for automatic failover
- Ports: Multiple AC (including 240V for well pumps), USB, 12V
- Recharge: AC primary, solar backup (800W+ input), generator charging
- Transfer switch compatible for whole-home integration
- Price range: $2,000-$4,000+
Critical considerations:
- Cycle life critical for long-term reliability (LiFePO4 mandatory)
- EMP/solar flare protection (Faraday cage storage)
- Firmware updates for longevity
- Service network availability for repairs
Example models class: EcoFlow Delta Pro + Extra Battery, Bluetti AC300 + B300 modules, and Goal Zero Yeti 6000X deliver home backup capacity with expandability to 10kWh+.
Solar pairing: Permanent rooftop array (800W-1,500W) or portable 400W+ for emergency deployment.
Common power station mistakes to avoid
Selecting a camping power station involves technical decisions where specification misinterpretation leads to buyer’s remorse.
Mistake #1: Confusing capacity (Wh) with output (W)
Watt-hours (Wh) measure energy storage capacity how much total energy the battery holds.
Watts (W) measure power output rate how much power the inverter delivers at any moment.
A 500Wh battery with a 300W inverter powers a 200W device for 2.5 hours (500Wh ÷ 200W = 2.5 hours), but cannot power a 400W appliance at all (exceeds inverter limit).
Conversely, a 300Wh battery with a 1,000W inverter powers a 900W device for only 20 minutes (300Wh ÷ 900W = 0.33 hours = 20 minutes).
Correct specification interpretation:
- High Wh, low W = Extended runtime for small devices
- Low Wh, high W = Brief operation of powerful appliances
- High Wh, high W = Extended runtime for powerful appliances (premium category)
Match both specifications to your actual usage pattern. Calculate the required capacity (Wh) independently of the required output (W).
Mistake #2: Ignoring the inverter waveform type
Pure sine wave inverters produce smooth AC power identical to grid electricity. All electronics function safely.
Modified sine wave inverters create a stepped approximation of AC power. This waveform damages sensitive equipment:
- CPAP machines malfunction or fail
- Laptop power supplies overheat
- LED lights flicker or buzz
- Audio equipment produces interference
- Induction cooktops fail to operate
Modified sine wave units cost 20-30% less but risk destroying equipment worth thousands. The savings disappear with a single damaged laptop.
Purchase rule: Verify “pure sine wave” specification explicitly stated. Assume a modified sine wave if unspecified.
Mistake #3: Underestimating solar charging time
Marketing materials advertise “solar ready” without explaining realistic recharge times.
A 100W solar panel produces 100W only under perfect conditions:
- Perpendicular sun angle (noon)
- Clear sky (no clouds)
- Optimal temperature (25°C / 77°F)
- Clean panel surface
Real-world efficiency averages 60-75% of rated wattage:
- 100W panel → 60-75W actual output
- Morning/evening angles reduce output 30-50%
- Partial clouds reduce output 40-70%
- Panel heat above 25°C reduces efficiency 0.5% per degree
Realistic solar charging calculation:
- 500Wh battery
- 100W panel
- 5 hours of effective sunlight
- 70% efficiency factor
- Actual energy captured: 100W × 5 hours × 0.70 = 350Wh
- Result: 1.4 days to fully recharge, not same-day
Size solar arrays based on actual energy capture, not panel nameplate ratings. A 200W panel provides the same effective recharge as advertised for 100W panels.
Mistake #4: Overlooking cold-weather performance degradation
Lithium batteries lose capacity at low temperatures through reduced chemical reaction rates.
Temperature capacity retention:
- 20°C (68°F): 100% rated capacity
- 0°C (32°F): 80% capacity (Lithium-ion), 90% capacity (LiFePO4)
- -10°C (14°F): 50% capacity (Lithium-ion), 75% capacity (LiFePO4)
- -20°C (-4°F): 30% capacity (Lithium-ion), 60% capacity (LiFePO4)
A 500Wh Lithium-ion battery delivers only 250Wh at 0°C—insufficient for calculated requirements.
Cold weather mitigation strategies:
- Oversize battery capacity by 50% for winter camping
- Choose LiFePO4 chemistry for temperature resilience
- Store the battery inside the sleeping bag overnight
- Insulate battery housing with foam wrap
- Warm battery before charging (charging below 0°C damages cells)
Mistake #5: Selecting based on price-per-watt-hour alone
True cost calculation includes:
- Upfront purchase price
- Cycle life (replacement frequency)
- Warranty coverage
- Efficiency losses
- Accessory costs (cables, solar panels, car charger)
Example comparison:
Budget Option:
- $400 for 500Wh Lithium-ion
- 800 cycle life
- Cost per cycle: $0.50
- 5-year expected lifespan
- Annual cost: $80
Premium Option:
- $600 for 500Wh LiFePO4
- 3,500 cycle life
- Cost per cycle: $0.17
- 20-year expected lifespan
- Annual cost: $30
The premium option costs $200 more upfront but $50 less annually over its lifespan. Total 10-year cost: Budget = $800 (2 replacements), Premium = $600 (single purchase).
Factor cycle life into price comparisons. The cheapest upfront option often costs more over the ownership duration.
Mistake #6: Buying excessive capacity “just in case.
Oversized power stations carry weight, cost, and opportunity penalties.
Diminishing returns:
- Capacity doubling rarely doubles utility
- Excess weight reduces portability
- Upfront capital locks funds that could upgrade other gear
- Solar panels sized for smaller stations work inadequately for larger ones
Right-sizing process:
- Calculate actual consumption (as detailed in the “How many watt-hours” section)
- Add 20% buffer
- Stop there
A 1,500Wh station for 400Wh daily consumption wastes $500+ and adds 20 lbs of unnecessary weight. That capital better funds quality sleeping bags, tents, or additional camping trips.
Expandable battery systems solve capacity uncertainty. Purchase the base unit matching calculated needs, then add battery modules if requirements increase.
Solar panel integration: Maximizing off-grid capability
Solar charging transforms power stations from finite energy reserves into renewable power systems.
Solar panel specifications explained
Wattage rating: Nameplate power output under standard test conditions (STC)
- STC: 1,000 W/m² irradiance, 25°C cell temperature, 1.5 air mass
- Real-world output: 60-80% of rated wattage
Voltage specifications:
- Voc (Open Circuit Voltage): Maximum voltage with no load, typically 18-24V for 100W panels
- Vmp (Voltage at Maximum Power): Optimal operating voltage, typically 16-20V
- Must fall within power station input range (commonly 12-48V DC)
Current specifications:
- Isc (Short Circuit Current): Maximum current flow, typically 5-8A for 100W panels
- Imp (Current at Maximum Power): Optimal operating current
- Must not exceed power station maximum input current (commonly 10A limit)
Panel efficiency:
- Monocrystalline: 18-22% efficiency, best for limited space
- Polycrystalline: 15-17% efficiency, lower cost
- Thin-film: 10-12% efficiency, flexible/portable form factors
Panel sizing for camping power stations
Match panel wattage to battery capacity and daily consumption.
Formula: Daily consumption (Wh) ÷ Effective sun hours × 1.4 (efficiency factor) = Minimum solar wattage
Example calculations:
500Wh daily consumption:
- 500Wh ÷ 5 hours × 1.4 = 140W minimum
- Recommendation: 150-200W panel
1,000Wh daily consumption:
- 1,000Wh ÷ 5 hours × 1.4 = 280W minimum
- Recommendation: 300-400W panel
Effective sun hours by region:
- Desert Southwest (Arizona, Nevada): 6-7 hours
- Mountain West (Colorado, Montana): 5-6 hours
- Pacific Northwest (Washington, Oregon): 3-4 hours
- Northeast (New York, Maine): 4-5 hours
- Southeast (Florida, Georgia): 5-6 hours
Adjust calculations for your primary camping regions. Pacific Northwest campers need 50% larger panels than Southwest users for equivalent daily energy capture.
Panel portability types
Rigid panels:
- Aluminum frame construction
- Glass or polymer surface
- Most efficient (18-22%)
- Heaviest option (2-3 lbs per 100W)
- Best for permanent installations or base camp setups
Folding panels:
- Multiple rigid panels hinged together
- Built-in kickstands for angle adjustment
- An integrated charge controller is sometimes included
- Medium weight (1.5-2 lbs per 100W)
- Optimal for car camping and overlanding
Flexible panels:
- Thin-film or monocrystalline on a flexible substrate
- Curves to mount on vehicle roofs or tent surfaces
- Lower efficiency (12-17%)
- Lightest option (0.8-1.2 lbs per 100W)
- Best for backpack camping and weight-critical applications
Portable blanket panels:
- Fabric-backed panels that fold like blankets
- Extremely packable
- Medium efficiency (15-18%)
- Quick deployment
- Ideal for motorcycle camping and tight storage
Connection types and cables
MC4 connectors: Industry standard for solar panels
- Weatherproof screw-lock design
- Carries 20A+ current safely
- Male/female polarized (prevents reverse polarity)
- Most power stations accept MC4 with an adapter cable
Anderson Powerpole: Alternative connector for ham radio compatibility
- 15A/30A/45A current ratings
- Genderless design (any connector mates with any other)
- Less common on consumer camping gear
XT60 connectors: Drone battery standard, appearing on some power stations
- 60A continuous rating
- Smaller form factor than Anderson
- Yellow housing standard color
DC barrel plugs: Older standard, still present on budget units
- 5.5mm × 2.1mm most common size
- Polarity errors are possible (can damage equipment)
- 5A maximum current typical
Purchase power stations with MC4 or XT60 input to maximize panel compatibility. Adapter cables bridge connector types, but native compatibility eliminates failure points.
Parallel vs. series panel configurations
Parallel connection:
- Voltage stays constant (18V + 18V = 18V)
- Current doubles (5A + 5A = 10A)
- Use when: Panel voltage already within station input range
- Benefit: Maintains power output if one panel shaded
Series connection:
- Voltage doubles (18V + 18V = 36V)
- Current stays constant (5A + 5A = 5A)
- Use when: Need higher voltage to match station input range
- Drawback: The entire series output drops if one panel is shaded
Example application: Power station accepts 12-48V input, 10A maximum
- 2× 100W panels (18V, 5.5A each)
- Parallel: 18V, 11A → Exceeds current limit (don’t use)
- Series: 36V, 5.5A → Within limits (correct configuration)
MPPT charge controllers (present in quality power stations) optimize power extraction regardless of voltage, making series configurations preferable for voltage-flexible inputs.
Solar charging optimization techniques
Angle adjustment:
- Perpendicular sun angle maximizes wattage capture
- Adjust panel angle 3-4 times daily for 15-25% output gain
- Use kickstands or adjustable mounts
- South-facing in Northern Hemisphere, north-facing in Southern Hemisphere
Surface cleaning:
- Dust reduces output 5-10%
- Dirt/bird droppings reduce output 20-40%
- Clean with water and a microfiber cloth
- Clean panels before each charging session
Temperature management:
- Panels lose 0.5% efficiency per degree above 25°C
- Elevate panels 2-4 inches above ground for airflow
- Avoid placing panels on hot vehicle roofs during charging
- 10°C temperature reduction = 5% output gain
Shade elimination:
- Partial shade on even 10% of the panel reduces output 50%+
- Reposition panels away from trees, tents, vehicles
- Monitor sun’s path across the day and adjust proactively
Parallel charging (AC + Solar):
- Charge from wall outlet while simultaneously solar charging
- Cuts recharge time 40-60%
- Use during morning before departure to maximize both sources
Maintenance and longevity optimization
Proper care extends the power station’s lifespan from 5 years to 15+ years.
Battery health preservation
Charge level storage:
- Store at 50-60% charge for maximum longevity
- Fully charged storage degrades calendar life 30-40%
- Fully depleted storage risks deep discharge damage
- Recharge to 60% before multi-month storage
Charge cycle management:
- Avoid charging to 100% except when needed for immediate use
- Avoid discharging below 20% when possible
- Partial cycles (40% to 80%) extend total cycle life 2-3×
- Full cycles (0% to 100%) are acceptable, but accelerate degradation
Temperature exposure limits:
- Store in temperature-controlled environments (15-25°C / 59-77°F ideal)
- Avoid vehicle storage in summer (interior temperatures exceed 60°C / 140°F)
- Avoid freezing temperatures during storage (chemical damage risk)
- Insulate during cold-weather use
Calendar aging mitigation:
- Charge/discharge once every 3 months during storage
- Prevents electrolyte stratification
- Maintains BMS calibration
- Minimal effort with significant longevity benefit
Firmware updates
Modern power stations contain microprocessors managing battery charging, load balancing, and safety cutoffs. Manufacturers release firmware updates improving:
- Charging algorithm efficiency
- Battery longevity optimization
- Bug fixes preventing shutdowns
- Feature additions (app connectivity, new charging modes)
Update process:
- Check the manufacturer’s website quarterly for firmware releases
- Download the update file to the USB drive or via the mobile app
- Connect the USB to a power station or sync via Bluetooth
- Follow on-screen update instructions (typically 5-10 minutes)
- Do not interrupt updates (can brick the device)
Units without update capability age poorly as software bugs remain unresolved. Verify update availability before purchase.
Port and connector care
AC outlet maintenance:
- Inspect for loose connections (causes arcing and outlet damage)
- Clean dust from outlet openings with compressed air
- Avoid plugging/unplugging under load (causes arcing)
- Replace damaged outlets immediately (DIY or manufacturer service)
USB port protection:
- Avoid forcing cables (bent pins disable ports)
- Keep dust covers closed when unused
- Clean contacts with 90%+ isopropyl alcohol if charging slows
- USB-C ports most susceptible to dust accumulation
DC carport care:
- Tighten retaining ring (prevents poor contact and heating)
- Inspect for corrosion from moisture exposure
- Apply dielectric grease to connector (prevents oxidation)
Solar input port:
- Verify polarity before connection (reverse polarity damages input circuit)
- Inspect MC4 connectors for cracks or water ingress
- Replace weathered cables preemptively
- Store with dust cap installed
Cleaning and exterior care
Enclosure cleaning:
- Wipe with damp microfiber cloth
- Avoid harsh chemicals (damage plastic finishes)
- Dry thoroughly before storage
- Inspect vents for blockage (reduces cooling efficiency)
Handle and wheel maintenance:
- Lubricate telescoping handles with silicone spray
- Tighten handle fasteners if wobble develops
- Inspect wheels for cracks (UV damage over time)
- Replace wheels before failure (prevents expensive drops)
Cooling fan inspection:
- Listen for bearing noise (indicates fan wear)
- Vacuum external vents to prevent dust buildup
- Internal fan cleaning requires disassembly (voids most warranties)
- Fan failure causes thermal shutdown under load
Warranty and support utilization
Documentation retention:
- Keep purchase receipts indefinitely
- Photograph serial numbers and model information
- Save all correspondence with support
- Document issues with photos/videos
Support contact protocol:
- Exhaust troubleshooting guides before contacting support
- Prepare device information (model, serial, purchase date, firmware version)
- Describe the issue clearly with reproduction steps
- Request case number for tracking
- Follow up weekly if unresolved
Warranty claim process:
- Register product immediately after purchase
- Note warranty period and cycle guarantees
- Submit claims promptly (documentation degradation over time reduces success)
- Escalate to manager if frontline support unhelpful
- Credit card purchase protection sometimes supplements manufacturer warranty
Third-party repair becomes viable after warranty expiration. Battery replacement costs 40-60% of new unit price but extends life 5-8 years for units with quality inverters and housings.
FAQ
Q: How many watt-hours do I need for camping?
Most campers need 300Wh to 1,000Wh per day, depending on devices like laptops, coolers, CPAP machines, and cooking appliances.
Calculate each device’s wattage × usage hours, then add a 20% buffer.
Q: Is a camping power station better than a generator?
Yes for most campers. Power stations are silent, emission-free, maintenance-free, and safe for sensitive electronics, while generators are louder and fuel-dependent.
Q: Can I use solar panels to recharge a camping power station?
Yes. With enough solar input to match daily energy use, a camping power station can operate indefinitely during off-grid trips.
Q: What size power station is best for CPAP camping?
Most CPAP users need 600–800Wh minimum, especially if using heated humidification or camping in cold temperatures.
Final Checklist: Making Your Camping Power Station Decision
Selecting the perfect camping power station reduces to quantifiable metrics rather than subjective preferences.
Your decision framework:
- Calculate energy requirements accurately using the device-by-device formula from the watt-hour section
- Add 20% buffer to account for efficiency losses and unexpected usage
- Select LiFePO4 chemistry if budget permits (3,500 cycle life justifies premium)
- Match inverter wattage to your highest-draw device plus 20% headroom
- Verify pure sine wave output to protect electronics
- Size solar panels to daily consumption ÷ 5 hours × 1.4 efficiency factor
- Prioritize recharge speed if trip duration exceeds battery capacity
- Accept weight appropriate to your transport method (backpack vs vehicle)
The camping power station market matured significantly between 2020-2025. Reliable options exist across all price points from $200 budget units to $3,000 expandable home backup systems.
Avoid decision paralysis by selecting the minimum viable capacity meeting calculated requirements rather than maximizing specifications.
Testing your setup before critical trips prevents field disappointments. Charge devices overnight using the power station, measure actual consumption, and verify calculations match reality.
This validation identifies undersized capacity before you’re 50 miles from grid power.
Power stations transform camping from rationed device usage to comfortable modern convenience.
The ability to recharge laptops, power medical devices, and maintain food refrigeration extends outdoor adventures from weekend escapes to month-long expeditions.
Solar integration creates truly indefinite off-grid capability limited only by food supplies and personal tolerance.
The camping power station serves as the foundation of modern outdoor infrastructure.
Select wisely based on calculated requirements, maintain properly, and enjoy decades of reliable portable electricity enabling adventures previously impossible.